There’s something magical about walking into a room with beautifully detailed walls. Those crisp lines, the play of shadows, the instant sophistication trim work brings – it’s architectural eye candy that never goes out of style.
The best part? You don’t need a contractor’s budget or years of carpentry experience to pull it off. With some basic tools, patience, and the right approach, you can transform plain walls into showstoppers that look like they belong in a luxury home.
I’ve spent the last few months experimenting with different molding techniques in my own space, and honestly, I’m shocked at how much impact these projects have made. Some took an afternoon, others a weekend, but every single one elevated the room in ways paint alone never could.
Why Wall Trim Molding Changes Everything
Let me ask you something – have you ever noticed how empty your walls feel even after you’ve painted them your perfect color? That’s because walls crave dimension.
Trim work creates visual interest through shadows and depth. When light hits those raised profiles throughout the day, your walls literally come alive. It’s like adding jewelry to an outfit – suddenly everything feels more intentional and polished.
Beyond aesthetics, molding actually makes rooms feel larger and ceilings appear higher. Strategic trim placement draws the eye upward and creates the illusion of grander proportions. In my small guest room, adding picture frame molding made the space feel 30% bigger without changing a single piece of furniture.
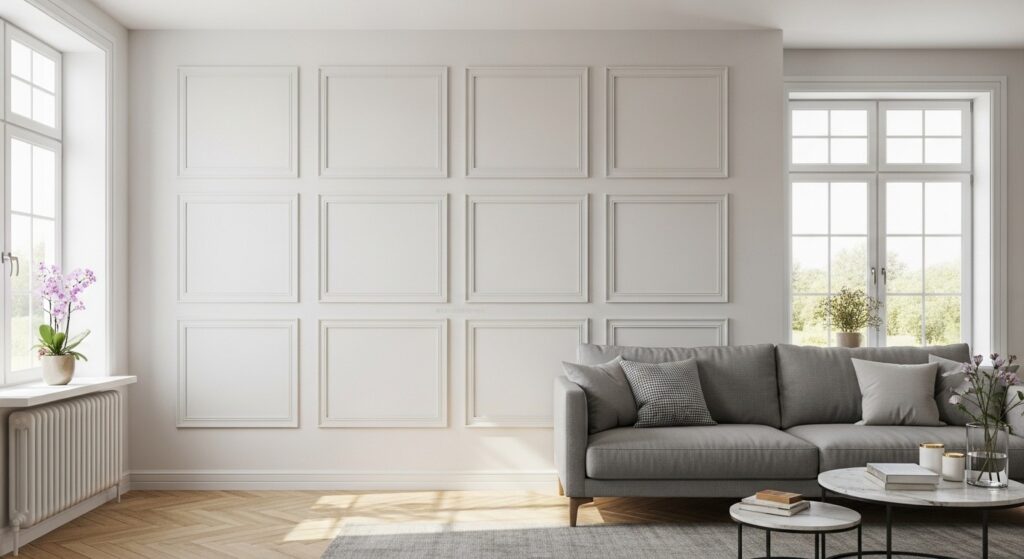
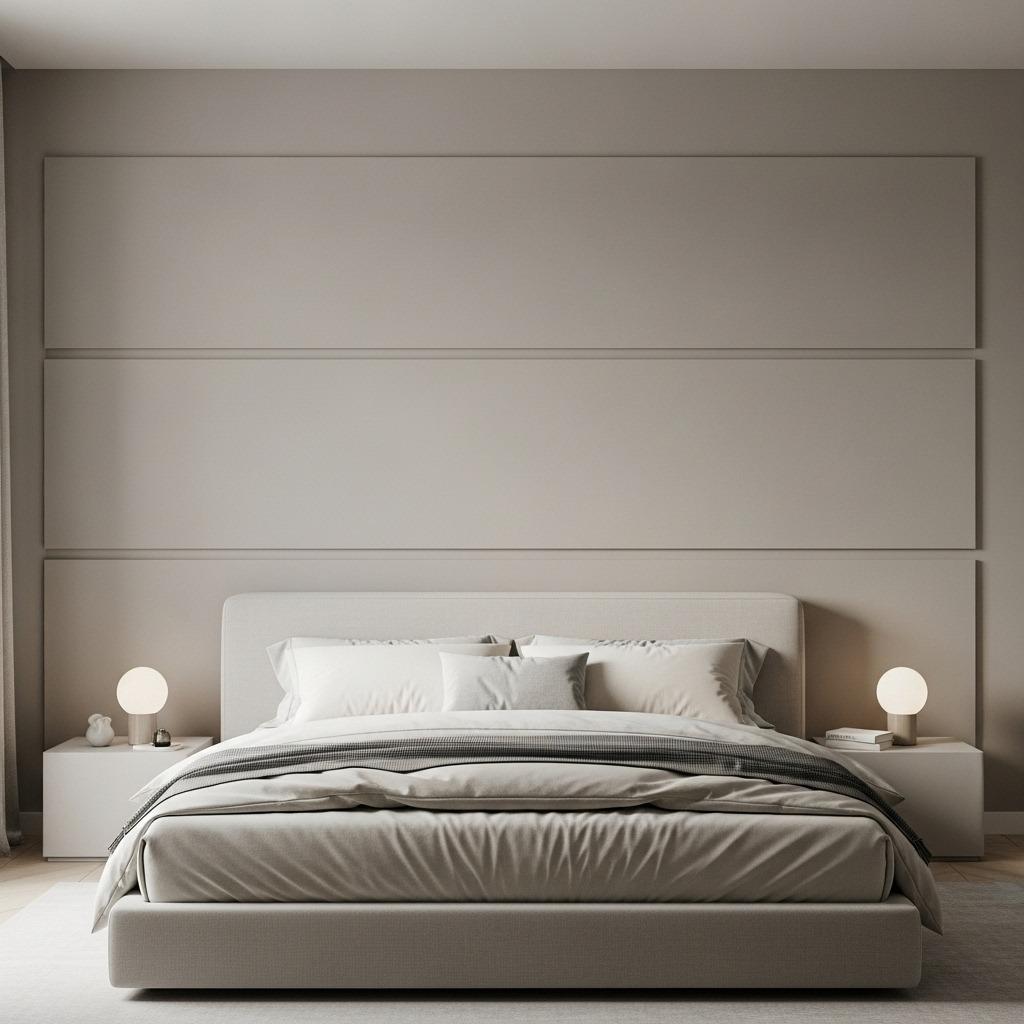
1. Classic Picture Frame Molding
This is where I always tell beginners to start. Picture frame molding involves creating rectangular “frames” on your walls using simple trim pieces – and it’s honestly hard to mess up.
You’re basically just measuring, cutting 45-degree angles, and gluing pieces to the wall. The result? Instant paneling that looks like it cost thousands. I completed an entire bedroom accent wall in about four hours, including drying time.
The key is keeping your rectangles evenly spaced and level. I learned this the hard way after eyeballing my first attempt (narrator: they were not even). Invest in a good level and measuring tape, and you’ll thank yourself later.
2. Vertical Board and Batten
Board and batten brings that modern farmhouse vibe everyone’s obsessed with, but here’s the thing – it’s way easier than it looks. You’re essentially attaching vertical boards to your wall at regular intervals.
I used 1×3 boards spaced 16 inches apart in my entryway, and the transformation was immediate. The vertical lines made my 8-foot ceilings feel like 10-foot ceilings. Pro tip: run your boards from floor to ceiling for maximum impact.
The spacing matters more than you’d think. Too close together and it feels busy; too far apart and it looks sparse. The 16-18 inch sweet spot creates rhythm without overwhelming the space. Some people add a horizontal top rail, but I prefer the clean, uninterrupted vertical lines for a contemporary living room aesthetic.
3. Traditional Wainscoting
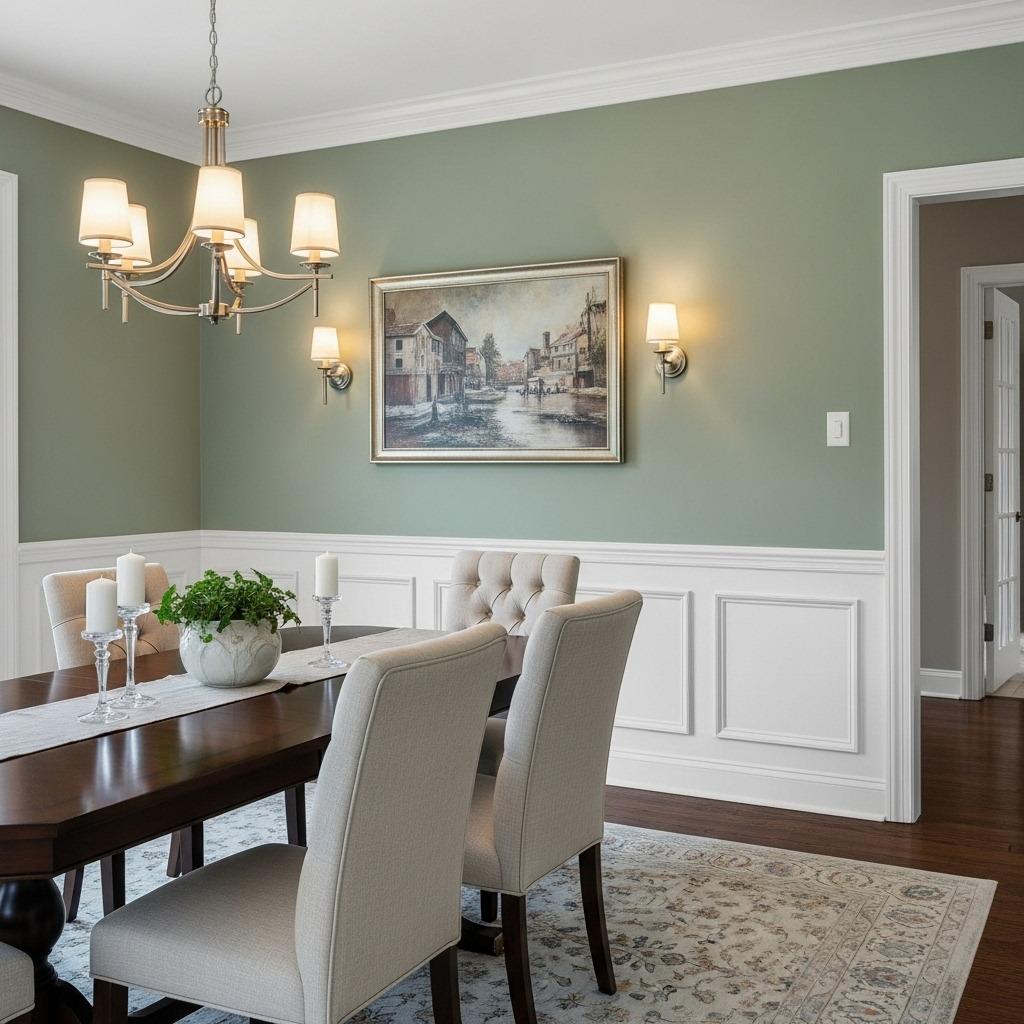
Wainscoting is one of those details that screams quality construction. It typically covers the lower third of your wall and instantly adds sophistication to any room.
You can go full traditional with recessed panels (more advanced) or fake it beautifully with flat panels topped by a chair rail. I went the easier route in my dining room, and even my contractor friend couldn’t tell it wasn’t “real” wainscoting.
The standard height is 32-36 inches from the floor, but I’ve seen stunning installations that go as high as 48 inches in rooms with tall ceilings. Paint it the same color as your trim for classic elegance, or try a contrasting color for more drama.
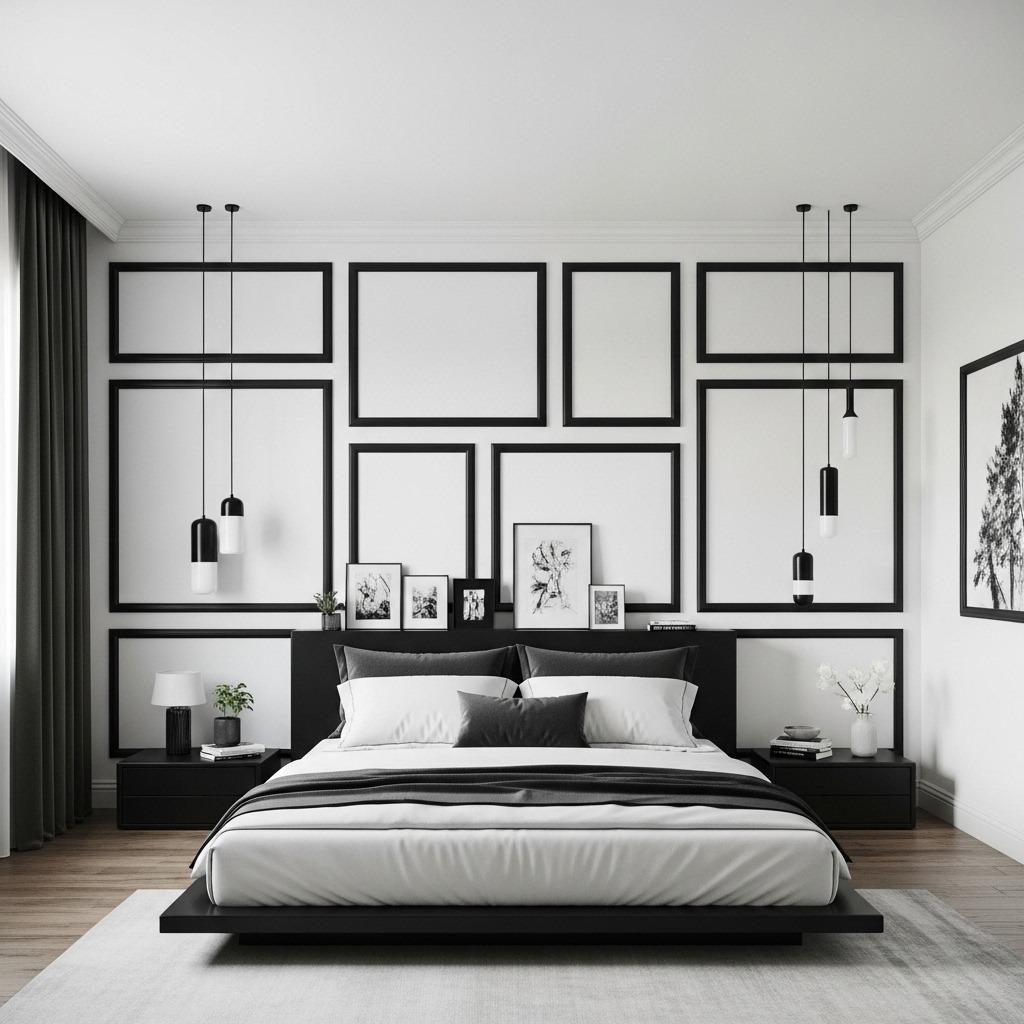
4. Grid Pattern Accent Wall
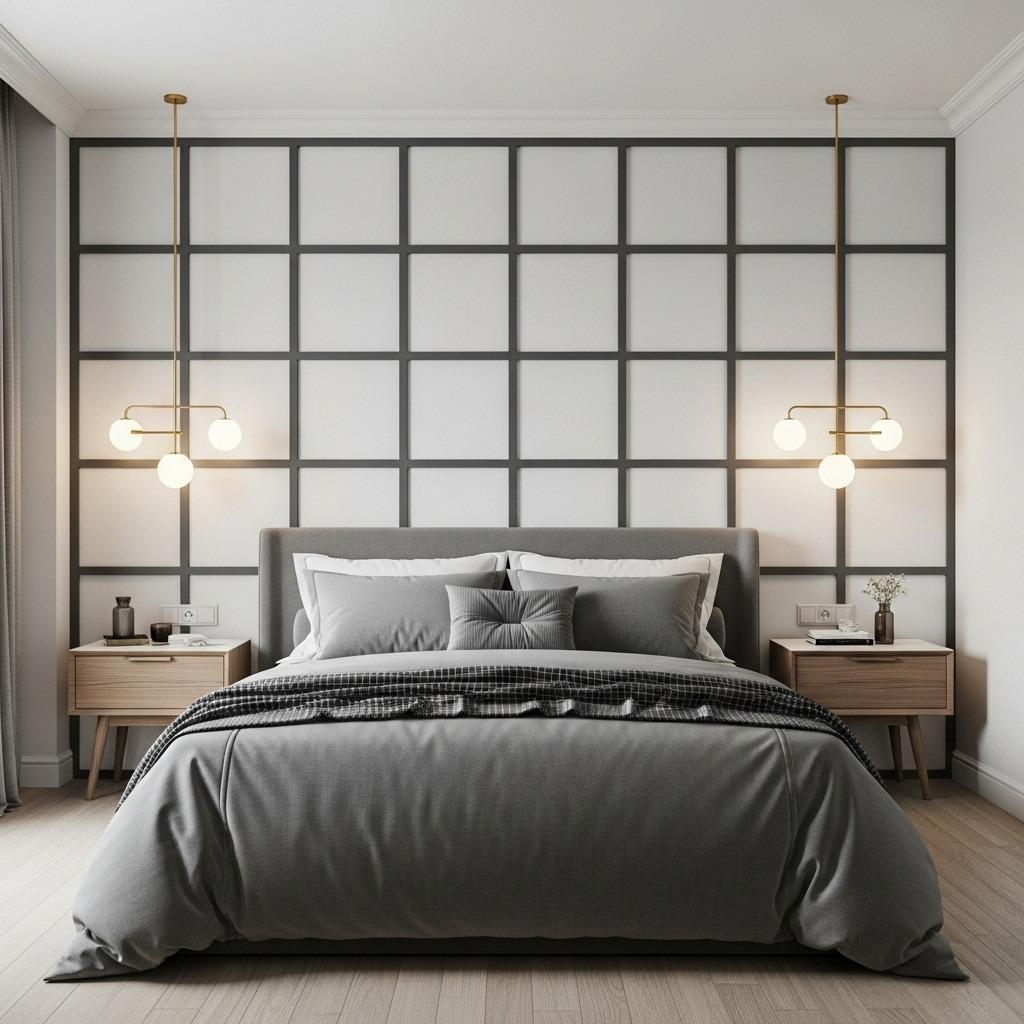
Grid patterns are having a serious moment right now, and I completely understand why. They’re geometric, modern, and create instant visual interest on otherwise boring walls.
This technique works beautifully behind beds, in home offices, or as a living room focal point. You’re creating a series of horizontal and vertical intersections – think tic-tac-toe board but elegant.
I made mine with simple 1×2 boards arranged in a 3×3 grid behind my bed. The trick is planning your layout on paper first so all your rectangles end up the same size. Nothing screams amateur like uneven boxes.
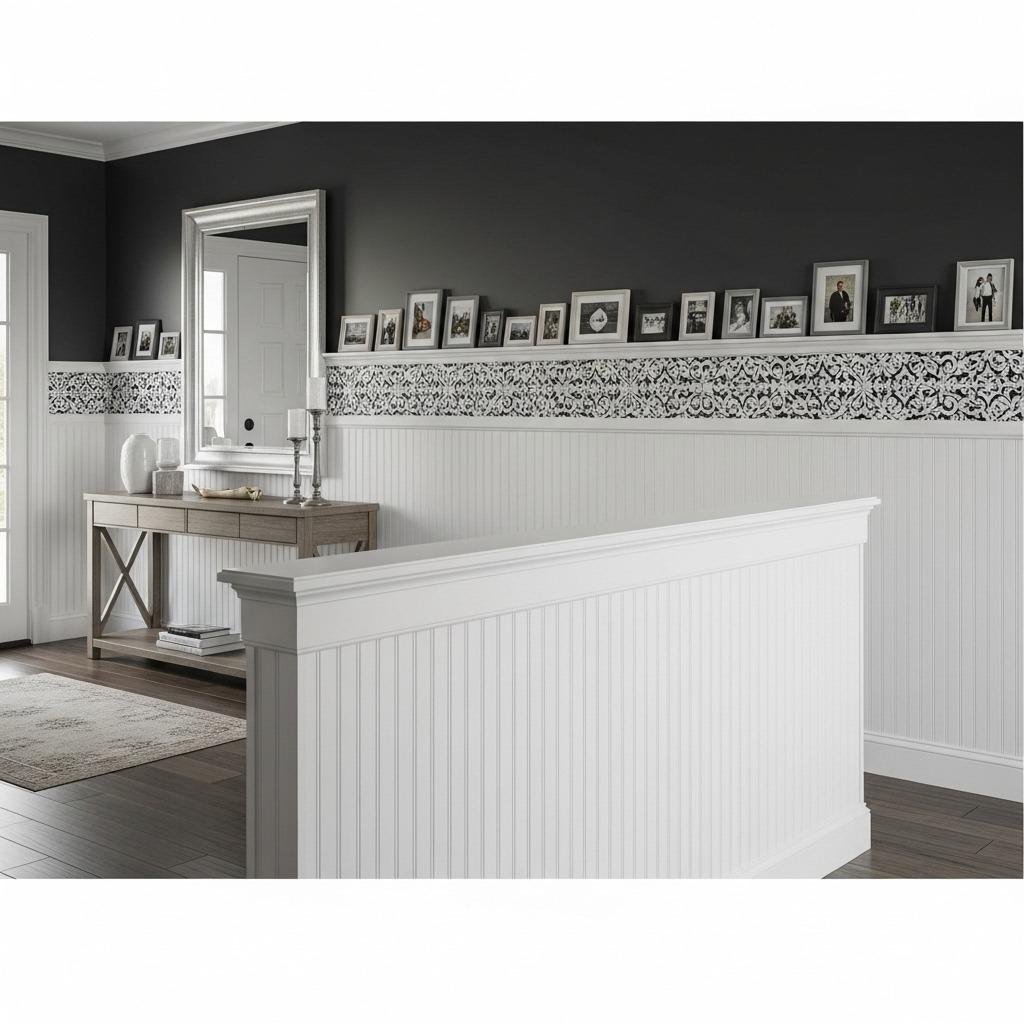
5. Simple Chair Rail Divider
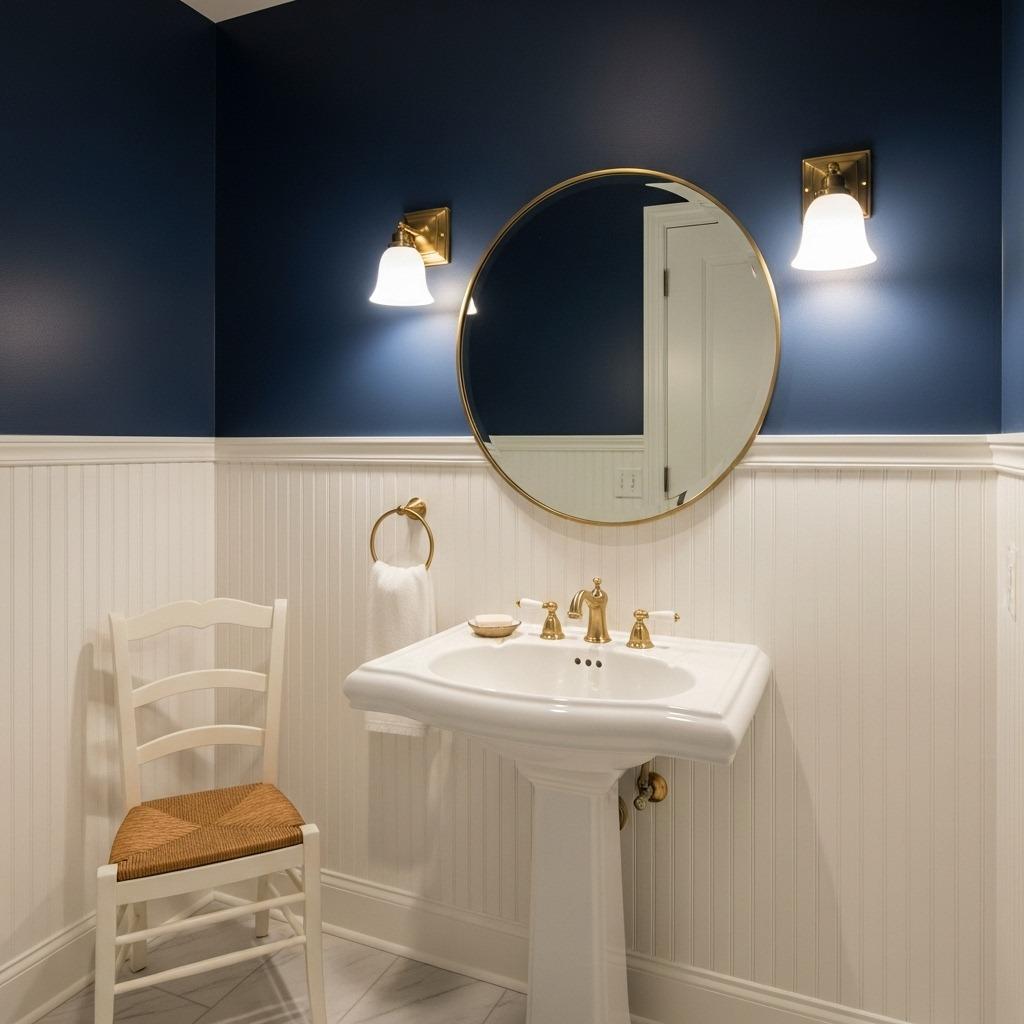
Sometimes all a room needs is one clean horizontal line. Chair rails traditionally sit about one-third up the wall and were originally meant to protect walls from chair backs (hence the name).
Today, they’re purely decorative – but what decoration! A chair rail lets you play with two-tone walls without the look feeling dated. Different colors or textures above and below the rail create visual layers.
I installed chair rail in my bathroom and painted the lower section in a darker shade. It brought the large room down to a more intimate scale and gave me a place to add beadboard wallpaper below for extra texture.
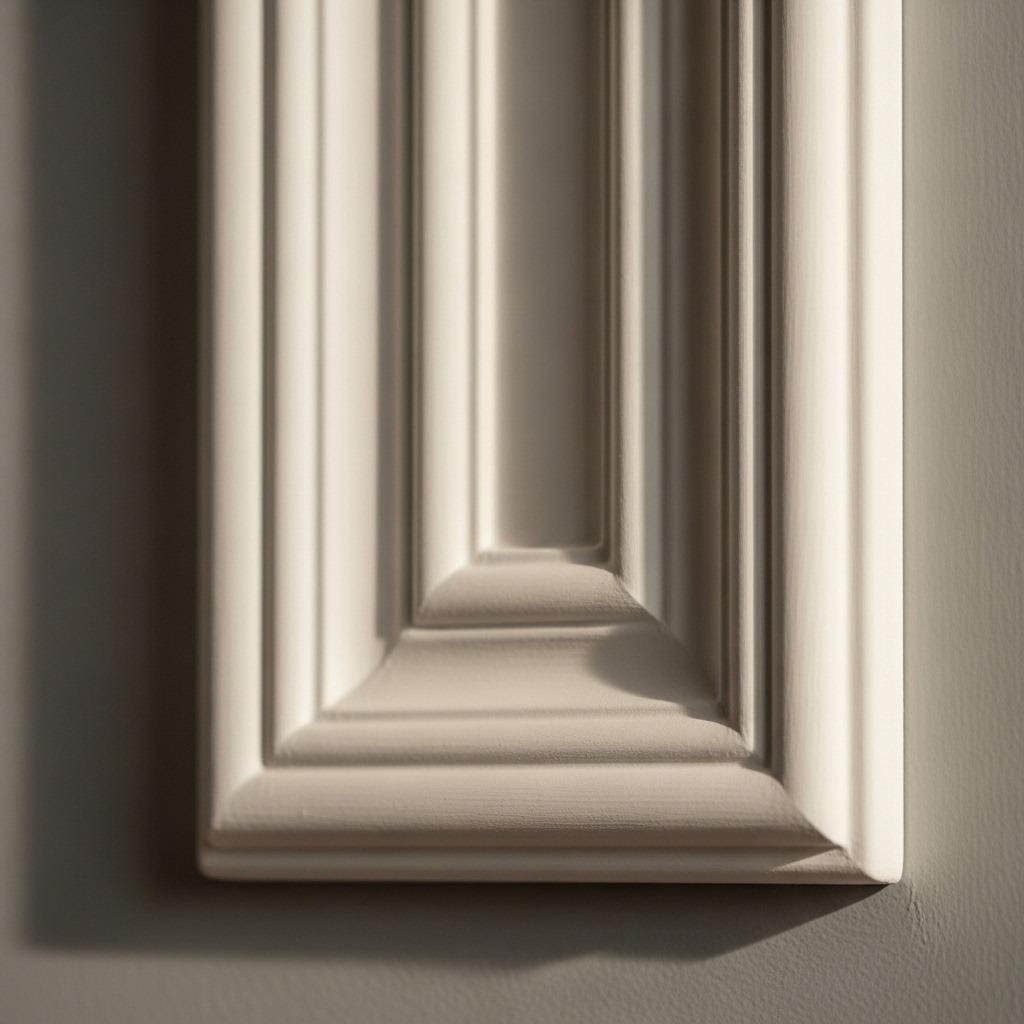
6. Crown Molding at the Ceiling
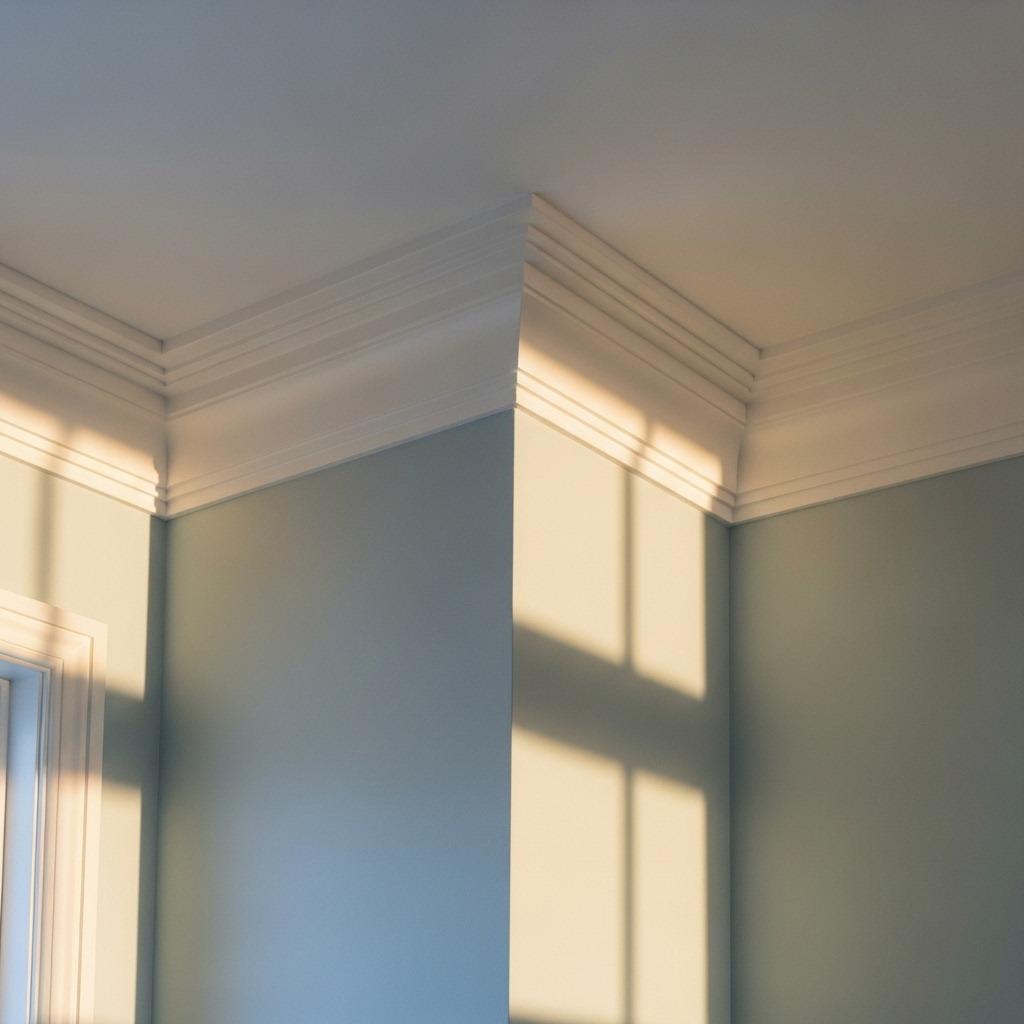
Crown molding is the finishing touch that makes ceilings and walls meet gracefully. It’s been around forever because it works – that angled transition piece softens harsh corners and adds elegance.
Cutting the angles intimidated me for years until I learned about coping saws and compound miter saws. There’s definitely a learning curve, but even imperfect corners can be filled and painted. YouTube became my best friend during this project.
The bigger your room, the wider your crown molding should be. I used 3.5-inch molding in my living room with 9-foot ceilings, and it’s perfectly proportioned. In rooms with 8-foot ceilings, stick with 2.5-3 inches so it doesn’t overwhelm the space.
7. Flat Panel Wall Treatment
Flat panel treatments are incredibly forgiving for beginners. You’re attaching thin, flat boards directly to the wall to create raised rectangular sections – no complicated profiles or angles required.
I used 1×4 boards laid flat in my guest bedroom to create large, elegant panels. The minimal profile gives a contemporary feel while still adding that architectural detail Pinterest users go crazy for.
These panels work exceptionally well when you paint them a shade darker or lighter than your main wall color. The subtle contrast makes the panels pop without feeling busy.
8. Door and Window Casing Upgrade
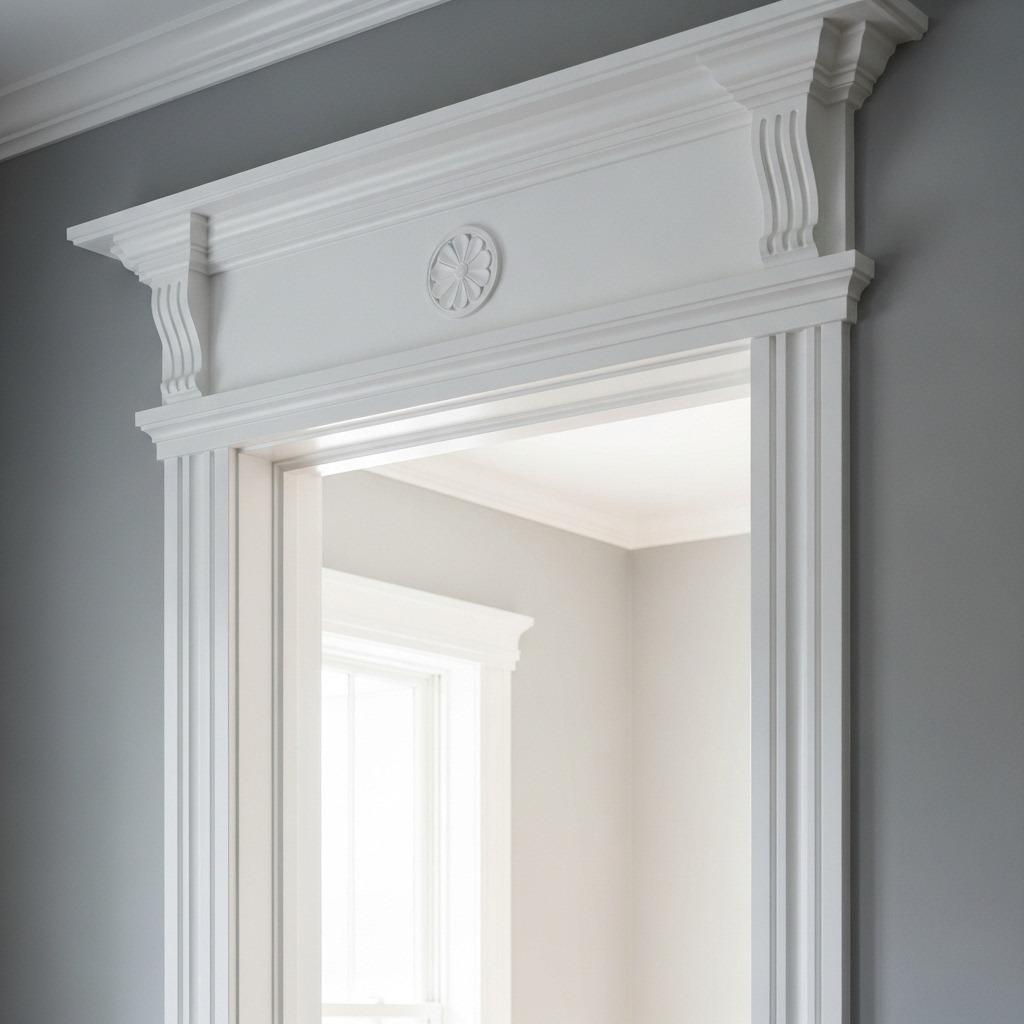
Don’t overlook your doors and windows when planning trim work. Upgrading basic builder-grade casing to something more substantial changes the entire feel of your openings.
I replaced my boring 2-inch flat casing with craftsman-style trim featuring a decorative header and plinth blocks. The doors suddenly looked like they belonged in a custom home instead of a cookie-cutter subdivision.
This is one of those affordable home upgrades that delivers massive impact for the investment. Each doorway took about an hour once I got my system down. Windows took even less time since you’re only doing three sides.
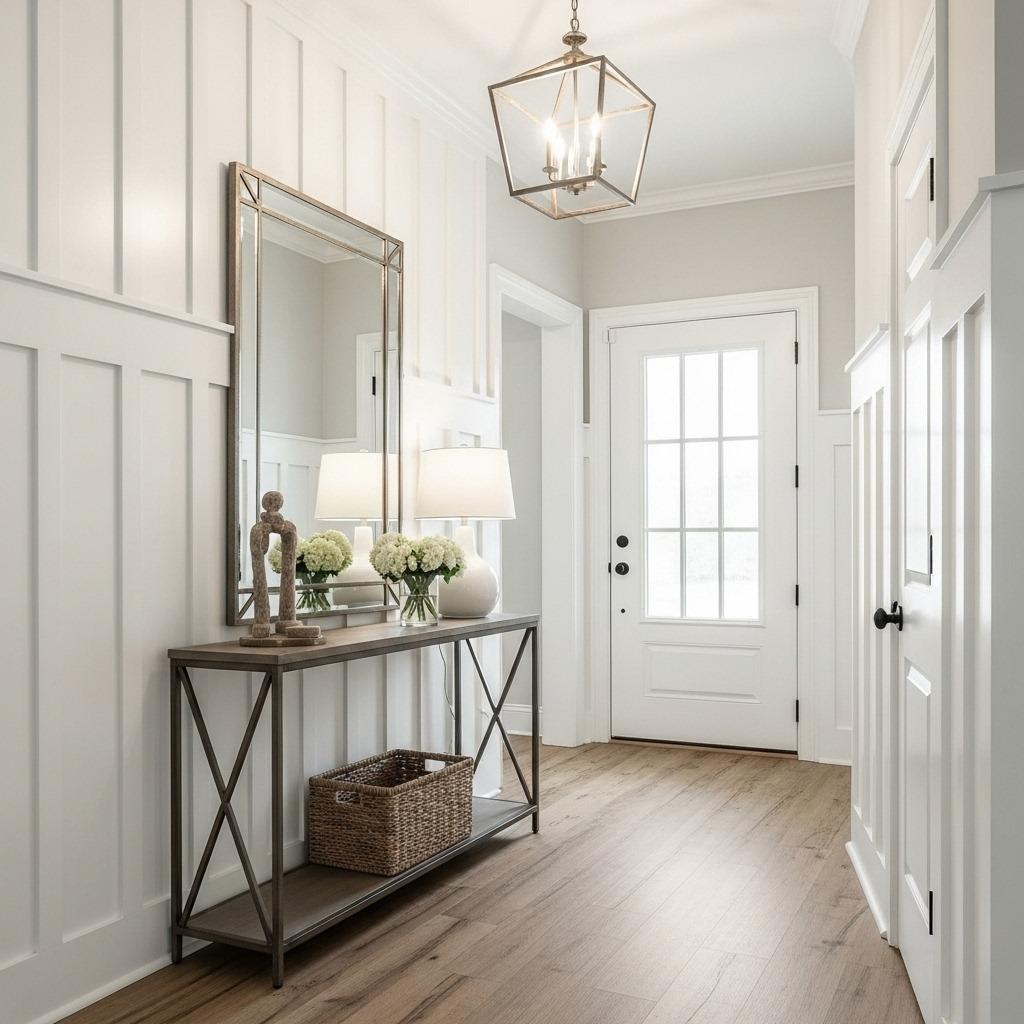
9. Half Wall Paneling
Half wall paneling sits somewhere between wainscoting and full wall coverage – usually extending about halfway up your wall. It’s perfect for adding interest without overwhelming smaller spaces.
I installed this in my entryway and capped it with a small shelf rail that’s both decorative and functional. The rail gives me a place to rotate seasonal decor while the paneling below protects the wall from daily wear.
The beauty of half wall paneling is versatility. Go horizontal for a craftsman feel, vertical for farmhouse vibes, or create a geometric pattern for contemporary style. All three approaches work – it’s just about matching your home’s personality.
10. Horizontal Shiplap with Trim Cap

Shiplap gets all the attention, but adding a trim cap transforms it from farmhouse basic to elevated design. The cap rail at the top creates a finished edge and transition point if you’re not taking shiplap to the ceiling.
I used this approach in my kitchen backsplash area, running shiplap horizontally and capping it with a small crown molding. The combination feels intentional and complete rather than like I just stopped installing boards randomly.
The key is choosing your cap rail carefully. It should be substantial enough to register as a design element but not so large it overwhelms your shiplap. I used a 2-inch colonial-style molding that created the perfect balance.
11. Baseboard Height Drama
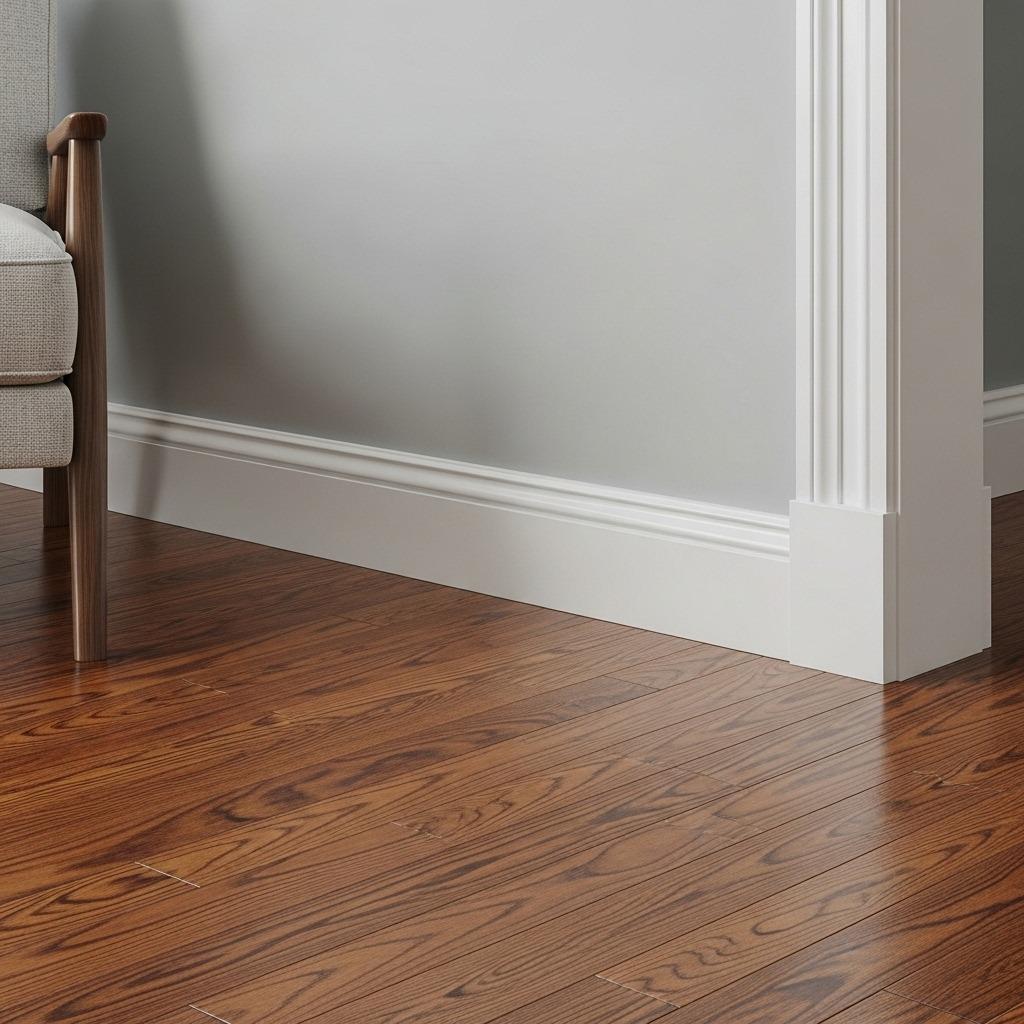
Most homes have sad, wimpy 3-inch baseboards that disappear into the floor. Upgrading to taller baseboards (6-8 inches) grounds your room and makes everything feel more luxurious.
I went with 7-inch baseboards in my main living spaces, and the difference is absurd. The room feels more finished, the walls seem taller, and the overall quality of the space jumped up several notches. This is one change that pays off instantly.
Taller baseboards also give you more flexibility with decorative profiles. You can add shoe molding at the bottom, incorporate reveal details, or stack multiple trim pieces for a truly custom look. Check out successful small space renovation projects that prove substantial trim works even in compact rooms.
12. Coffered Ceiling with Wall Integration
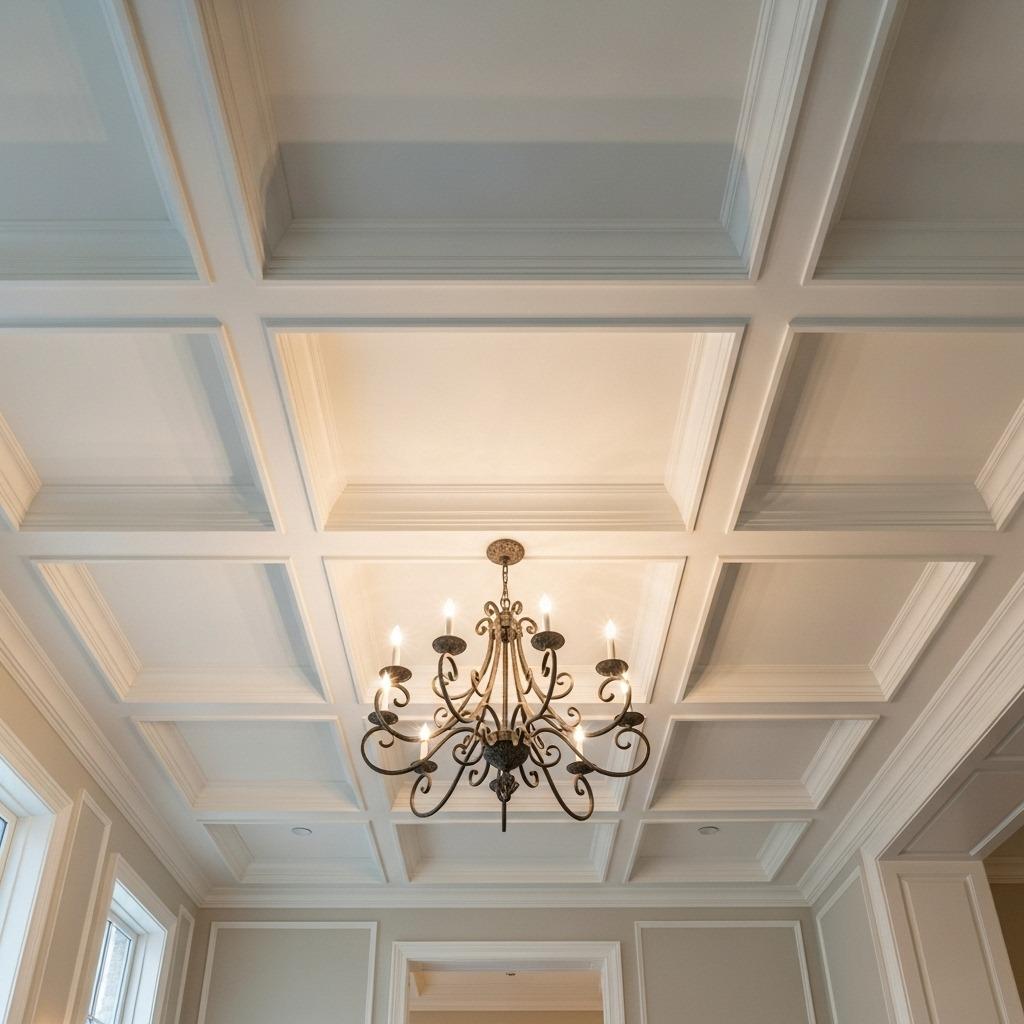
Coffered ceilings are definitely advanced DIY territory, but if you’re up for a challenge, the payoff is incredible. The trick to making them work is integrating your ceiling pattern with your wall trim.
I haven’t tackled this one yet personally (it’s on my list), but I’ve studied countless tutorials. The basic principle involves creating recessed boxes on your ceiling using beams, then running crown molding where ceiling meets wall to tie everything together.
This works best in rooms with at least 9-foot ceilings. In a luxury master bedroom or formal dining room, coffered ceilings with coordinating wall trim create an envelope of elegance. Just plan carefully – once you start cutting ceiling holes, there’s no going back.
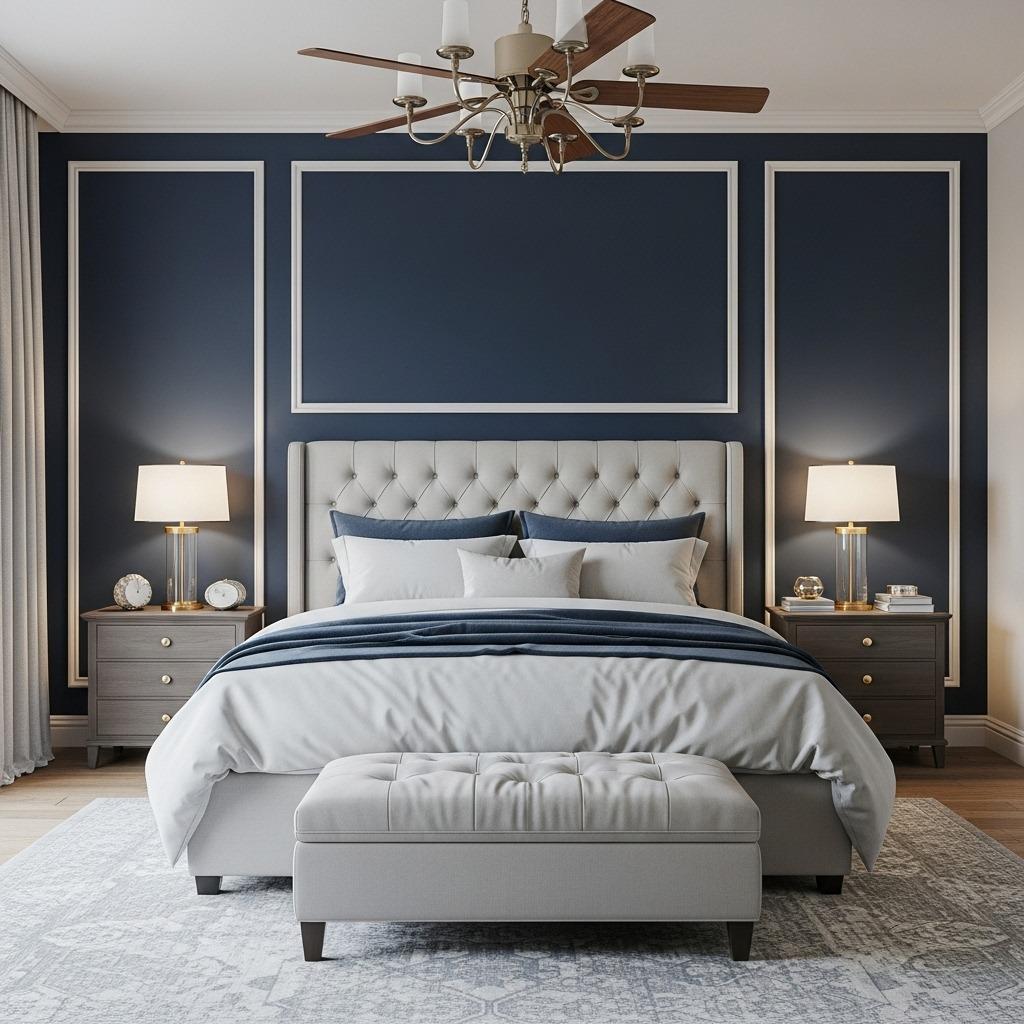
13. Two-Tone Molding Detail
Here’s a trick that adds complexity without extra work: paint your molding a different color than your walls. This two-tone approach highlights all your hard work and creates striking contrast.
I went bold in my bedroom, painting picture frame molding in matte black against soft white walls. The graphic effect is stunning and makes the molding the star of the show. You could also try navy, charcoal, or even a soft blush for something unexpected.
This technique works with any molding style – crown, baseboards, picture frames, wainscoting. The key is choosing colors with enough contrast to read clearly but not so much that they fight each other. Test samples on your wall before committing.
14. Corner Trim Accents
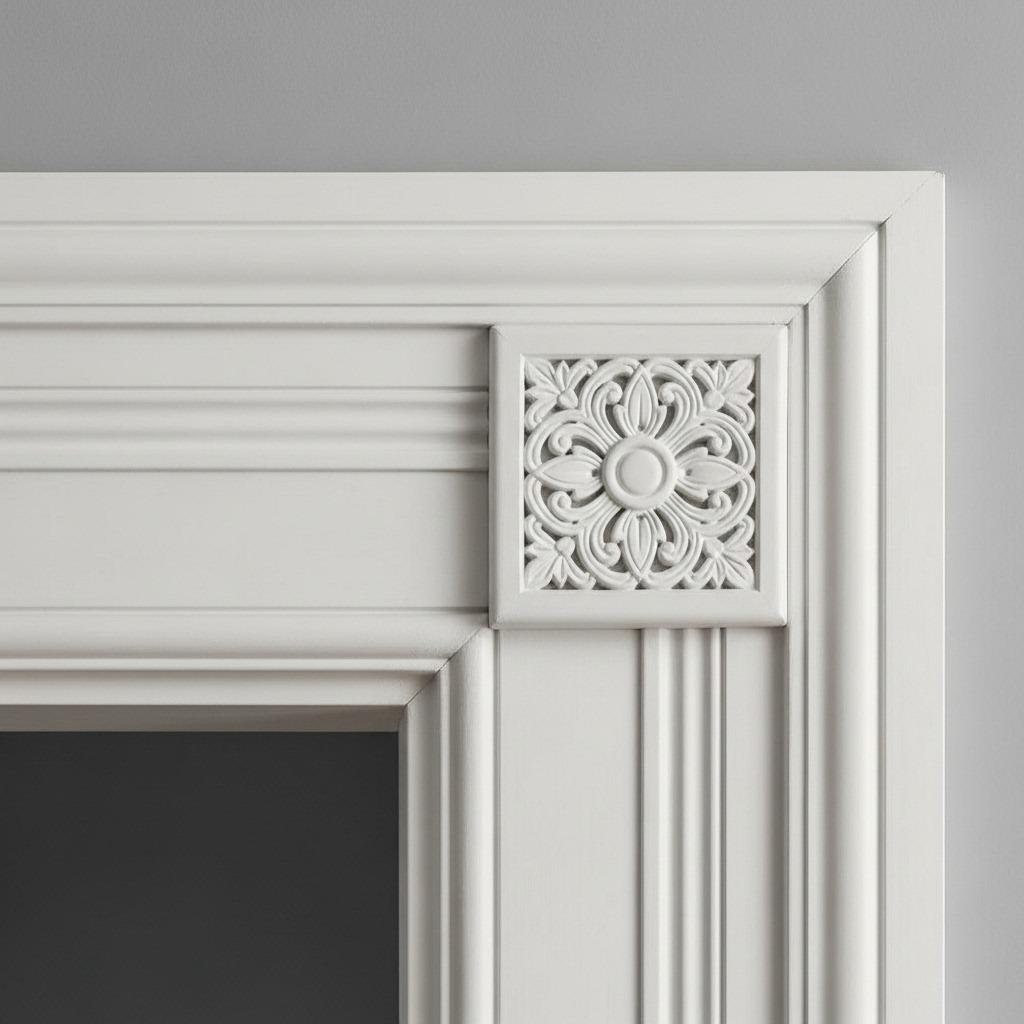
Corners are often forgotten in trim projects, but they’re opportunities for extra detail. Adding decorative corner blocks or rosettes where trim pieces meet creates polished, furniture-quality finishing.
I used corner blocks on all my door casings – small decorative squares where the horizontal head casing meets the vertical side pieces. This simple addition eliminated tricky 45-degree cuts and added a craftsman detail that makes the trim look intentional.
You can also add corner trim at baseboard corners instead of mitering the angles. This works especially well in older homes where walls might not be perfectly square. The corner blocks hide any gaps while adding charm.
15. Faux Ceiling Beam with Crown Integration
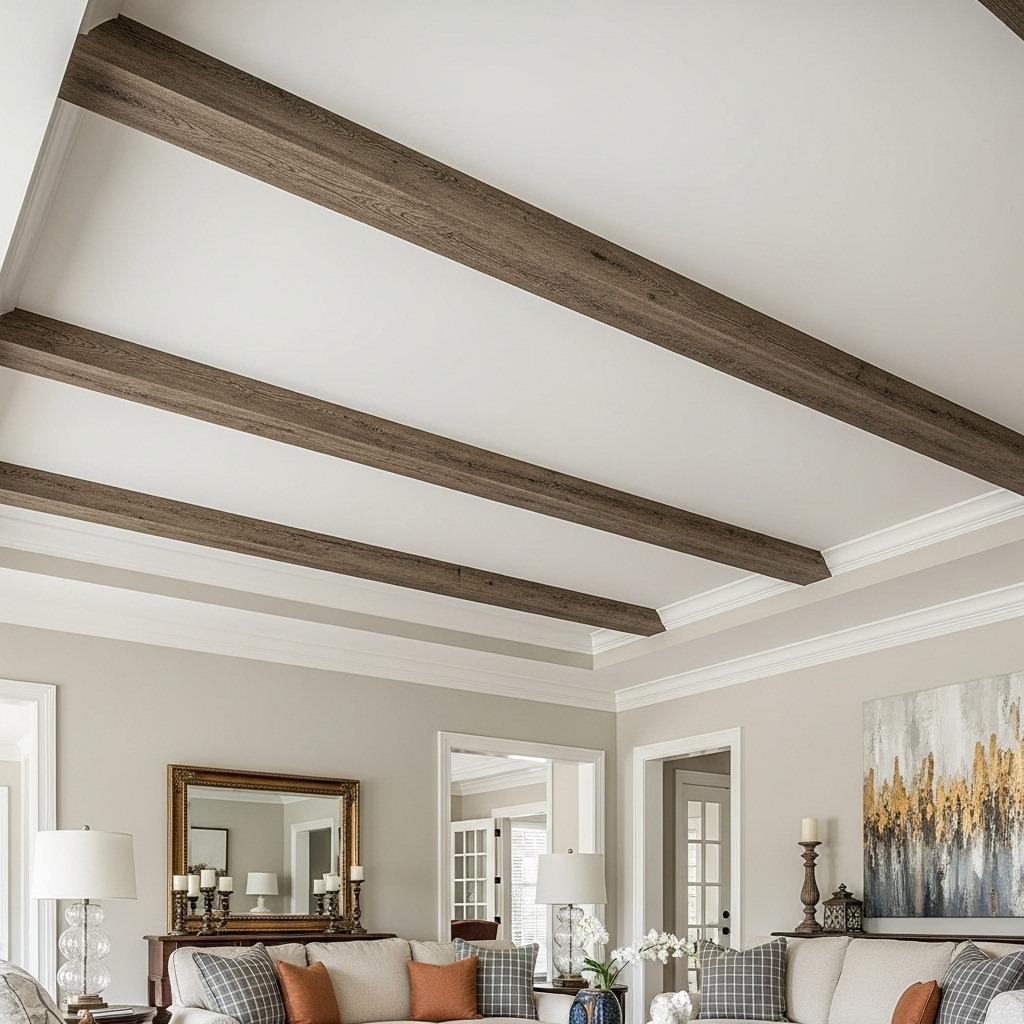
Faux beams add architectural weight overhead, and when you integrate them with crown molding, they create sophisticated ceiling detail that looks original to the home.
This works beautifully in open concept spaces where you want to define zones without walls. Run faux beams perpendicular to your longest wall, then install crown molding around the perimeter that ties into the beams.
I’m planning this for my living room to visually separate the seating area from the dining space. The beams will run above the furniture arrangement, creating a ceiling “room” that defines the space. The crown molding will unify everything into one cohesive design.
Essential Tools for DIY Trim Work

Let’s talk tools because having the right equipment makes everything easier. You don’t need a full workshop, but certain items are non-negotiable for quality results.
A compound miter saw is your best friend for cutting clean angles. I resisted buying one for months and tried using a hand miter box – what a mistake. Once I invested in a decent miter saw, my cuts became precise and my frustration level dropped dramatically.
You’ll also need a good nail gun (pneumatic or cordless), a level (4-foot minimum), measuring tape, caulk and caulk gun, wood filler, sandpaper, and paint supplies. A stud finder helps when you need to nail into something solid. These tools will serve you through multiple home improvement ideas beyond just trim work.
Choosing the Right Trim Material
Material choice affects both your budget and final look. Most DIYers default to paint-grade pine or MDF, but there are pros and cons to consider for each.
MDF is affordable, cuts cleanly, and takes paint beautifully. It’s perfect for painted applications and won’t warp or split like wood can. The downside? It’s heavy and doesn’t hold up well to moisture, so skip it in bathrooms or anywhere damp.
Paint-grade pine costs more but is lighter and more moisture-resistant. If you want to stain your trim instead of painting it, you’ll need to step up to hardwood options like oak or poplar. I’ve used both MDF and pine depending on the project, and both work great when properly installed and finished.
Planning Your Layout Like a Pro
Here’s where most people mess up: they buy trim and start nailing without a real plan. Take time to map out your design on paper first – I promise this saves headaches later.
Measure your walls carefully and draw them to scale. Sketch where each piece of trim will go, including measurements. This helps you visualize the final look and calculate exactly how much material you need. I add 10% for waste and mistakes.
Consider sight lines too. Where will people’s eyes land when they enter the room? Make sure your most visible walls get extra attention to detail. Less visible areas can be slightly less perfect – nobody will notice that back corner where the trim doesn’t quite match up.
Paint Before or After Installation?
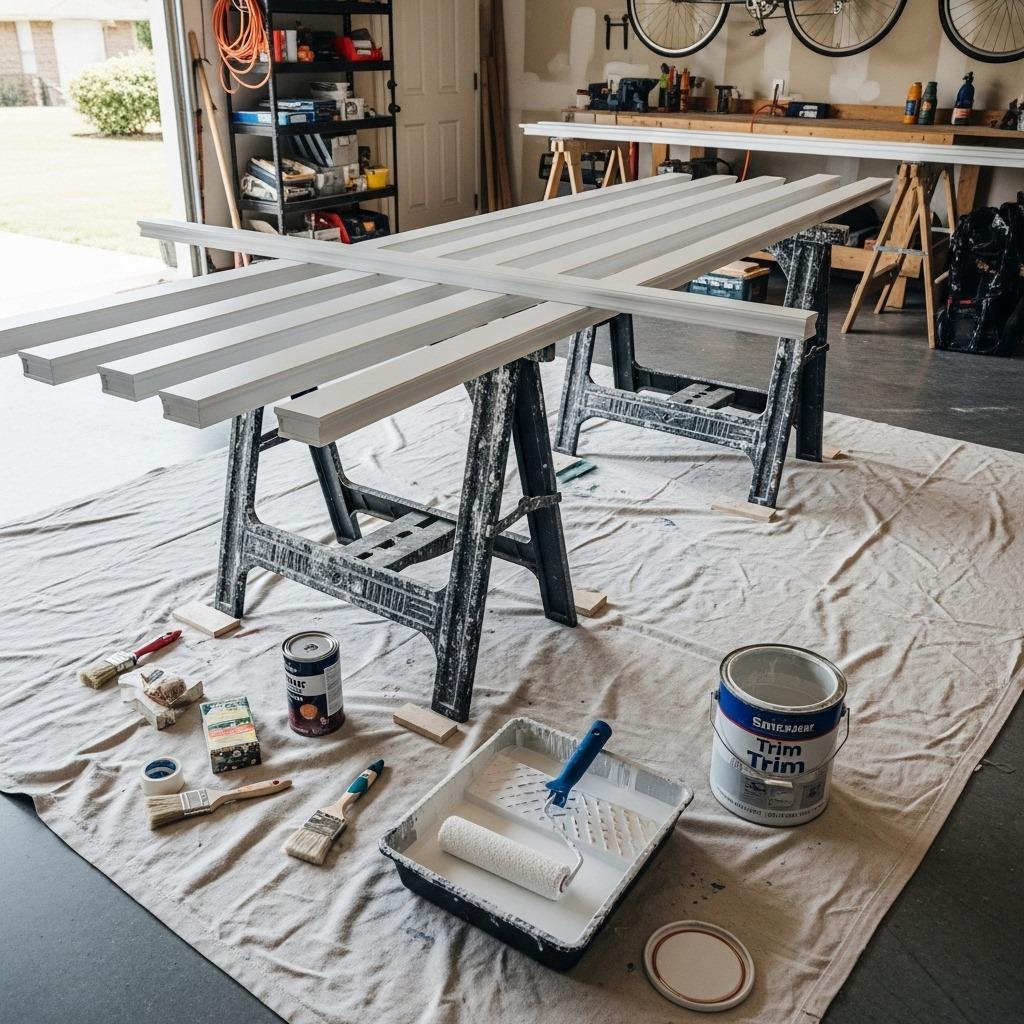
This debate rages among DIYers. I’ve tried both approaches, and here’s my take: pre-paint the trim before installation, then touch up after.
Pre-painting saves so much time and hassle. You can paint long sections of trim efficiently on sawhorses instead of crouching by walls. Plus, you’re not trying to cut perfect lines where trim meets wall – the trim is already painted when you install it.
After installation, you’ll need to caulk all gaps and fill nail holes anyway. That’s when you touch up those spots with your paint. This two-step process gives you the cleanest, most professional finish. For more color strategy, explore these paint color schemes that pair beautifully with white trim.
Common Mistakes to Avoid
Let me save you from my early disasters. First mistake: not checking walls for level and plumb before starting. Newsflash – most walls aren’t perfectly straight. If you don’t account for this, your perfectly cut trim will look wonky.
Second mistake: skimping on caulk and wood filler. These are your secret weapons for professional-looking results. Every single gap, seam, and nail hole should be filled, sanded smooth, and touched up with paint. This takes time but makes mediocre trim look masterful.
Third mistake: rushing. Trim work requires patience and precision. One miscut board can set you back an hour and waste expensive material. Measure twice, cut once – it’s a cliché because it’s true. I learned this after wasting half my budget on rushed mistakes during my first project.
Maintaining Your New Trim Work
Once your trim is installed, a little maintenance keeps it looking fresh. Dust accumulates on horizontal surfaces, especially on crown molding and chair rails, so regular cleaning matters.
Use a slightly damp microfiber cloth to wipe down painted trim. Avoid harsh chemicals that can dull the finish or cause yellowing over time. If you notice minor scratches or dings, keep some touch-up paint handy for quick fixes.
Caulk can shrink and crack over time, especially where trim meets walls. Check seams annually and recaulk any gaps that appear. This takes minutes and prevents your trim from looking aged before its time. Proper care means your detailed wall molding work will look stunning for decades.
The ROI of DIY Trim Projects
Let’s talk money because this matters. Professional trim installation costs $4-8 per linear foot depending on complexity. DIY projects run about $1-2 per linear foot for materials, meaning you’re saving 60-75% by doing it yourself.
My entire living room picture frame molding project cost $200 in materials and took me a weekend. A contractor quoted $1,400 for the same work. That’s a $1,200 savings for about 12 hours of effort – definitely worth my time.
Beyond immediate savings, quality trim work increases home value. Real estate agents consistently note that architectural details like molding help homes sell faster and for higher prices. You’re not just improving your enjoyment of the space; you’re making a smart investment in your home’s future value.
Wall trim molding completely transforms how a room feels without changing its actual structure. Whether you start with simple picture frames or dive into full wainscoting, these projects prove that architectural elegance is within reach for any motivated DIYer.
The satisfaction of stepping back and seeing those crisp lines and dimensional details you created yourself? That’s a feeling store-bought decor can never match. Your walls will thank you, your home’s value will increase, and every guest will assume you hired a professional.
Start with one accent wall, master the basics, and build from there. Before you know it, you’ll be that person friends call asking for trim advice – and you’ll have the stunning Pinterest-worthy walls to prove your expertise.

