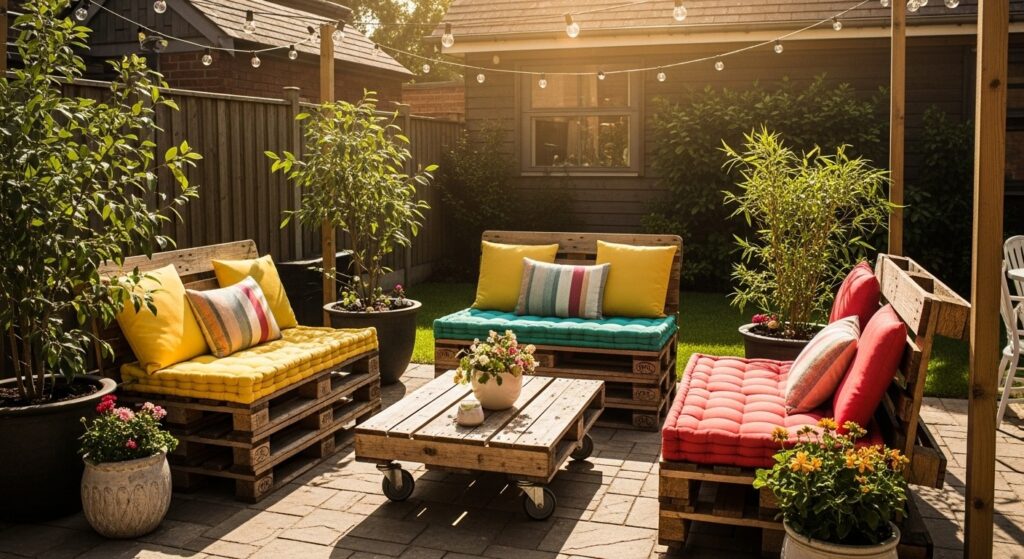
There’s something incredibly satisfying about sitting on furniture you built with your own hands. When that furniture happens to be in your garden, surrounded by flowers and fresh air, the satisfaction doubles. Creating DIY garden furniture isn’t just about saving money (though that’s a nice bonus). It’s about crafting pieces that fit your exact space and style while adding a personal touch that store-bought furniture simply can’t match.
Whether you’re working with a sprawling backyard or a modest balcony, handmade outdoor seating can transform any space into your favorite spot to unwind. The beauty of DIY projects is that they’re forgiving – imperfections often add character rather than detract from the final piece. Plus, you get to choose materials that work within your budget and skill level.
I’ve gathered some of my favorite DIY garden furniture ideas that balance creativity with practicality. These projects range from simple weekend builds to slightly more involved creations, but none require professional carpentry skills. Let’s explore how you can build outdoor comfort piece by piece.
1. Classic Pallet Sofa with Storage Underneath
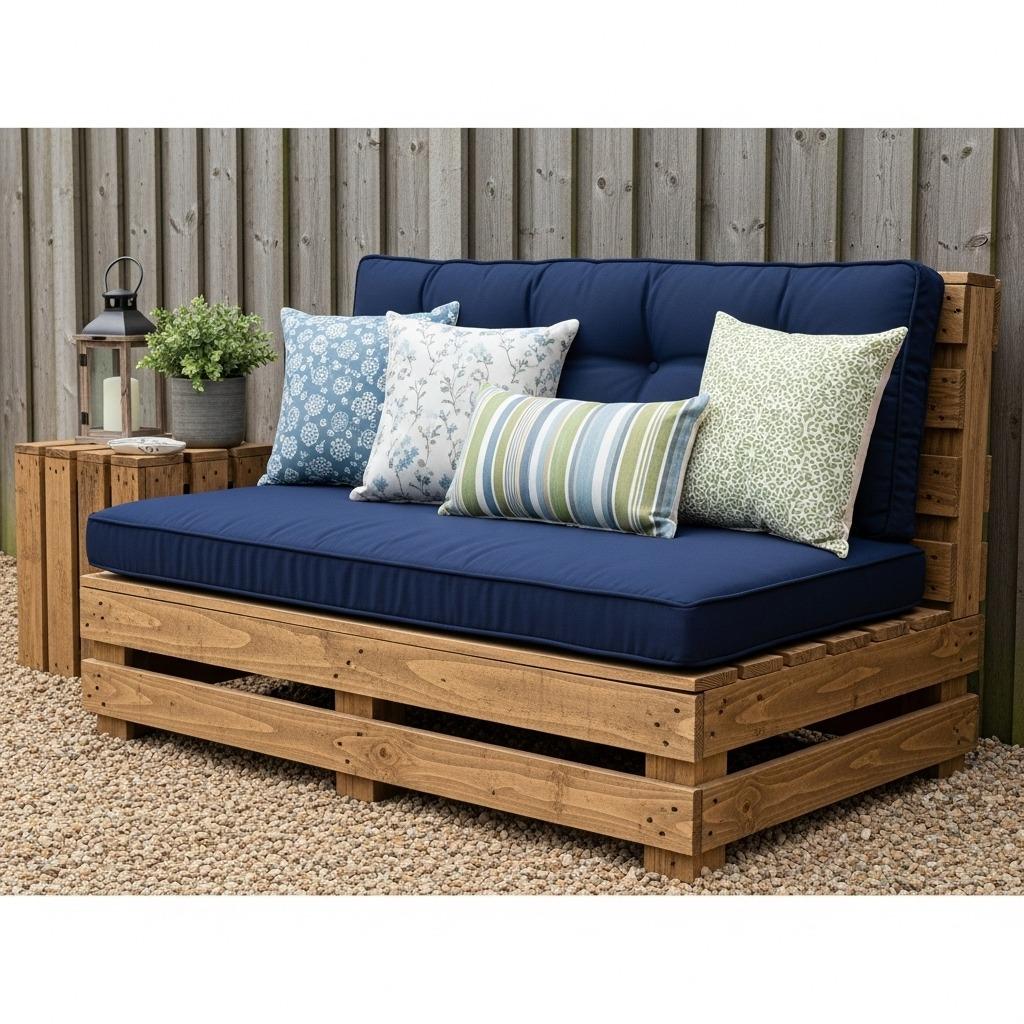
Wooden pallets remain one of the most versatile materials for outdoor furniture, and a pallet sofa offers both seating and hidden storage. You’ll need 4-6 sturdy pallets depending on your desired size, outdoor cushions, and some basic tools. The beauty of this project lies in its customization potential.
Start by stacking two pallets for the base to create the right seating height. Secure them together with wood screws, making sure everything feels stable when you sit on it. The space between pallet slats naturally creates storage compartments where you can tuck away gardening gloves, small tools, or outdoor toys.
Sand down rough edges to prevent splinters, then decide whether to paint, stain, or leave the wood natural. If you choose to finish the wood, use exterior-grade products designed to withstand moisture and UV rays. Add wheels to the bottom if you want easy mobility around your garden and nursery space.
The final step involves selecting cushions that complement your outdoor aesthetic. Weather-resistant foam cushions work best, though you can also make custom covers from outdoor fabric. This homemade outdoor seating typically costs less than $100 if you source free pallets.
2. Concrete Block and Wood Plank Bench
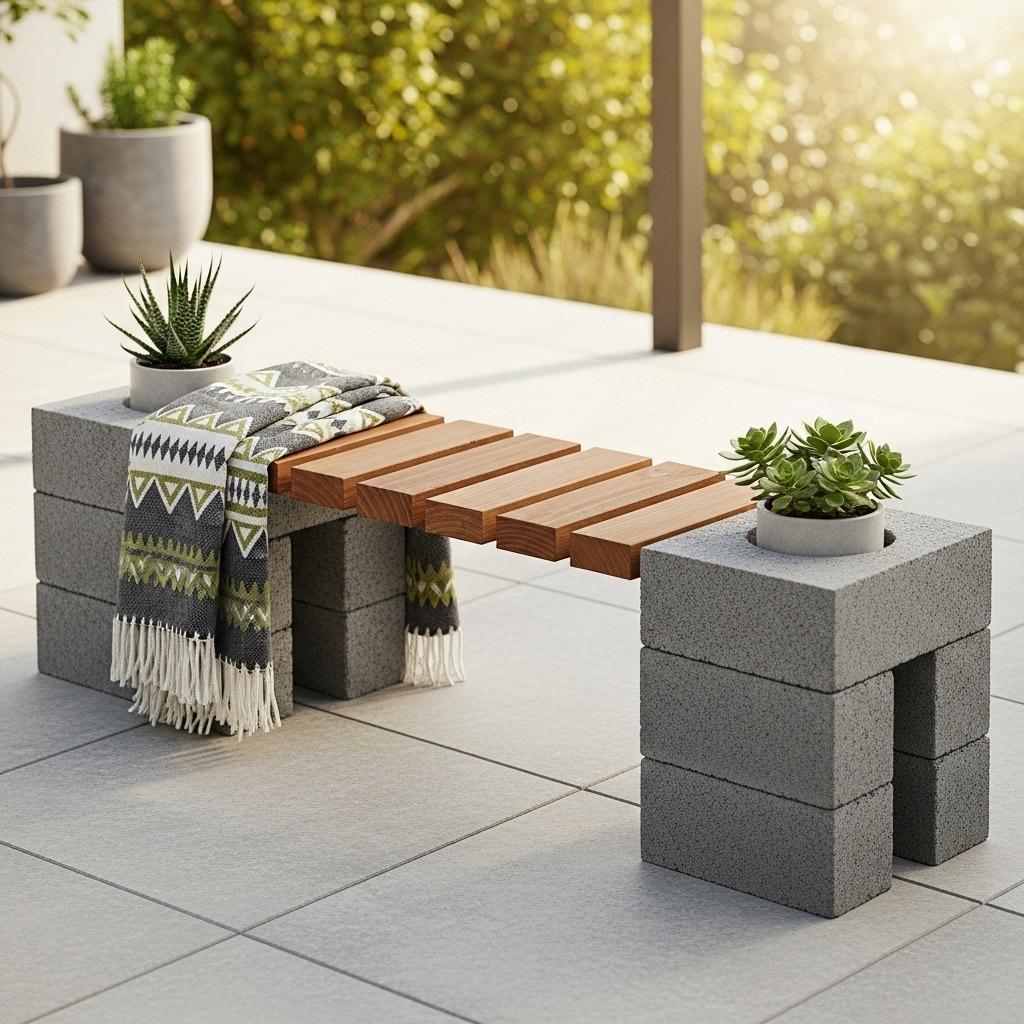
Sometimes the simplest designs make the biggest impact. A concrete block bench combines industrial aesthetics with functional seating, requiring minimal tools and zero advanced skills. You’ll need concrete blocks (cinder blocks work perfectly), wooden planks, and optionally some concrete adhesive for added stability.
Arrange the concrete blocks in your desired configuration – typically two blocks per support point. The blocks should be positioned with the holes facing up, which creates opportunities for adding plants or inserting lighting later. Space them according to the length of your wooden planks, usually about 4-6 feet apart.
The wooden planks become your seating surface. Choose treated lumber that can handle outdoor conditions, and consider cedar or redwood for natural weather resistance. Sand the planks smooth, apply your chosen finish, and simply place them across the blocks. No screws or complicated assembly required.
This design works beautifully in modern or industrial-style gardens. You can paint the concrete blocks in bold colors, stain the wood to match your outdoor plant arrangement, or keep everything neutral. The project typically takes under two hours from start to finish, making it perfect for beginners.
3. Upcycled Tire Ottoman with Rope Wrapping
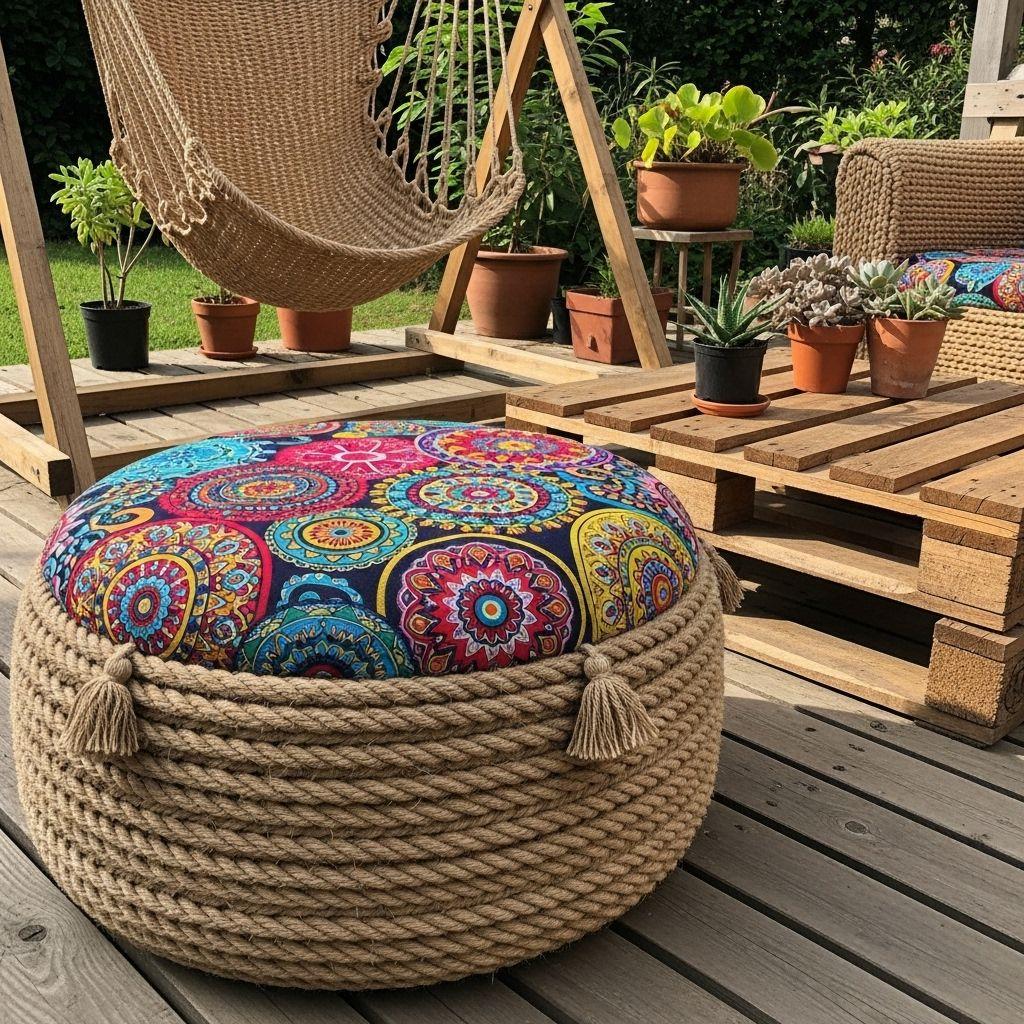
Old tires get new life as comfortable garden ottomans when wrapped in rope. This project transforms what would be waste into stylish outdoor seating that adds texture and visual interest. You’ll need a clean tire (any size works, though car tires are easiest to work with), thick rope (manila or sisal work well), two circular plywood pieces, and strong adhesive.
Cut two plywood circles slightly larger than your tire’s diameter to create top and bottom surfaces. Attach these circles to the tire using construction adhesive or screws. Once secure, begin wrapping rope around the entire piece, starting from the bottom and working your way up in tight concentric circles.
Use hot glue or construction adhesive every few inches to keep the rope in place as you wrap. The key is maintaining consistent tension so the rope sits flush against itself. When you reach the top, tuck the end underneath previous layers and secure it firmly. The entire wrapping process takes patience but no special skills.
These upcycled garden chairs (or ottomans, really) work as footrests, extra seating, or even side tables when topped with a tray. Add a round cushion on top for extra comfort, or leave it as-is for a more textured look. Each ottoman costs roughly $20-30 in materials, making it an affordable way to add seating.
4. Tree Stump Side Tables with Natural Finish

If you have access to tree stumps from recent tree removal, don’t haul them away – they make stunning natural side tables. The organic texture and growth rings tell a story while providing a stable surface for drinks, books, or potted plants. You’ll need a tree stump (12-18 inches in diameter works best), sandpaper, wood sealer, and optionally hairpin legs for added height.
Start by cleaning the stump thoroughly and removing any loose bark. Let it dry completely, which might take several weeks depending on moisture content. Sand the top surface smooth while leaving the sides more rustic. This contrast between refined and natural creates visual interest.
Apply several coats of exterior wood sealer to protect against moisture and insects. Polyurethane works well for creating a smooth, water-resistant finish on the top. For the sides, you might use a lighter treatment that preserves the bark’s texture while still offering protection.
Consider your table’s height – stumps can be short accent tables or standard side table height depending on what you start with. Adding hairpin legs underneath raises the profile and creates a more modern look. These tables complement any garden furniture arrangement and work especially well in rustic or natural-themed outdoor spaces.
5. Repurposed Door Headboard Bench
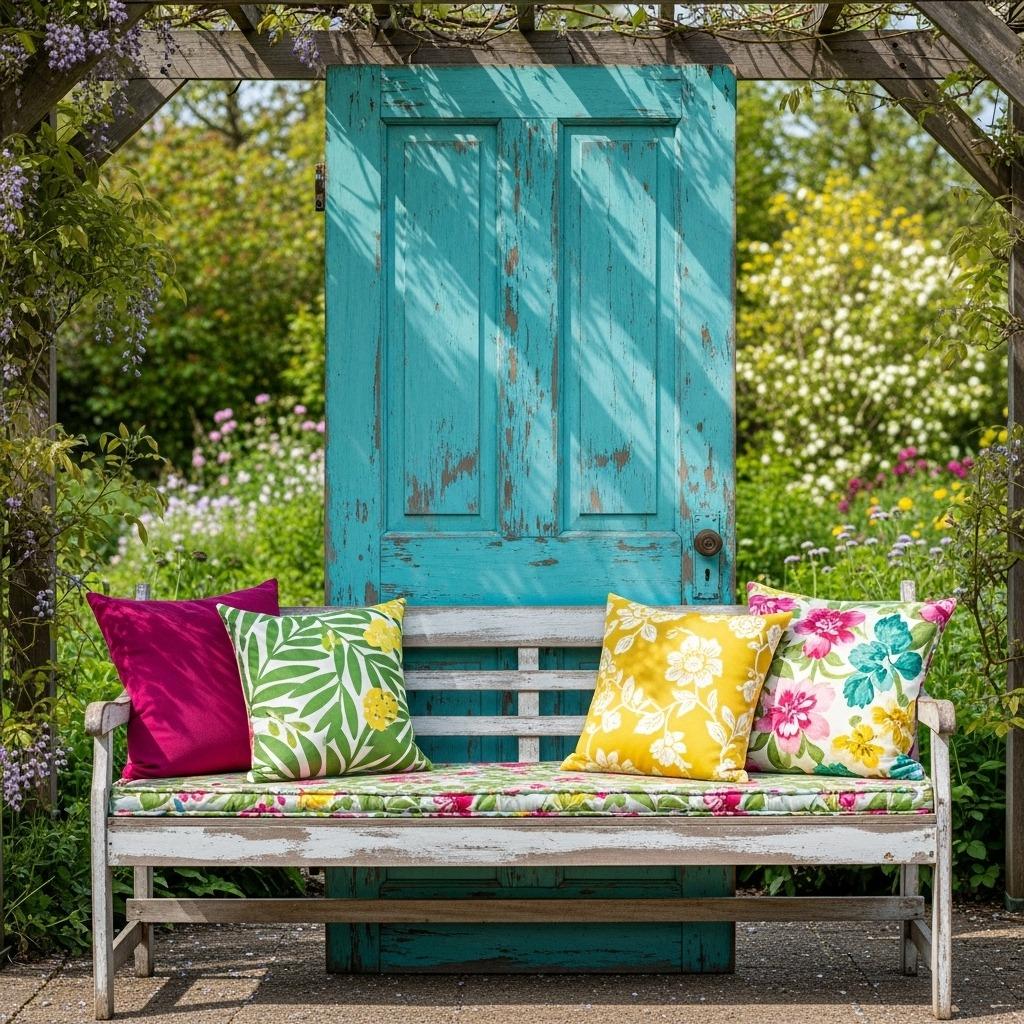
Old doors destined for the dump can become charming garden benches with vintage character. This project works especially well with wooden doors that have interesting panel designs or original paint patina. You’ll need a solid wood door, four wooden legs (4×4 posts work great), outdoor cushions, and basic carpentry tools.
Cut the door to your desired bench length if needed, though standard door width often makes a perfect two-seater. Create a frame underneath using 2×4 lumber to support the seating surface and provide attachment points for legs. The door becomes your seat back and partial seat, oriented horizontally.
Attach four sturdy legs to the frame’s corners, making sure they’re perfectly level so your bench doesn’t wobble. You can cut the door’s height down if it seems too tall for a comfortable back rest. Sand any rough spots while preserving the aged finish that gives the piece its character.
This homemade outdoor seating tells a story while providing comfortable perching space. The project connects beautifully with vintage decor themes if you extend that aesthetic outdoors. Seal the wood with exterior products, add weather-resistant cushions, and you’ve created a conversation piece that cost almost nothing.
6. Crate Coffee Table with Caster Wheels
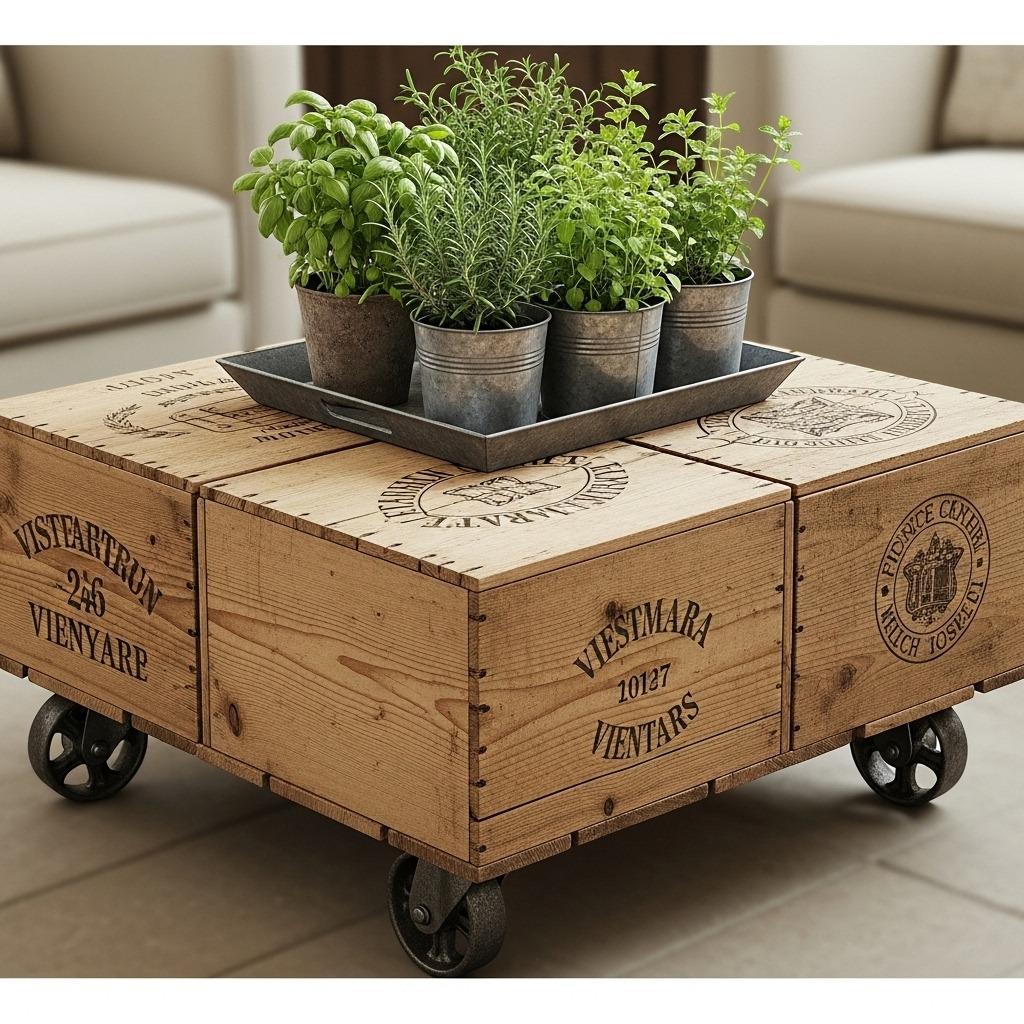
Wooden crates stacked and secured together create mobile coffee tables perfect for outdoor entertaining. You’ll need four matching wooden crates (wine crates or apple crates work beautifully), wood screws, four caster wheels, and wood stain or paint. The hollow center provides excellent storage for outdoor entertaining supplies.
Arrange the crates in a square formation with the open sides facing outward. This configuration creates a table with built-in shelving on all four sides – perfect for storing extra cushions, blankets, or entertaining essentials. Secure the crates together using wood screws through the corners where they meet.
Flip the assembled piece upside down and attach locking caster wheels to each corner. Locking wheels are essential so your table doesn’t roll away unexpectedly. Once the wheels are secured, flip it back over and decide on your finish. Natural wood with clear sealer maintains the rustic look, while paint can match your outdoor color scheme.
This garden table craft adapts to various styles depending on how you finish it. The mobility means you can easily rearrange your outdoor space or roll the table away for lawn care. The project costs around $40-60 including wheels, making it budget-friendly while delivering storage and surface space.
7. Ladder Plant Stand Turned Seating Shelf

An old wooden ladder gains new purpose as a combination plant display and narrow seating bench. This works particularly well in tight spaces where traditional furniture won’t fit. You’ll need a sturdy wooden ladder (5-6 feet tall works best), wooden boards cut to fit between rungs, exterior wood finish, and cushions if desired.
Lay the ladder horizontally and secure it in this position using metal brackets attached to a fence or wall. The rungs now become shelf supports rather than climbing steps. Cut wooden boards to fit between each rung level, creating flat surfaces for plants, decor, or even a slim seating area on the lowest level.
The bottom rung typically sits about 18 inches from the ground – perfect bench height. Add a slim cushion across this lowest shelf to create seating, while upper shelves display plants or decorative items. This vertical approach maximizes limited space while providing both function and visual interest.
Finish the wood with exterior stain or paint that coordinates with your container garden aesthetic. The ladder’s angles create visual movement while the horizontal planks offer stability. This project requires basic cutting skills but transforms an unusable item into multifunctional outdoor furniture for roughly $30-40 in materials.
8. Fabric Hammock Chair with Wooden Dowels
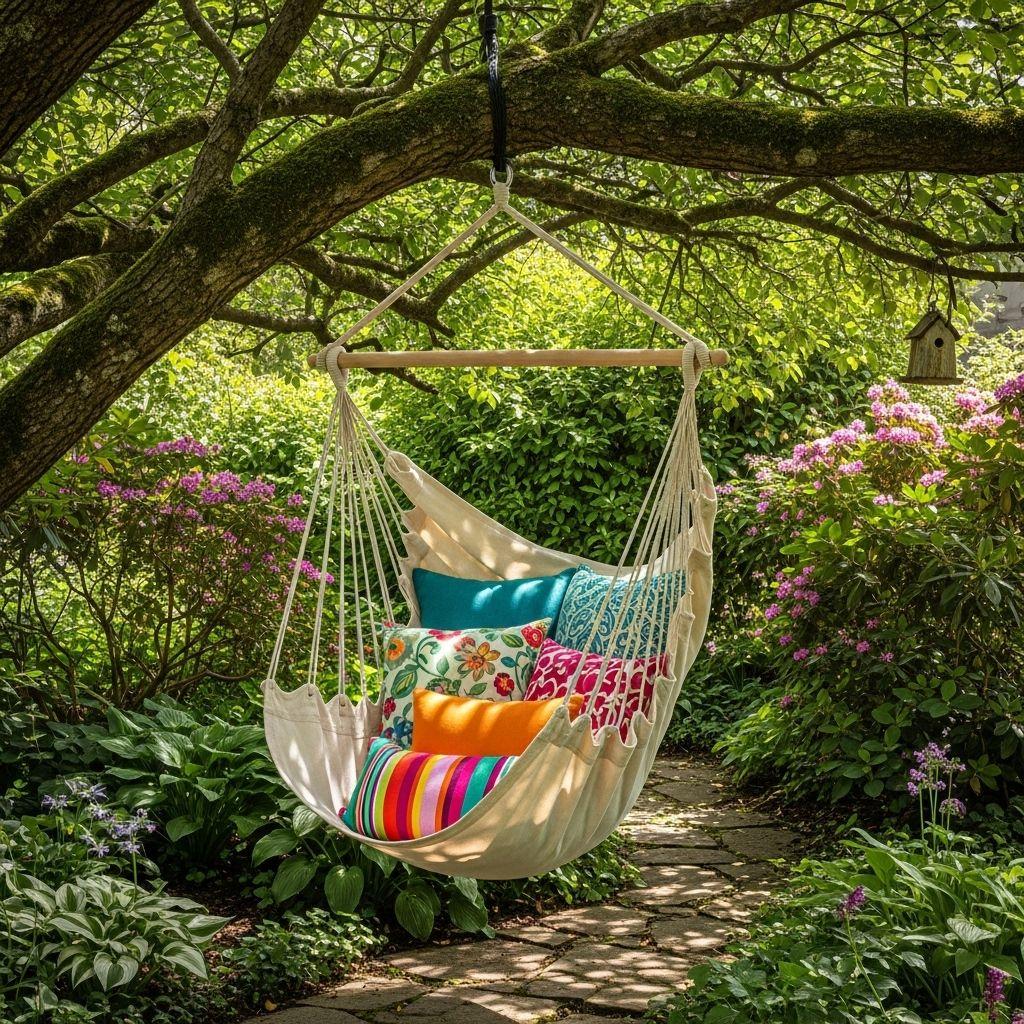
Fabric hammock chairs offer comfortable suspended seating that’s surprisingly simple to make. Hem all fabric edges to prevent fraying, then create a double-fold pocket on two opposite ends large enough to slide the dowels through. These dowels distribute weight and keep the chair’s opening spread wide. Reinforce the dowel pockets with extra stitching since they’ll bear your full weight.
Drill holes through each dowel end for rope attachment. Thread thick rope through these holes and tie secure knots that won’t slip. The rope extends upward to hang from a sturdy tree branch, pergola beam, or ceiling hook rated for at least 300 pounds. Test weight capacity before full use.
Add pillows and throws to personalize your hanging seat. This homemade outdoor seating works wonderfully in corners that can’t accommodate traditional chairs. The gentle swaying motion creates a relaxing experience while the portable nature means you can move it seasonally or between different hanging spots.
9. Concrete and Copper Pipe Side Table
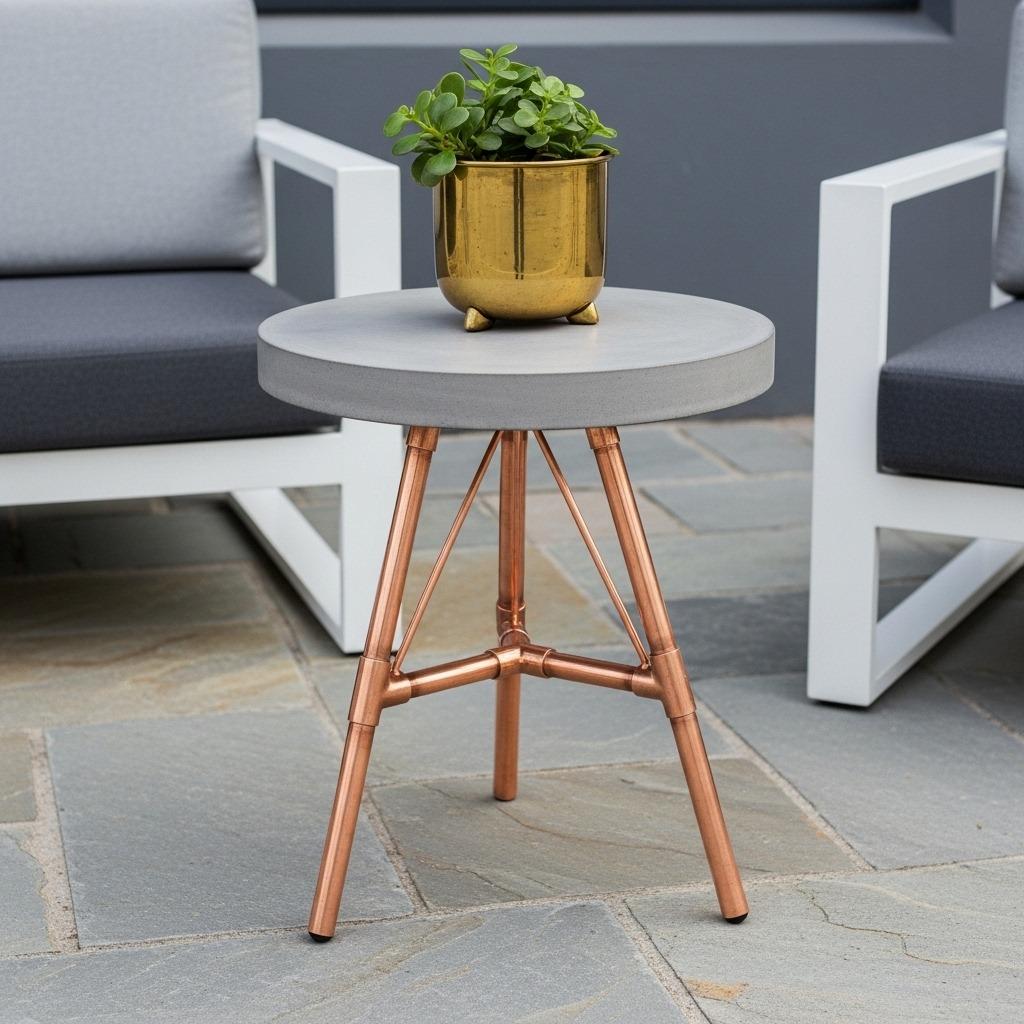
Industrial design meets modern aesthetics in a concrete and copper pipe table. This project creates surprisingly lightweight furniture despite its solid appearance. You’ll need quick-setting concrete mix, a circular mold (a bucket or planter works), copper pipes, copper fittings (elbows and T-joints), and copper cleaner.
Create your table base by assembling copper pipes and fittings into a tripod or rectangular frame. The pipes should extend to your desired table height (usually 18-24 inches for side tables). Use pipe cutters for clean cuts and ensure all connections are tight. The copper
Mix concrete according to package directions and pour into your circular mold. Allow it to partially set (about 30 minutes), then create three evenly-spaced indentations where your copper pipe legs will insert. Let the concrete cure completely (24-48 hours) before demolding.
Once cured, attach the concrete top to the copper base. You might need construction adhesive for added stability, or the pipes can simply rest in the indentations you created. The weight of concrete holds everything in place naturally. This design looks expensive and sophisticated while costing around $50 in materials and requiring no welding or advanced skills.
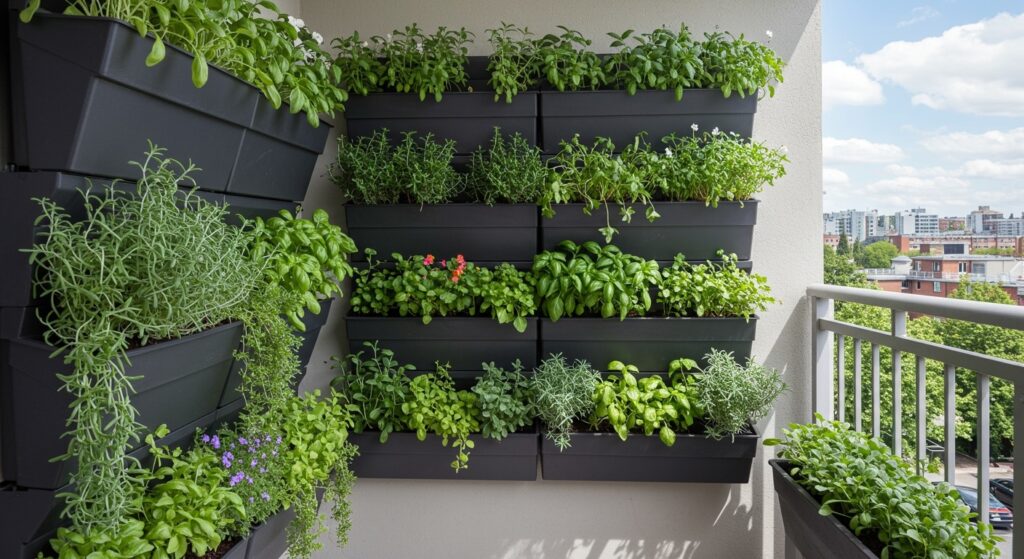
10. Pallet Vertical Garden Wall with Fold-Down Table
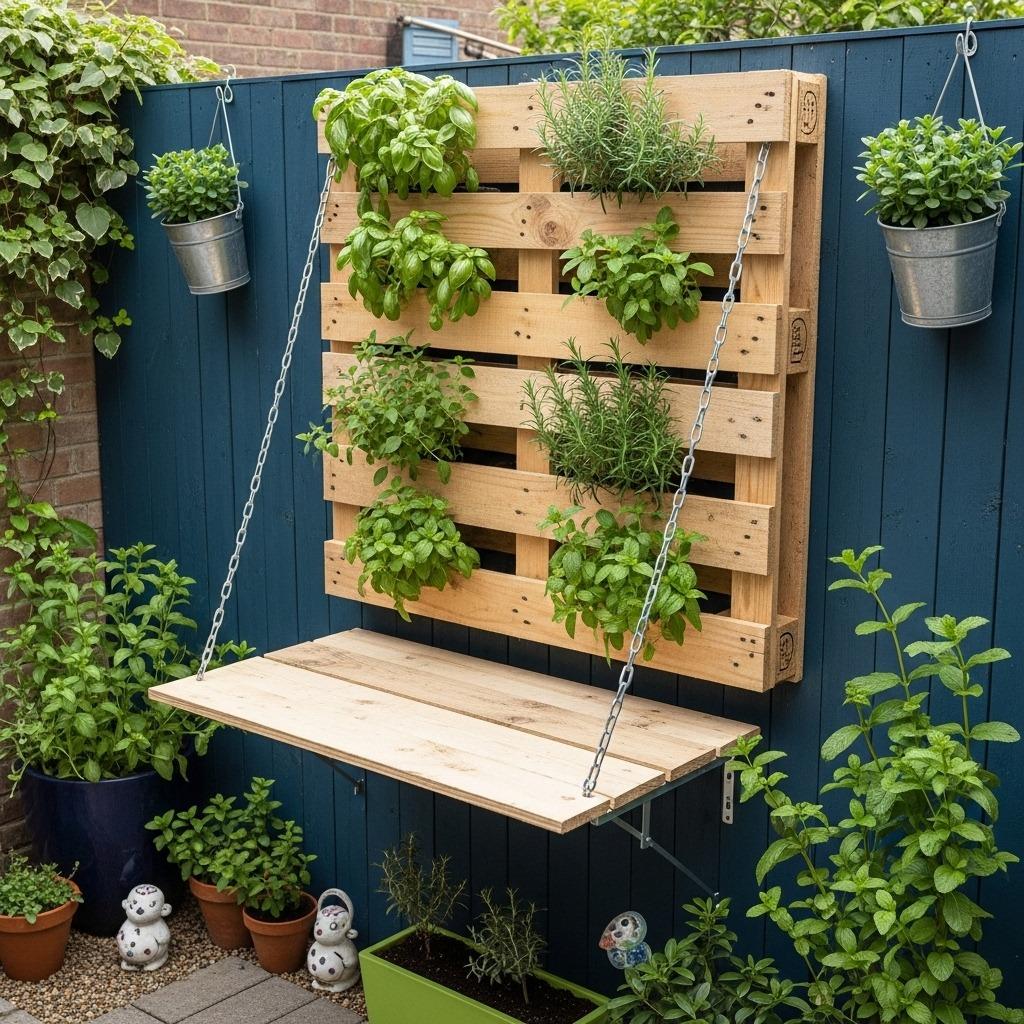
Maximize small spaces with a vertical pallet garden that includes a fold-down eating or work surface. This dual-purpose piece provides both greenery display and functional table space. You’ll need one sturdy pallet, landscape fabric, potting soil, plants, two sturdy hinges, and a support chain or cable.
Mount the pallet vertically against a fence or wall, ensuring it’s securely attached to studs or solid structure. Staple landscape fabric to the back to create planting pockets between slats. Fill these pockets with soil and tuck in shallow-rooted plants like herbs, succulents, or trailing flowers.
The bottom pallet section gets modified into a fold-down table. Cut a horizontal piece that hinges down from the pallet’s base, creating a flat surface when extended. Attach support chains or cables on each side that catch the table at a 90-degree angle when lowered. When not in use, the table folds up flush against the pallet.
This design works beautifully for balcony vegetable gardens or compact patios where space is precious. You get living wall beauty plus instant table space for potting, dining, or working outdoors. The vertical element draws the eye upward while the fold-down function maintains floor space when the table isn’t needed.
11. Wine Barrel Bistro Set with Glass Top
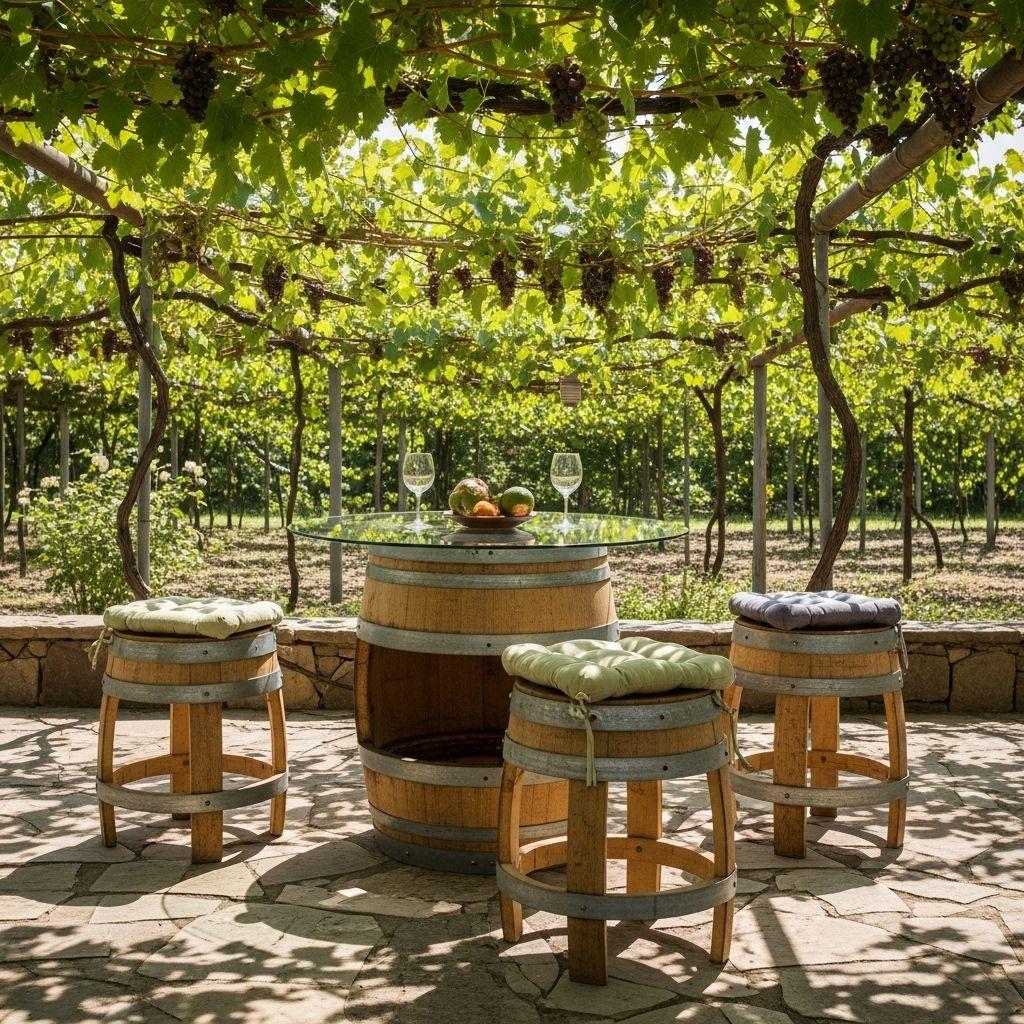
Half wine barrels transform into charming table bases with rustic appeal. If you’re near wineries, you might source authentic barrels, though decorative half-barrels from garden centers work equally well. You’ll need two half barrels (one for the table, optionally two more for stools), a round glass or wood top, and weather-resistant finish.
The larger barrel becomes your table base. Flip it upside down so the open end faces the ground, creating a stable pedestal. Cut a circular top from plywood or purchase a glass round cut to size. Glass tops showcase the barrel’s interior texture while wood tops offer more traditional styling.
Secure the top to the barrel using construction adhesive or L-brackets hidden underneath. If making matching stools, smaller half-barrels work perfectly at seating height. Add round cushions to stools for comfort, choosing fabrics that complement your outdoor color palette.
Seal the wood with exterior varnish to protect against moisture while enhancing the grain. The barrel staves create natural texture and visual interest that no manufactured furniture can replicate. This garden table craft brings wine country charm to any outdoor space and typically costs $100-150 for the complete set depending on barrel sources.
12. Cinder Block Outdoor Firepit Seating
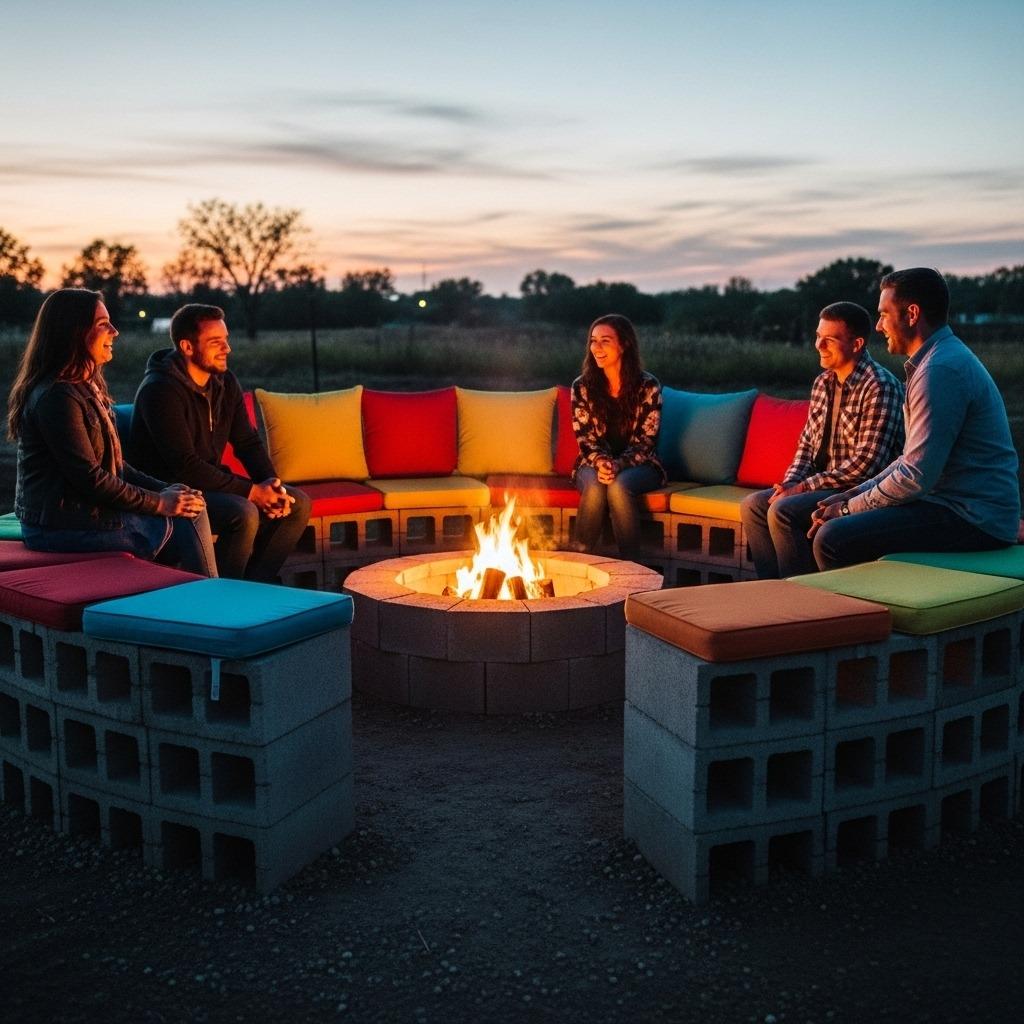
Cinder blocks arranged in a circular or square pattern create built-in seating around a firepit. This project works best for permanent outdoor living areas where you want an integrated look. You’ll need cinder blocks (calculate based on your desired pit size), paving stones or pavers for seating surfaces, fire-resistant mortar (optional), and sand for leveling.
Mark your firepit location and create a level base using sand. Arrange cinder blocks in your chosen shape, leaving gaps for airflow if building an enclosed firepit. Stack blocks 2-3 high for comfortable seating height around the pit’s perimeter. The blocks’ hollow cores can hold small solar lights for evening ambiance.
Top the cinder block seats with wide pavers or flat stones that extend slightly beyond the blocks’ edges. These create smooth seating surfaces without the rough texture of bare concrete. Add cushions or weatherproof seat pads for comfort during longer gatherings.
This design integrates with low-maintenance landscaping while creating permanent entertaining space. The blocks’ modular nature means you can adjust the configuration before cementing if desired. While you can stack blocks without mortar, using fire-resistant mortar creates a more permanent structure. Total costs typically range from $150-300 depending on scale.
13. Salvaged Window Frame Garden Divider with Shelf
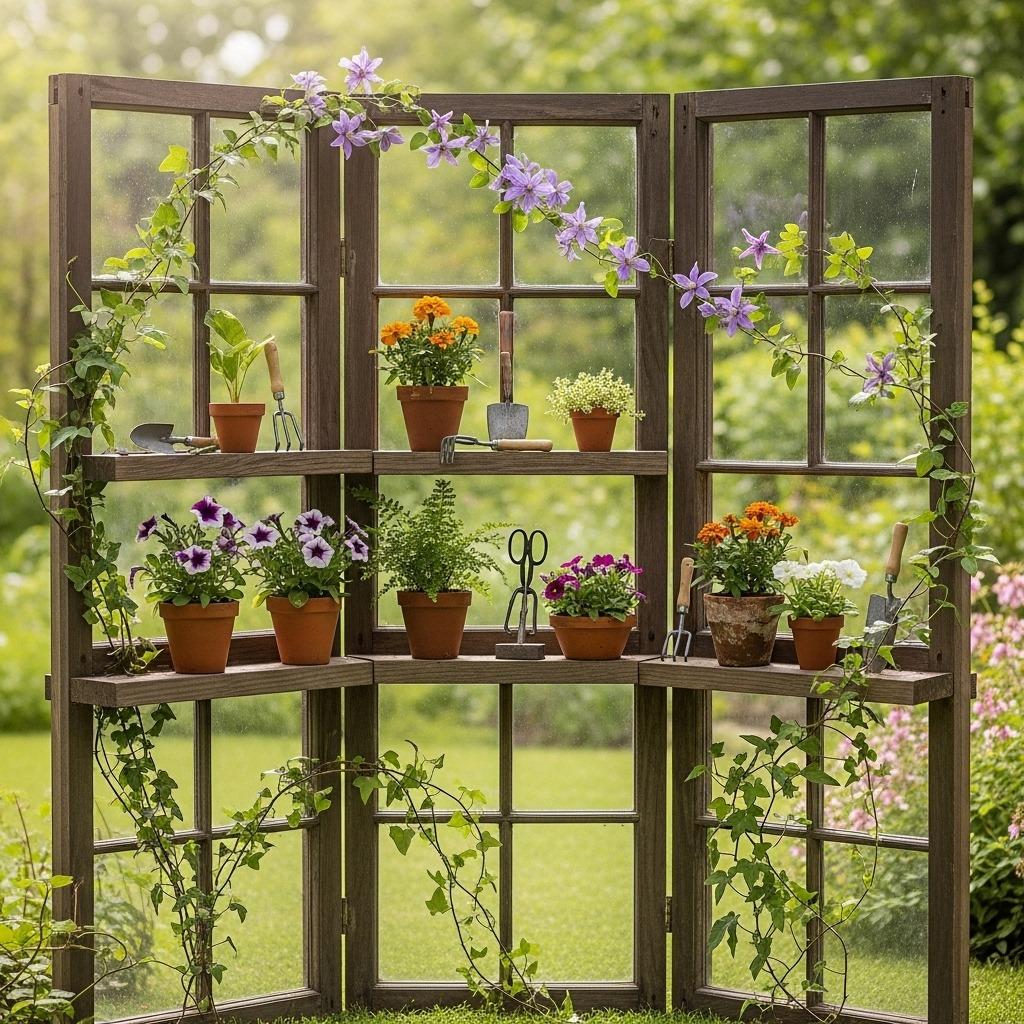
Old window frames create charming garden dividers that also function as display shelves. This project works beautifully for defining spaces within larger gardens or creating privacy on balconies. You’ll need 2-4 matching window frames, wooden boards for shelves, metal brackets, and exterior wood finish.
Connect window frames side by side using wood screws through the frames. This creates a screen-like divider with character and transparency. The glass panes (if intact) catch light beautifully while allowing visibility. If glass is missing, consider leaving frames open for an airy feel or adding wire mesh for climbing plants.
Attach narrow wooden shelves at varying heights between the frames using metal brackets. These shelves hold potted plants, garden decor, or serve as spots to set drinks during outdoor entertaining. The shelves break up the vertical lines while adding function to the decorative piece.
Position your divider to separate dining areas from garden beds, create a backdrop for container gardens, or simply add architectural interest to blank fence sections. The vintage windows pair beautifully with any style from cottage to modern. Finish wood elements with exterior paint or stain, and the project typically costs under $50 if you salvage windows.
14. Rope-Wrapped Wooden Crate Stools
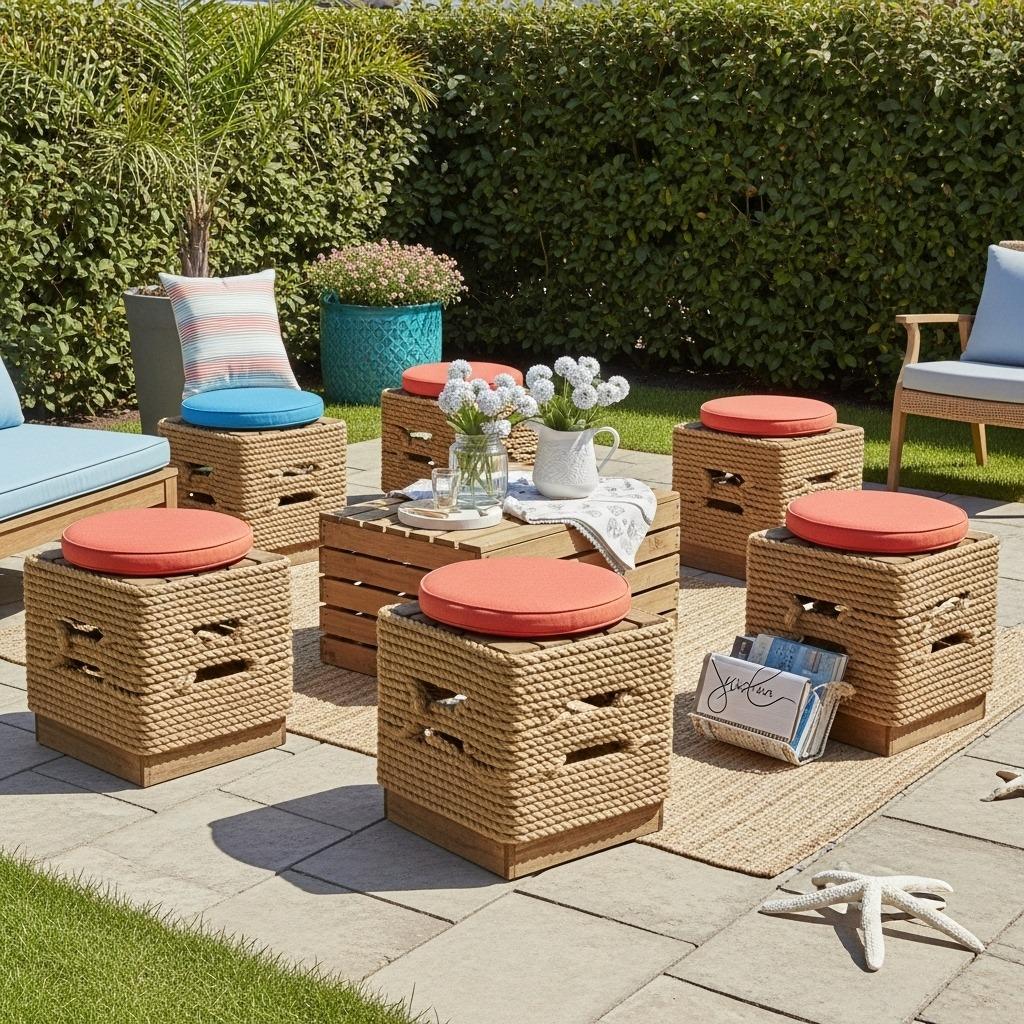
Sturdy wooden crates gain comfort and style through rope wrapping. This technique softens hard edges while adding nautical or bohemian flair. You’ll need wooden crates (milk crate size or larger), thick rope (at least ½ inch diameter), round cushions or DIY seat pads, and strong adhesive.
Flip the crate upside down so the opening faces downward – this becomes your stool base. Begin wrapping rope around all four sides, starting at the bottom and working upward. Apply construction adhesive or hot glue every few inches to secure rope as you wrap, maintaining consistent tension for a neat appearance.
Continue wrapping until you’ve covered all exterior surfaces. Pay special attention to corners, wrapping the rope smoothly around turns without gaps. When you reach the top, tuck the rope end underneath and secure it thoroughly. The finished base should feel solid without any loose rope sections.
Create or purchase round cushions that sit on top, transforming your wrapped crate into comfortable seating. These upcycled garden chairs work wonderfully as extra seating that stores easily or as permanent fixtures in conversation areas. The project costs approximately $25-35 per stool and requires no carpentry skills – just patience and steady hands.
15. Log Slice Pathway Stepping Stones with Built-In Seating
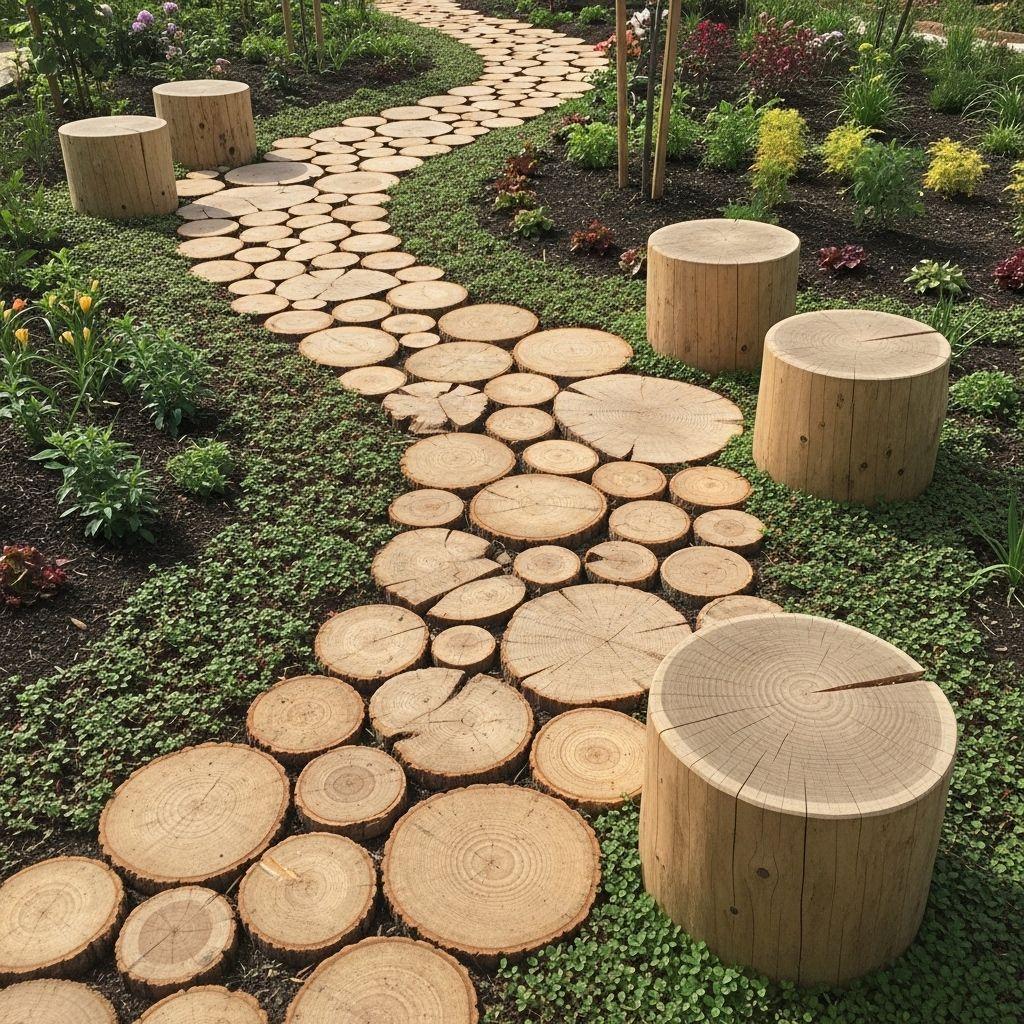
Large log slices serve double duty as pathway elements and casual seating spots throughout the garden. This project creates an organic flow while providing spontaneous resting places. You’ll need log slices at least 3 inches thick and 18-24 inches in diameter, exterior wood sealer, and gravel or sand for leveling.
Cut logs into uniform thickness slices, or source pre-cut slices from lumber yards or tree services. Thicker slices last longer and handle weight better for seating purposes. Sand the top surfaces smooth while leaving bark edges intact for natural texture.
Treat all log slices with multiple coats of exterior wood sealer to prevent rapid rot and insect damage. Clear sealers maintain the natural wood appearance while providing protection. Let slices cure completely before installation.
Create a pathway by positioning slices with comfortable stepping distances between them. Integrate larger slices at turns or along the path’s edge as impromptu seats. Excavate shallow depressions for each slice, add sand or gravel for leveling, then nestle slices into place flush with ground level.
This approach works beautifully in naturalistic gardens and complements wildlife-friendly landscaping. The pathway invites exploration while seating spots encourage lingering. As slices age and weather, they develop rich patina that enhances the organic aesthetic. Budget $100-200 depending on how many slices you need.
Building Comfort One Project at a Time
Creating your own garden furniture isn’t just about filling space with somewhere to sit. It’s about building comfort that matches your exact needs while expressing your personal style. Each piece you craft carries a story – of afternoons spent sanding, decisions about finishes, and that satisfying moment when you finally sit in something you built yourself.
The projects I’ve shared here span different skill levels and budgets, but they all share one quality: they make outdoor spaces more livable. Some will last decades with proper care, while others might be season-specific experiments. That flexibility is exactly what makes DIY furniture so appealing.
Your garden deserves furniture that invites you outside and makes you want to stay. Whether you tackle one simple project or gradually fill your space with handmade pieces, each addition transforms your outdoor area into a true extension of your home. The best part? Every piece reminds you that you created something beautiful and functional with your own hands.