There’s something magical about walking through a garden that reflects your personal style. While store-bought planters can cost a small fortune, creating your own homemade pots offers an affordable way to inject character into every corner of your outdoor space. Plus, you probably have most of the materials sitting in your garage right now.
I’ve spent countless weekends transforming plain containers into conversation starters, and what surprises me most is how forgiving these projects are. You don’t need artistic skills or expensive supplies. Sometimes the most charming pieces come from happy accidents – like that time I spilled paint on a terra cotta pot and it turned into my favorite planter.
Whether you’re looking to refresh your porch, add personality to your garden, or create thoughtful handmade gifts, these DIY flower pot ideas will spark your creativity without emptying your wallet.
1. Painted Terra Cotta Transformations

Plain terra cotta pots are blank canvases waiting for your personal touch. The porous surface accepts paint beautifully, and you can achieve stunning results with just a few basic supplies. What I love about this approach is how easily you can match your pots to existing outdoor decor or create coordinating sets.
Start by cleaning your pots thoroughly and letting them dry completely. Acrylic craft paint works wonderfully for most designs, though outdoor spray paint provides quicker coverage for solid colors. A coat of primer helps the paint adhere better and prevents the terra cotta from absorbing too much moisture through the design.
Geometric patterns have become incredibly popular – think color-blocked sections, chevron stripes, or simple polka dots. For something more organic, try ombre effects where colors gradually blend into each other. The trick is using painter’s tape to create crisp lines between sections.
If you’re feeling adventurous, abstract brushstrokes or splatter paint techniques can create gallery-worthy pieces. I once hosted a painting party where everyone decorated their own pot – the variety was incredible, and nobody needed previous art experience. Just remember to seal your finished design with outdoor varnish to protect it from weather and watering.
2. Rope-Wrapped Rustic Charm
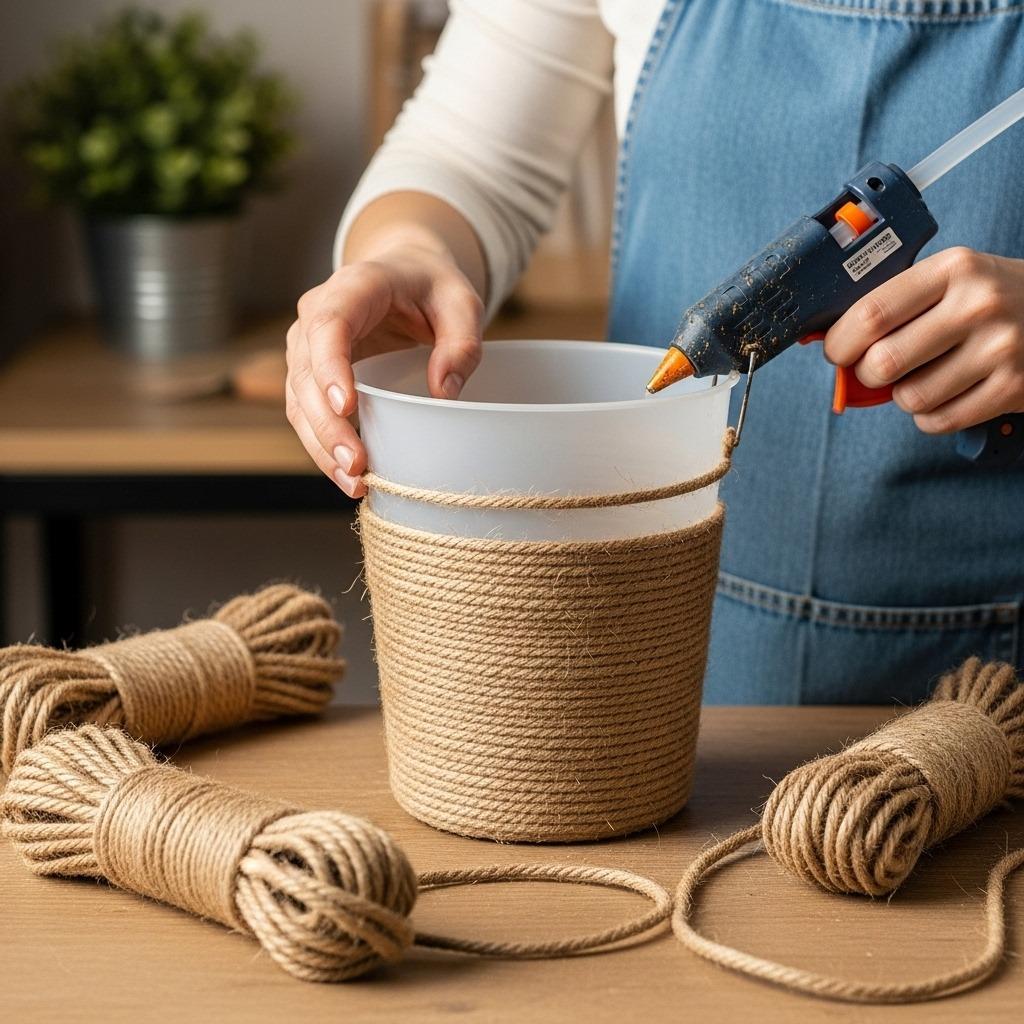
Natural fiber rope instantly adds texture and warmth to basic plastic nursery pots or dated containers. This technique works especially well if you’re drawn to coastal, farmhouse, or bohemian aesthetics. The best part? It’s surprisingly meditative to wrap rope around a pot while listening to music or a podcast.
Choose a rope thickness based on your pot size – thinner sisal or jute works for smaller containers, while chunkier manila rope suits larger planters. You’ll need a hot glue gun with plenty of glue sticks since you’ll be working continuously. Start at the bottom of the pot, applying glue in small sections and pressing the rope firmly against it.
Work your way up slowly, keeping the rope taut and pushing each new row snugly against the previous one to avoid gaps. For added interest, consider switching rope colors midway or incorporating other natural materials like twine or cotton cord. Some people like leaving strategic gaps to reveal painted stripes underneath.
The beauty of this project lies in its imperfections. Slight variations in spacing or texture only add to the handcrafted appeal. These rope-wrapped beauties look particularly stunning when grouped together on a patio table or used for herbs in your kitchen.
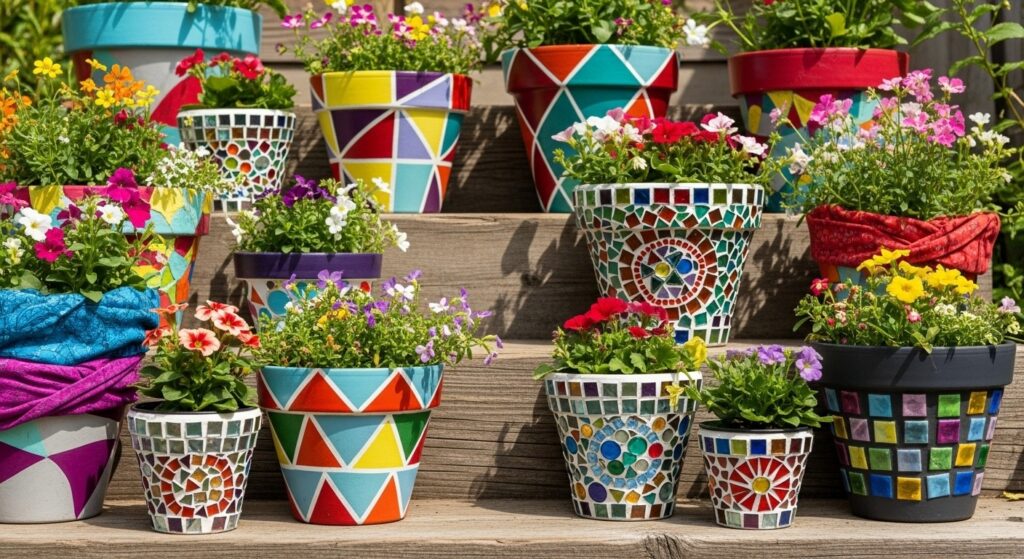
3. Mosaic Magic with Broken Tiles
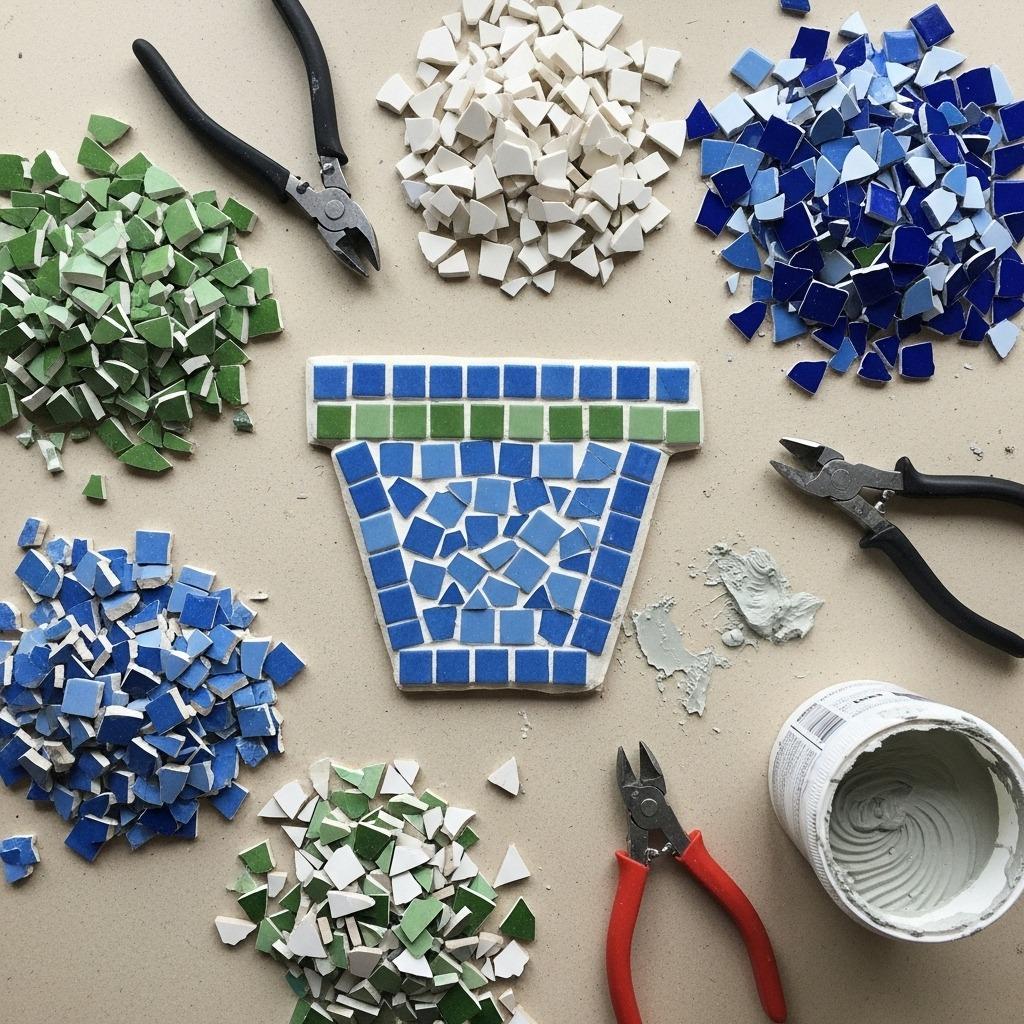
Those leftover tiles from your bathroom renovation? They’re about to become stunning mosaic planters. This technique might seem intimidating at first, but it’s actually quite forgiving – irregular pieces and varying grout lines only enhance the artistic, handmade quality.
You’ll need tile adhesive, grout, a sponge, and your broken tile pieces. If you don’t have leftover tiles, thrift stores often sell vintage plates and ceramic pieces for pennies. Wrap them in an old towel and tap gently with a hammer to create workable fragments. Sort pieces by color or pattern before starting to visualize your design.
Apply tile adhesive to small sections of your pot and press tile pieces into it, leaving small gaps for grout. You can create structured patterns like stripes or spirals, or go for a more organic, random arrangement. Let the adhesive cure for at least 24 hours before grouting – patience here prevents pieces from shifting.
Mix your grout according to package directions and spread it over the entire mosaic surface, working it into all the crevices. Wipe away excess with a damp sponge, being careful not to pull out the grout from between tiles. After it dries to a haze, buff the tiles clean with a dry cloth.
4. Fabric and Mod Podge Elegance
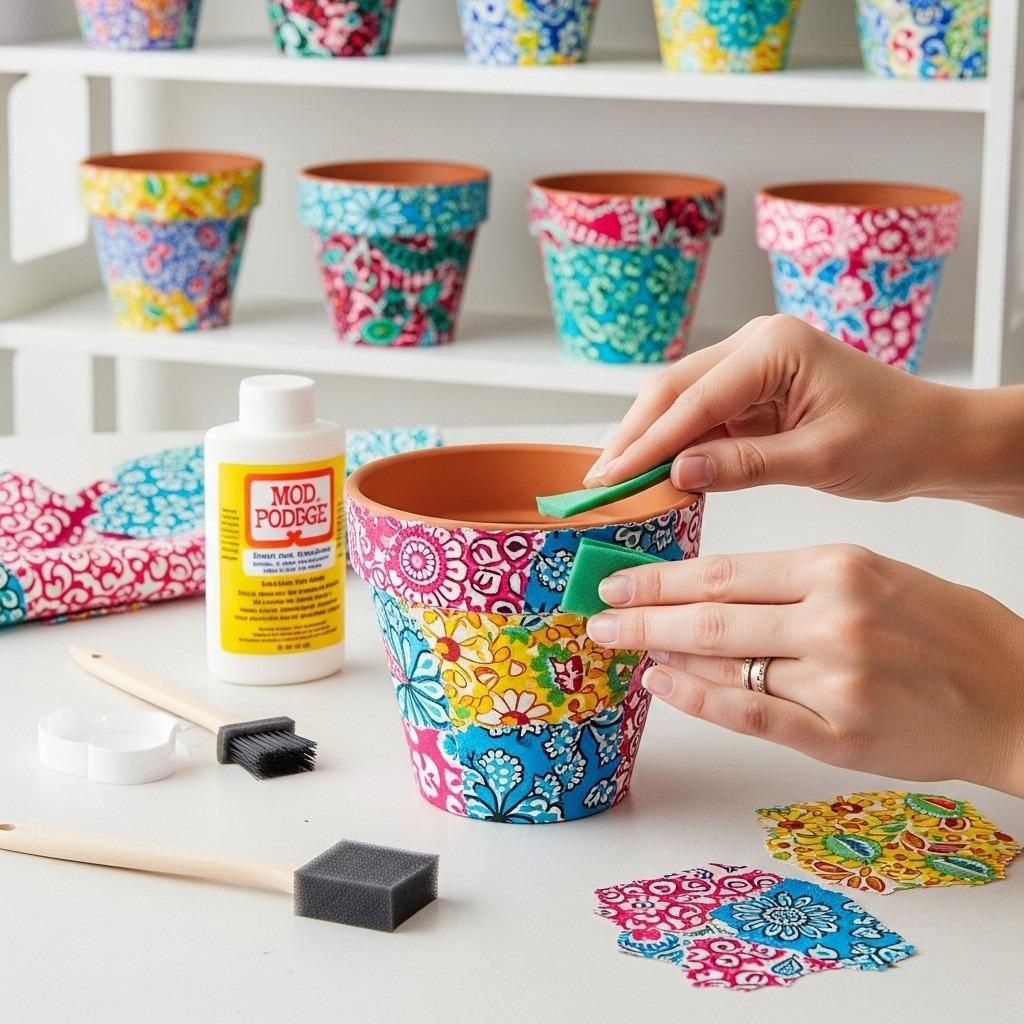
Transforming pots with decorative fabric creates surprisingly durable and beautiful results. This method lets you coordinate planters with outdoor cushions, tablecloths, or other textile elements in your space. I’m always amazed by how waterproof the finish becomes once properly sealed.
Select outdoor or heavier-weight cotton fabrics that can handle moisture exposure better than lightweight materials. Measure your pot’s circumference and height, adding extra for overlap and tucking. Cut your fabric pieces and test the fit before applying any adhesive.
Brush a generous layer of outdoor Mod Podge onto the pot’s exterior surface. Smooth your fabric onto the wet adhesive, working from one side to the other to prevent air bubbles and wrinkles. Use a credit card or smoothing tool to push out any trapped air and ensure good contact.
Trim excess fabric from the top and bottom edges, then fold and secure the raw edges with more Mod Podge. Once completely dry, apply at least two additional coats of outdoor Mod Podge over the entire exterior, letting each coat dry thoroughly. This seals and protects your fabric from water damage and UV fading.
These fabric-covered pots work beautifully for container gardening on covered porches or in partially sheltered areas. While they’re weather-resistant, bringing them under cover during heavy storms extends their life.
5. Concrete Industrial Chic
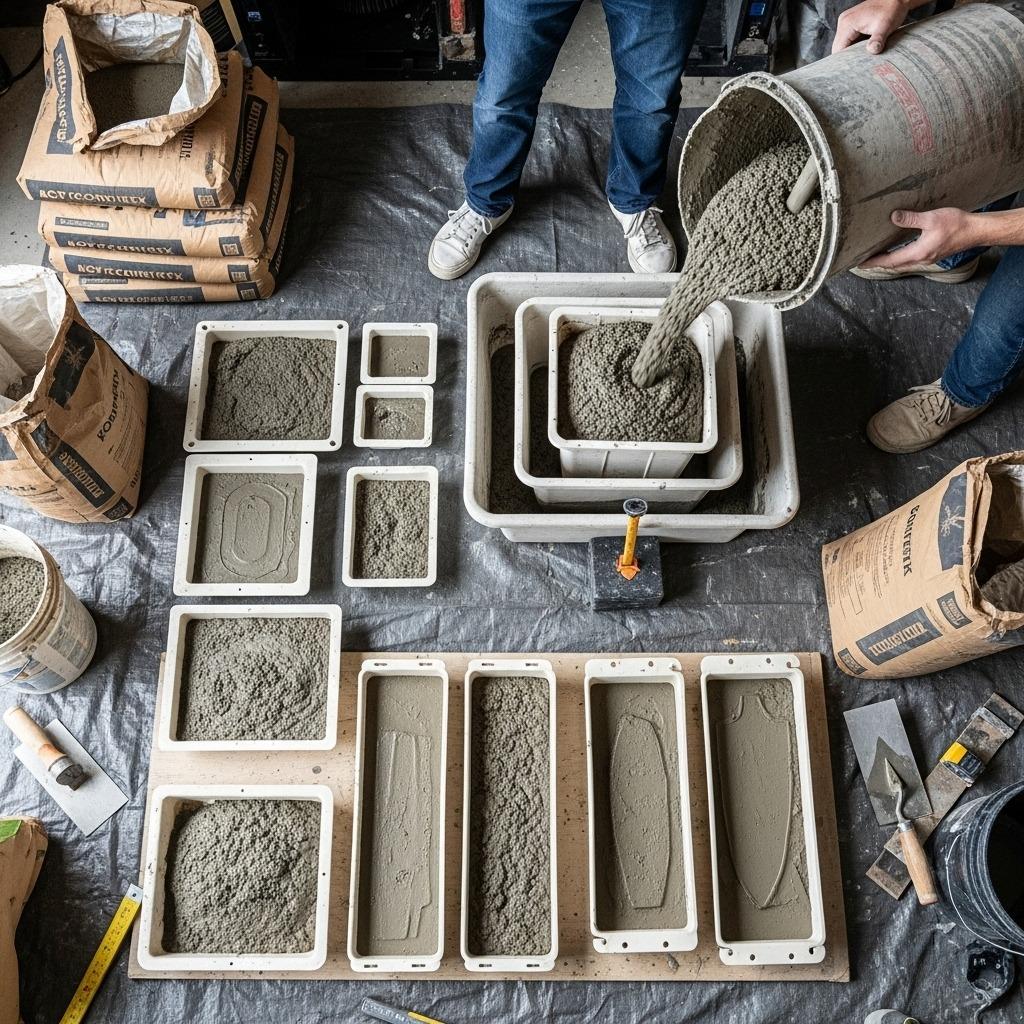
Mixing your own concrete planters sounds ambitious, but it’s actually straightforward and incredibly satisfying. The industrial aesthetic of concrete pairs perfectly with modern succulents or adds striking contrast to flowing floral arrangements. Plus, you can create custom sizes and shapes impossible to find in stores.
You’ll need concrete mix (fine casting concrete works best), two containers for creating the mold – one larger outer container and one smaller inner container, cooking spray, and something to weigh down the inner container. Old yogurt containers, plastic buckets, or cardboard boxes lined with plastic wrap all make excellent molds.
Spray both containers with cooking spray to help with demolding later. Mix your concrete according to package directions – aim for a thick, pancake batter consistency. Pour concrete into the larger container to about one-third full, then center the smaller container inside and weigh it down with rocks or sand.
Pour more concrete around the sides between the two containers, stopping about an inch from the top. Tap the mold firmly on your work surface to release air bubbles. Let cure for at least 48 hours before carefully demolding – concrete continues strengthening for weeks, so handle gently at first.
The raw concrete look has incredible appeal, but you can also paint, stain, or seal your finished planters. These work wonderfully for succulents and drought-tolerant plants since concrete naturally wicks moisture. They’re substantial pieces that anchor outdoor plant arrangements beautifully.
6. Decoupage with Book Pages and Maps
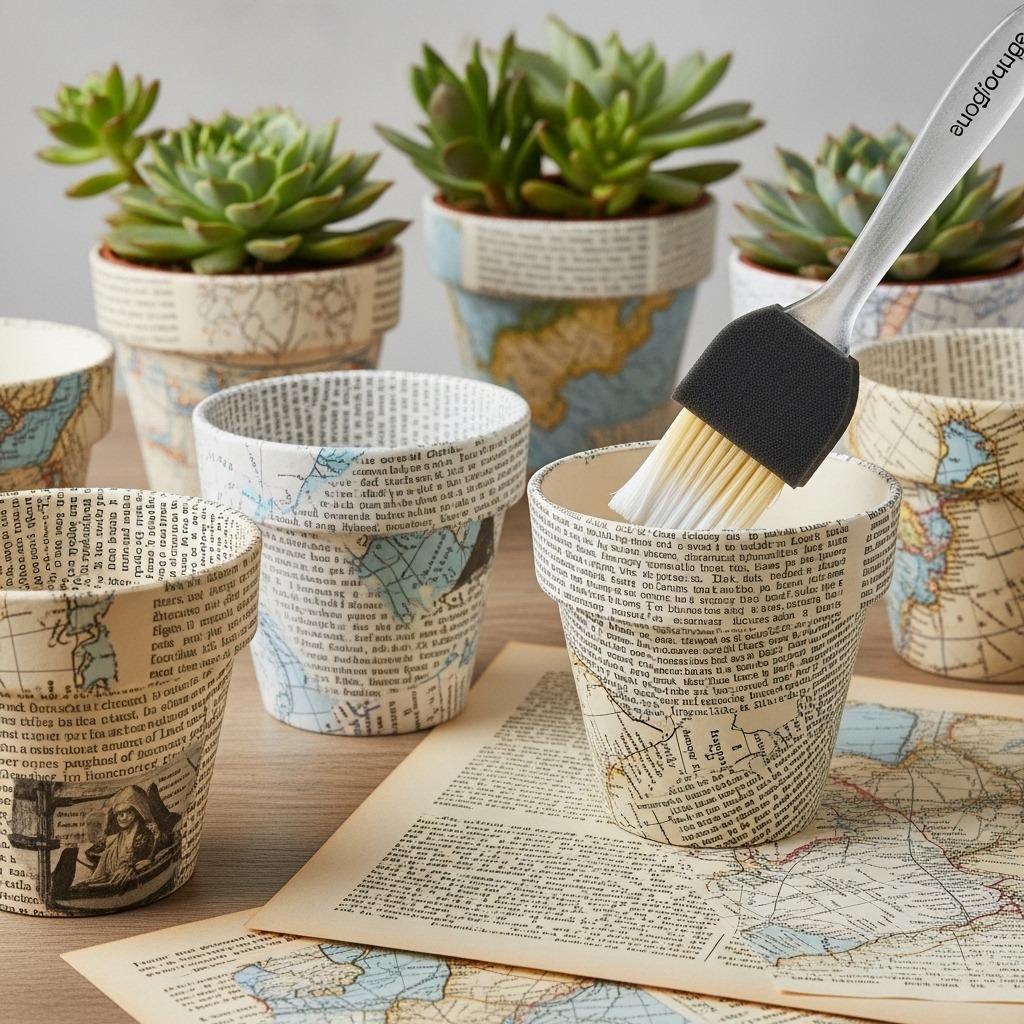
Upcycled container ideas don’t get much more charming than planters covered in vintage book pages or old maps. This technique breathes new life into damaged books, outdated atlases, or sheet music that’s too worn for its original purpose. The result looks curated and intentional without being overly precious.
Choose pages with interesting text, illustrations, or map details. Tear rather than cut the edges for a more organic, layered appearance. Torn edges also blend better when overlapped, hiding seams more effectively than straight cuts.
Apply Mod Podge to your pot’s surface in workable sections. Lay paper pieces onto the wet adhesive, smoothing as you go and slightly overlapping edges. Don’t worry about wrinkles or creases – they add character and vintage charm. Work your way around the pot, varying the placement of text and images.
Once covered, brush multiple thin coats of Mod Podge over the entire surface, allowing each layer to dry before adding the next. This builds up a protective, water-resistant finish. For extra durability on outdoor pieces, finish with a clear acrylic sealer spray.
These literary planters make thoughtful gifts when you coordinate the pages with the recipient’s interests. Travel maps for the adventurer, music sheets for the musician, or favorite book excerpts for the reader. They’re conversation starters that look equally at home in indoor gardens or on covered patios.
7. Lace Texture Impressions
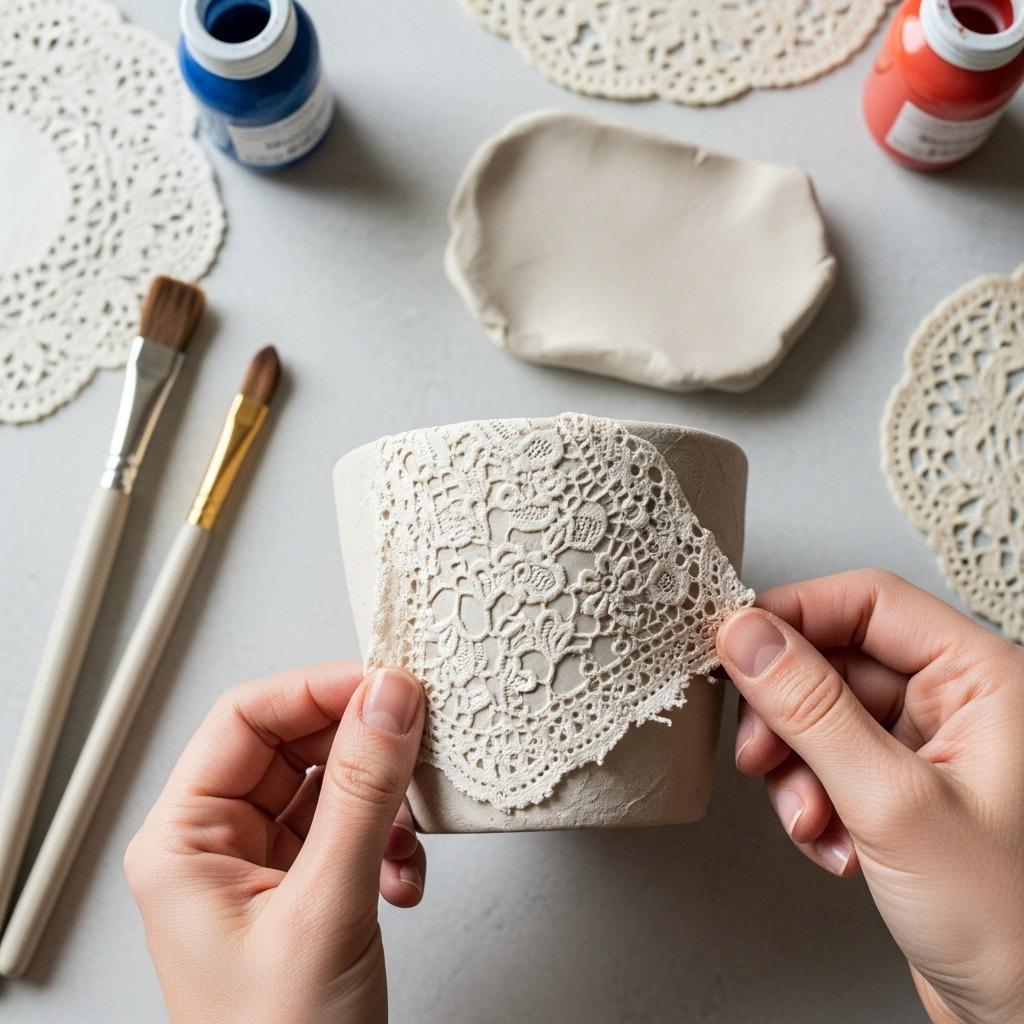
Creating dimensional texture on pots using lace produces unexpectedly elegant results. This technique works on both clay and plastic pots, transforming inexpensive containers into pieces that look high-end and sophisticated. The delicate patterns catch light beautifully and add visual interest from every angle.
You’ll need lace fabric (vintage doilies work wonderfully), air-dry clay or joint compound, and acrylic paint. Roll out your clay or spread joint compound onto the pot’s surface in a relatively even layer. Press lace firmly into the wet medium, using a rolling pin or your hands to ensure good contact with all the pattern details.
Carefully peel away the lace to reveal the impressed pattern beneath. Let dry completely before painting – this might take 24-48 hours depending on thickness and humidity. The textured surface accepts paint beautifully, and you can highlight the raised patterns by dry brushing with metallic or contrasting colors.
For subtle elegance, paint the entire pot one color then lightly brush metallic gold or silver over just the raised texture. For bolder statements, use contrasting colors between the background and pattern. These lace-textured pots look stunning filled with simple greenery that doesn’t compete with the detailed surface.
8. Chalkboard Paint Functionality
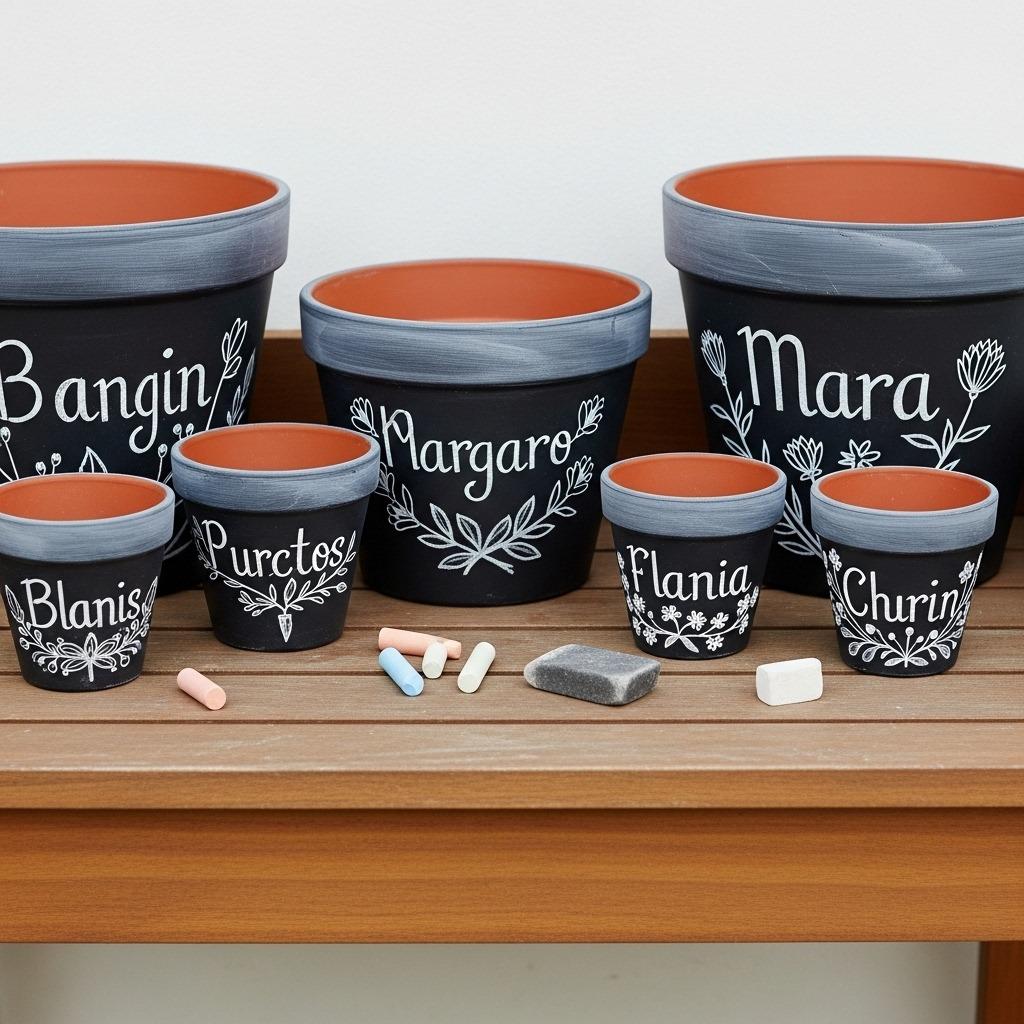
Chalkboard paint transforms ordinary pots into practical garden markers that you can update seasonally. This is especially useful if you’re gardening for beginners and need flexible labeling for different plantings. The matte black finish also provides sophisticated contrast in colorful garden settings.
Clean and dry your pots thoroughly before applying chalkboard paint. Two to three thin coats provide better coverage than one thick coat, which can leave streaks or drips. Let each coat dry completely before adding the next. Once fully cured, condition the surface by rubbing chalk over the entire painted area and wiping clean.
Now you can label plants, note watering schedules, or add decorative drawings that change with the seasons. Use regular chalk for easy updates or chalk markers for more permanent designs that won’t smudge in light rain. The beauty of this approach is its flexibility – what works in spring can easily transform for fall plantings.
Consider painting just sections of pots with chalkboard paint, leaving other areas in contrasting colors or natural terra cotta. Geometric shapes, stripes, or organic blobs of chalkboard paint create visual interest while maintaining functionality. These work particularly well for herb gardens where frequent labeling changes occur.
9. Stamped and Stenciled Patterns
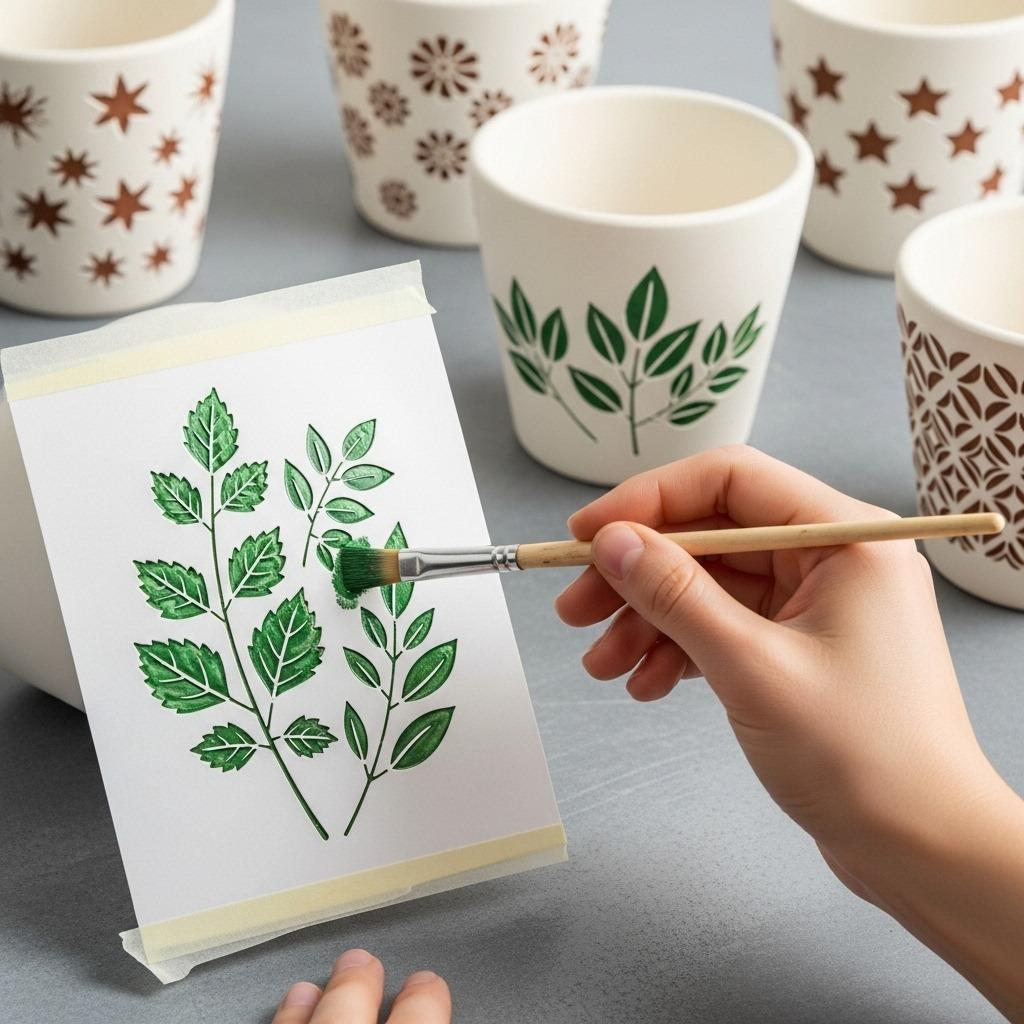
Creating repeating patterns with stamps or stencils offers the precision of professional design without requiring artistic skills. This technique lets you achieve remarkably consistent, polished results that look store-bought. The key is choosing the right tools and taking your time with even application.
Foam stamps, rubber stamps, or custom-cut stencils all work beautifully on pot surfaces. For stamps, apply paint directly to the stamp surface with a foam brush, then press firmly onto the pot. For stencils, secure them with painter’s tape and apply paint with a stencil brush using a pouncing motion rather than brushing strokes.
Metallic paints create particularly striking results when stamped onto dark base colors. Copper, gold, and silver all catch light beautifully and elevate simple patterns into something special. Plan your pattern before starting – measure and mark light guidelines if perfect spacing matters to your design.
Layer different patterns or colors for more complex designs. You might stamp leaves in various green shades, add metallic accents, or combine geometric and organic shapes. The repetition of patterns across multiple pots creates visual cohesion in garden displays even when using different sizes or shapes.
10. Repurposed Household Container Magic
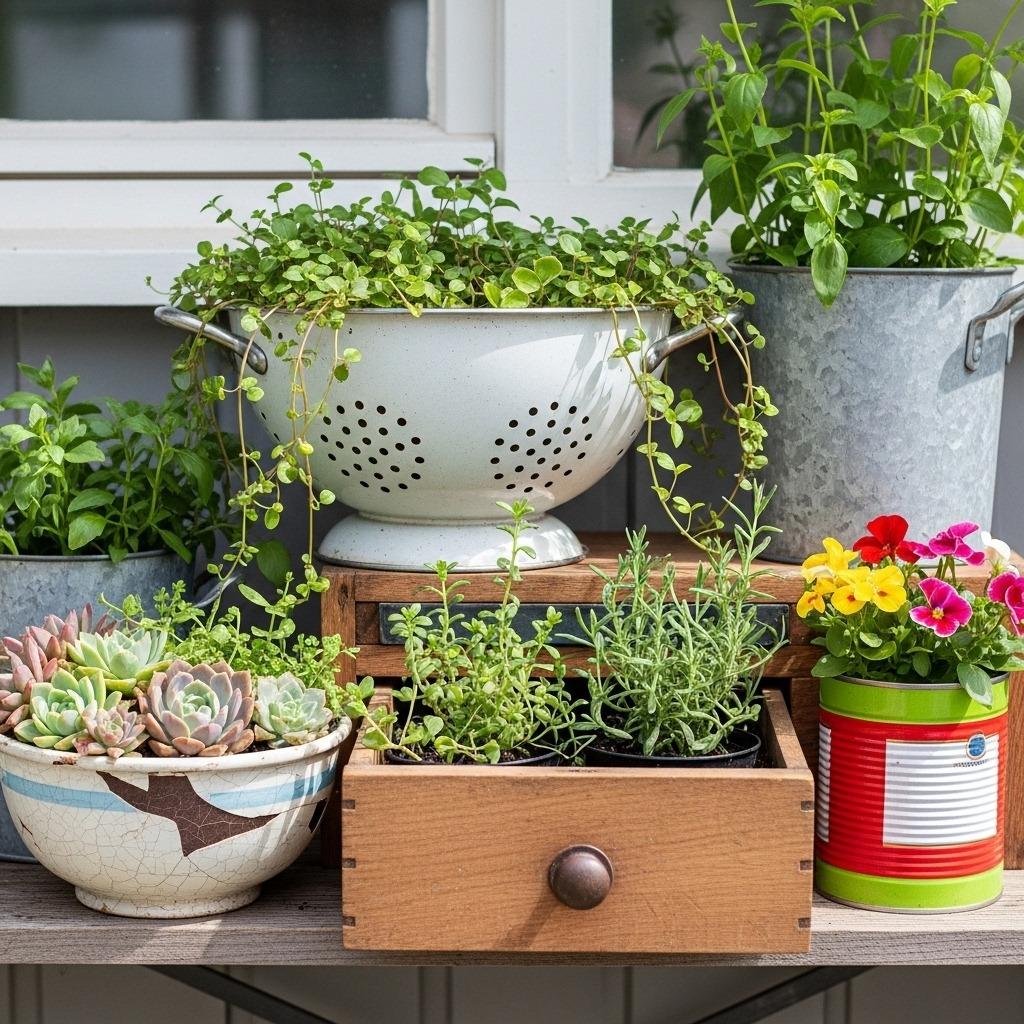
Some of the most creative pot crafts come from reimagining household items never intended for plants. Old colanders, vintage tea tins, wooden crates, ceramic bowls with chips, enamelware with worn spots – these all become charming planters with minimal effort. The built-in character and patina of aged items adds instant vintage appeal.
Drainage is the critical consideration when repurposing containers. Most non-traditional planters need holes drilled in the bottom. Use appropriate drill bits for the material – masonry bits for ceramic, metal bits for tin or enamelware. Drill slowly and steadily to prevent cracking or splitting.
Some items work beautifully without modifications. Colanders have built-in drainage and create whimsical hanging baskets when suspended with chain or rope. Vintage wooden drawers develop wonderful patina as they age outdoors and accommodate shallow-rooted plants perfectly.
The beauty of upcycled container ideas lies in their uniqueness – nobody else will have identical planters. Thrift stores, estate sales, and your own cabinets offer endless possibilities. Look for items with interesting colors, patterns, or shapes that speak to you. Grouping varied repurposed containers creates an collected-over-time look that’s infinitely more interesting than matching store-bought sets.
This approach aligns perfectly with sustainable living practices while adding personality to your outdoor spaces. Plus, giving new purpose to items headed for landfills feels good beyond just the visual appeal.
11. Marbled Paint Techniques
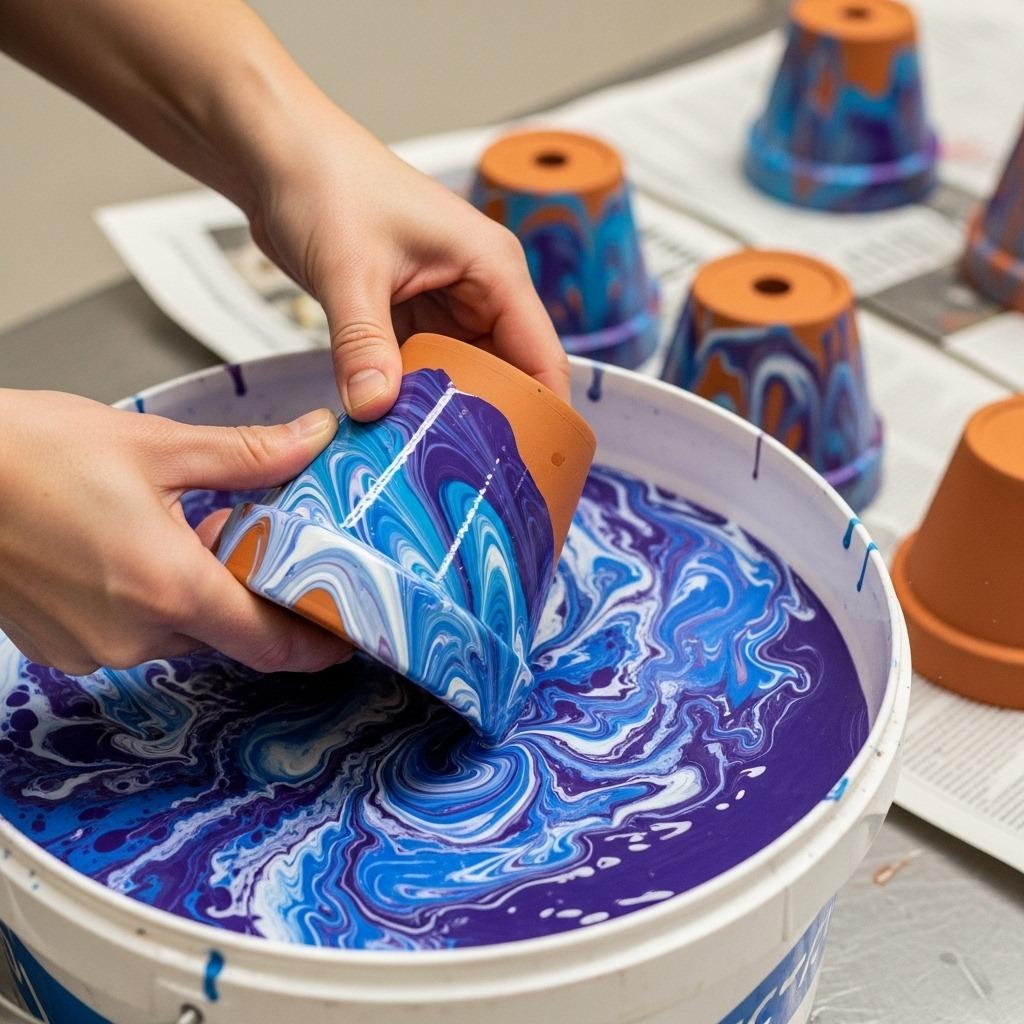
Water marbling creates mesmerizing, one-of-a-kind patterns that look complex but require minimal skill. This technique produces organic, flowing designs impossible to replicate, meaning each pot becomes a truly unique piece. The element of surprise makes the process as enjoyable as the finished product.
Fill a large bucket or container with room temperature water. Float several colors of acrylic or spray paint on the water’s surface – they’ll spread naturally into pools. Use a stick or skewer to gently swirl the paints together, creating marble patterns without over-mixing them into muddiness.
Holding your pot by the interior, slowly dip it into the water at an angle, rolling it through the paint layer. The paint transfers to the pot’s surface in those beautiful marbled patterns. Pull it out carefully, let excess water drip off, and set aside to dry completely.
Each dip creates entirely different results depending on paint colors, swirl patterns, and dipping angle. Some crafters prefer bold, contrasting color combinations while others choose analogous shades for subtler effects. Metallics mixed with regular paints add shimmery dimension.
Seal finished pots with clear acrylic spray to protect the paint and add water resistance. These marbled beauties look incredible grouped together despite – or perhaps because of – each one being completely different. They bring an artful, gallery-quality aesthetic to any space.
12. Succulent Display Arrangements
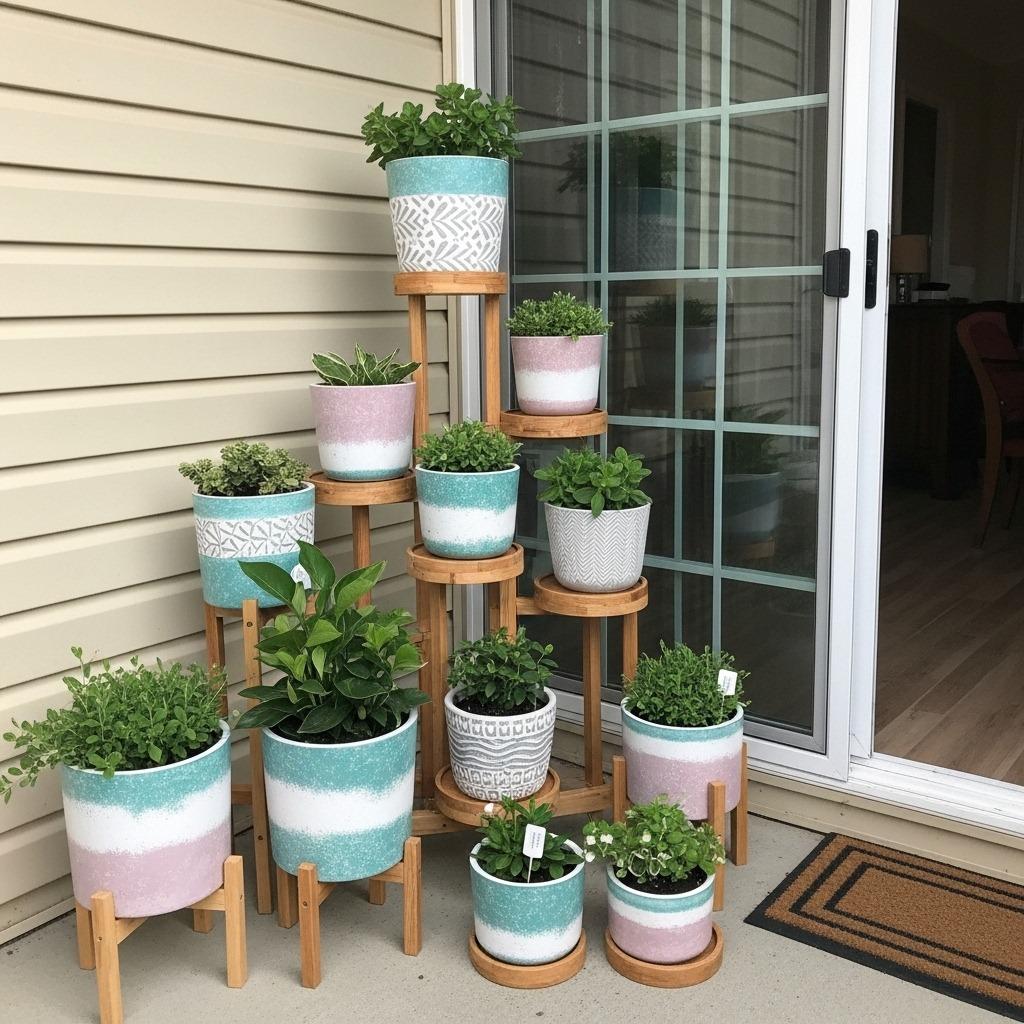
While this focuses on styling rather than pot creation, arranging multiple DIY planters into cohesive displays multiplies their impact dramatically. Thoughtful grouping transforms individual projects into professional-looking vignettes that could grace any magazine-worthy garden.
Vary heights by using plant stands, overturned pots, or stacked books to create levels. The eye naturally moves through displays with high, medium, and low points rather than everything sitting at the same height. Group odd numbers together – collections of three, five, or seven pots feel more balanced than even numbers.
Mix pot sizes, shapes, and styles while maintaining some unifying element. This might be a consistent color palette, similar plants, or a repeated material like rope or paint finish. Too much matching feels rigid, but too much variety reads as chaotic. Finding that sweet spot takes experimentation.
Consider the backdrop when arranging displays. A plain wall lets pots be the stars, while a fence or lattice adds dimension. Seasonal adjustments keep displays feeling fresh – spring bulbs, summer annuals, fall mums, or winter evergreens all change the dynamic while using the same handmade pots.
Creating these vignettes encourages you to see your pots as a collection rather than individual pieces. It’s similar to how gallery walls work indoors – the whole becomes greater than the sum of its parts.
Your garden deserves planters that reflect your personal style rather than whatever was on sale at the big box store. These DIY flower pot projects prove that a little creativity goes much further than a big budget. Whether you’re drawn to the rustic appeal of rope-wrapped vessels, the artistic flair of hand-painted designs, or the sustainable satisfaction of repurposed containers, there’s a project here that matches your skill level and aesthetic preferences.
The beautiful thing about creative pot crafts is how forgiving they are. If a paint stroke goes awry or a mosaic piece doesn’t sit quite right, those “imperfections” often become the most charming details. Your handmade pots will carry stories – the afternoon you spent creating them, the friends who helped, or simply the satisfaction of making something beautiful with your own hands.
Start with one simple project this weekend. Transform that stack of plain terra cotta pots in your garage or give new purpose to containers destined for recycling. Your garden will thank you, your budget will thank you, and every time you water your plants, you’ll feel that little spark of pride that comes from creating something uniquely yours.