You know that feeling when you look at your garden and something just feels… incomplete? Your plants are thriving, your flowers are blooming, but those basic terracotta pots aren’t exactly stealing the show. That’s where handmade container ideas come in, and honestly, nothing adds that cozy, whimsical touch quite like a crochet flower pot cover.
I’ve been experimenting with yarn garden crafts for a while now, and I’m kind of obsessed with how much personality a simple crocheted sleeve can add to an outdoor space. It’s like giving your plants a sweater, but make it fashion. The best part? You don’t need to be a crochet expert to create something beautiful. Even basic stitches can transform a plain pot into something that makes your neighbors stop and ask where you bought it.
Whether you’re working with small herb pots on your kitchen windowsill or larger planters on your patio, these decorative crochet pots offer endless possibilities for customization. Different yarns, colors, patterns, and textures mean you can match any garden aesthetic from cottage core to modern minimalist. Plus, they’re practical – the yarn layer adds a bit of insulation for your plants and protects pots from scratches.
Why Crochet Flower Pot Covers Are Having a Moment
There’s something wonderfully nostalgic about crocheted home accessories that feels fresh again. Maybe it’s the return of grandmillennial style, or perhaps we’re all just craving more handmade touches in our spaces. Either way, crochet flower pot covers hit that sweet spot between crafty and chic.
Unlike painting pots or buying expensive planters, crocheting a cover gives you complete creative control. You can switch them out seasonally, experiment with bold color combinations, or keep things neutral and textured. I love how forgiving this craft is – if you mess up a stitch or two, the organic nature of yarn actually makes imperfections look intentional.
The tactile quality of yarn adds unexpected warmth to gardens and patios. When you incorporate these pieces into your garden and nursery ideas, they create visual interest at different heights and angles. The texture catches light differently than ceramic or plastic, creating subtle shadows and depth that photographs beautifully (hello, Pinterest gold).
Getting Started: Yarn Selection and Basic Supplies
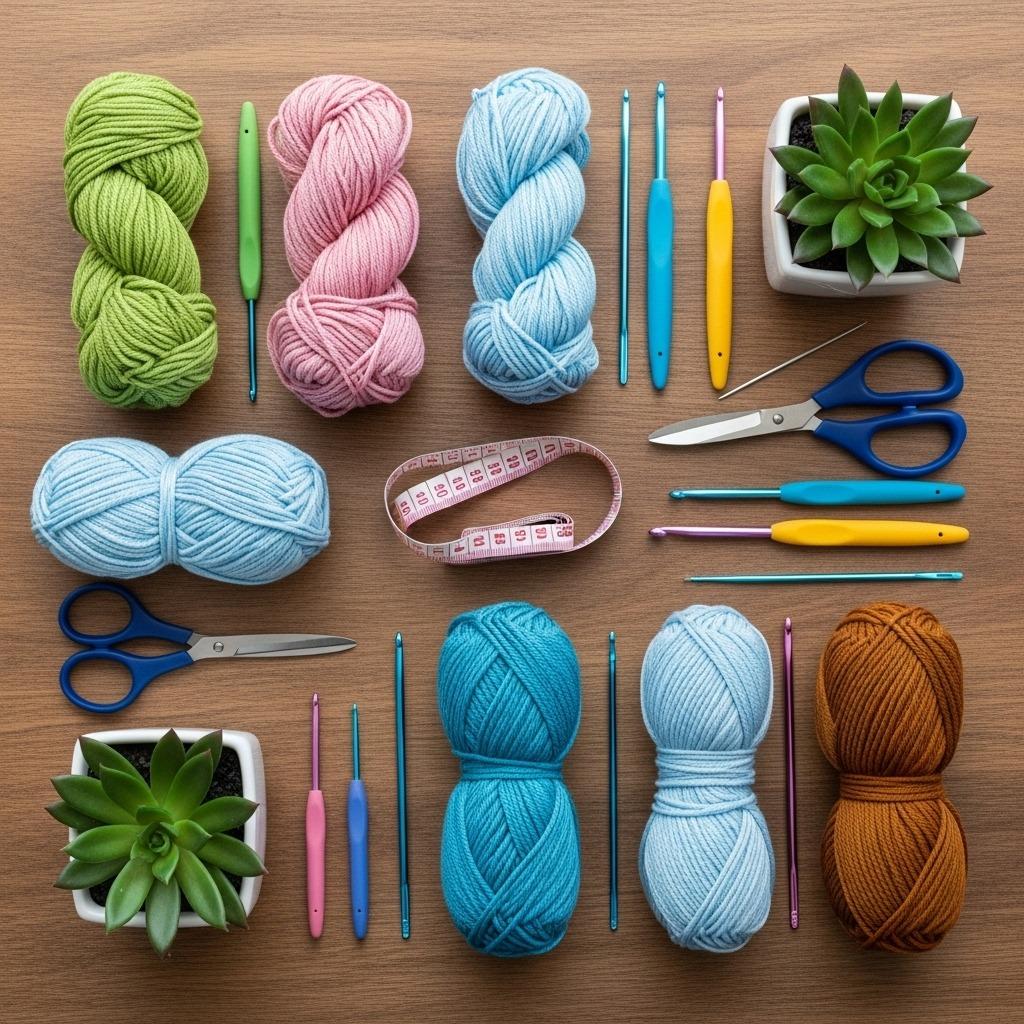
Choosing the right yarn makes all the difference for outdoor projects. You’ll want something durable enough to withstand moisture and sun exposure, but soft enough to work with comfortably. Cotton yarn is my go-to for crochet flower pot covers because it’s naturally breathable, washable, and comes in gorgeous color ranges.
Acrylic yarn works well too, especially the outdoor-specific varieties designed for patio furniture and cushions. These have UV resistance built in, which helps prevent fading over time. If you’re keeping your pots under a covered porch or bringing them inside during harsh weather, you have more flexibility with yarn choices. Wool blends add beautiful texture but aren’t ideal for pots that’ll be exposed to rain.
Beyond yarn, you’ll need basic crochet hooks (size depends on your yarn weight), scissors, and a yarn needle for weaving in ends. A measuring tape helps ensure your cover fits properly, and stitch markers can be lifesavers when working in rounds. Don’t overthink the supplies though – sometimes the best projects happen when you just grab whatever yarn is calling to you and see where it goes.
1. Simple Striped Covers for Beginners
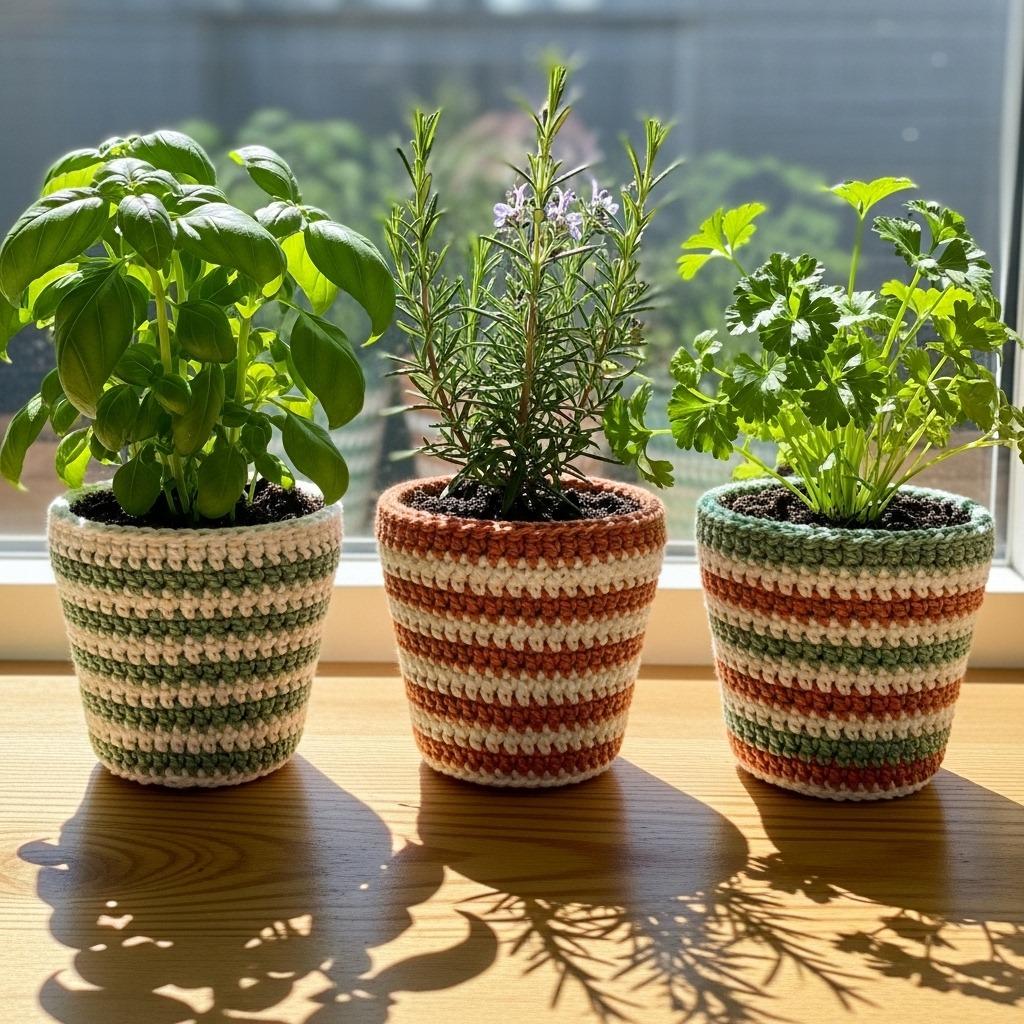
Starting with basic stripes takes the pressure off while still creating something visually appealing. The beauty of this approach is that you’re just working in single or double crochet rows, changing colors every few rows to create horizontal bands. It’s repetitive enough to be meditative but interesting enough to hold your attention.
I usually pick three to five coordinating colors and alternate them in a pattern that feels balanced. Maybe two rows of cream, three rows of sage green, two rows of terracotta, and repeat. The rhythm becomes almost automatic after the first few pattern repeats, which makes this perfect for evening crafting while watching TV.
These striped decorative crochet pots work especially well for herb gardens where you might cluster several pots together. Using the same color palette across multiple covers creates cohesion, while varying the stripe widths adds just enough variation to keep things interesting. You can finish the top with a simple border or leave it raw for a more casual vibe.
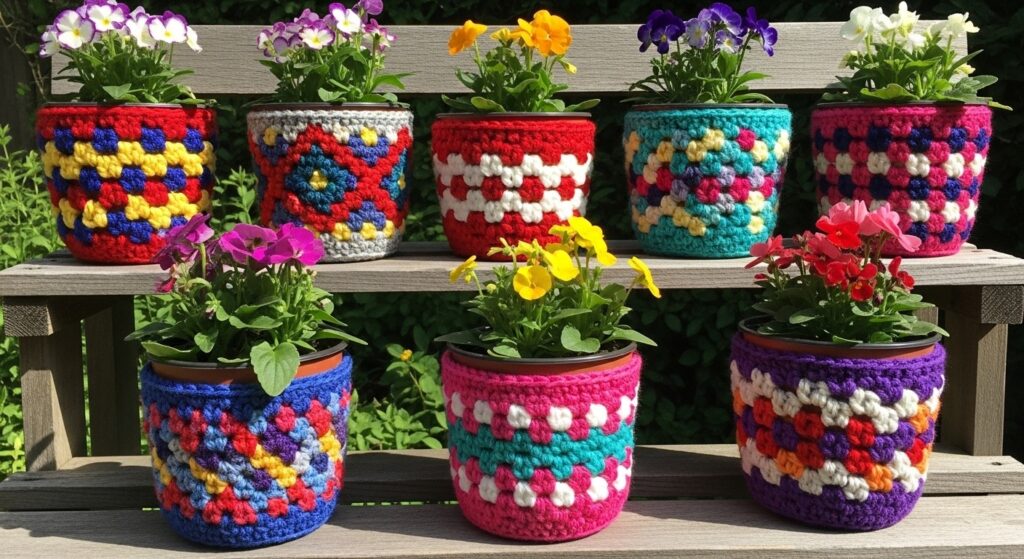
2. Granny Square Patchwork Style
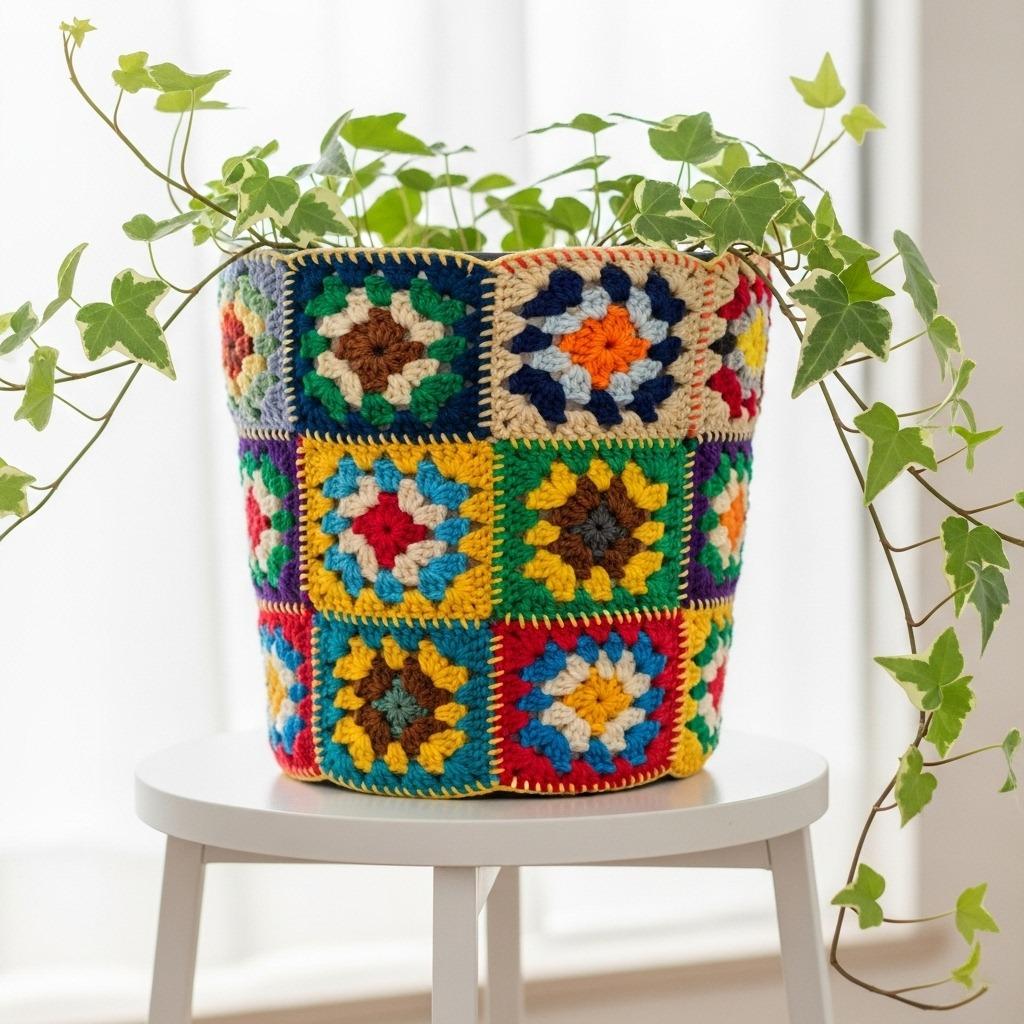
If you already know how to make granny squares, you’re basically halfway to creating stunning pot covers. The traditional granny square pattern translates beautifully to cylindrical shapes when you join squares strategically. I love mixing different color combinations in each square for a truly eclectic, boho look.
The process involves creating enough squares to wrap around your pot’s circumference, then joining them into a strip and seaming the back. You can work bottom-up or top-down depending on your preference. Some crafters add a separate crocheted base, while others leave the bottom open – both approaches work depending on whether your pot will be lifted frequently.
This patchwork style fits perfectly with boho chic living room aesthetics when you bring plants indoors. The same covers that charm outdoors look equally at home on plant stands and shelves inside.
3. Textured Bobble and Popcorn Stitch Designs
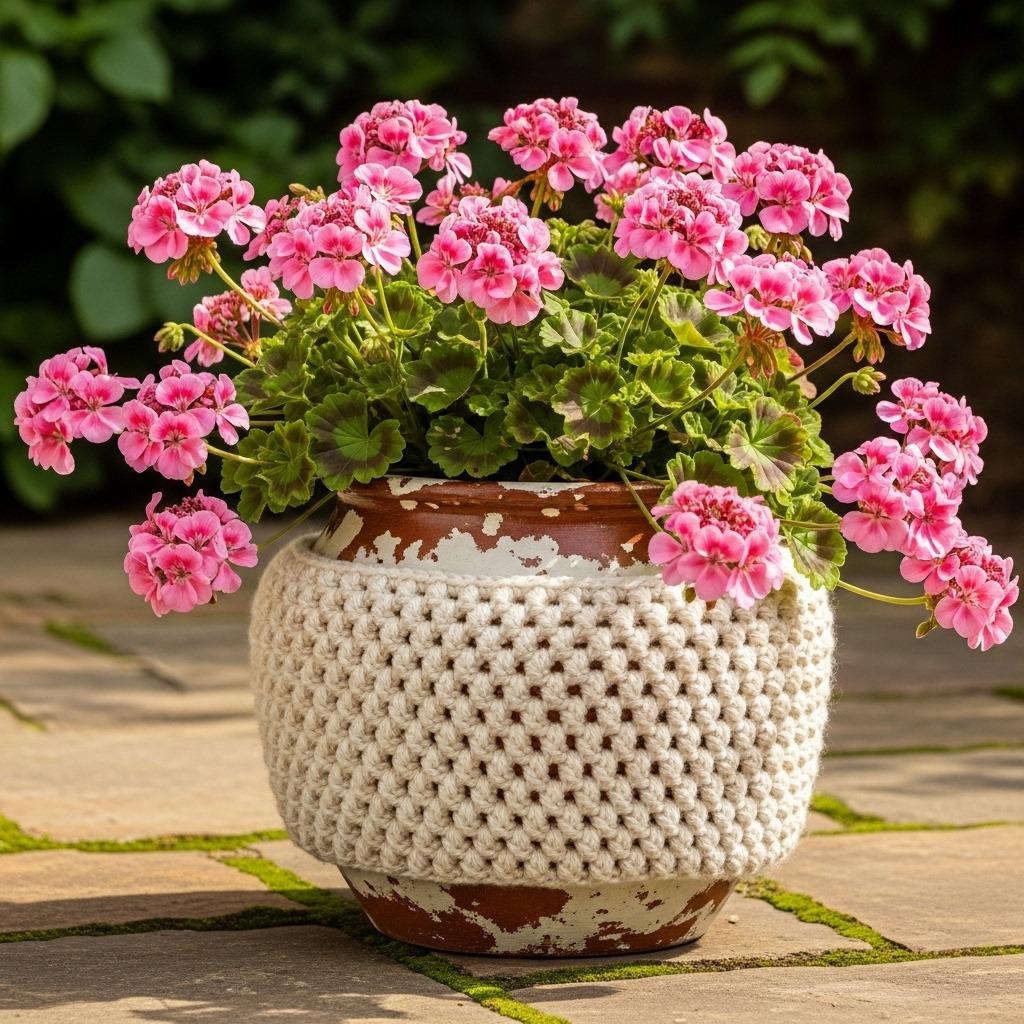
Want something that really pops? Dimensional stitches like bobbles and popcorns create incredible texture that adds depth to any garden display. These stitches work up thicker than flat stitches, giving your cover a plush, almost quilted appearance.
The tactile quality of these raised stitches catches sunlight beautifully throughout the day, creating changing shadow patterns as the sun moves. I particularly love using a single color with these textured patterns because the stitch work itself becomes the star. Cream or natural shades let the texture shine without competing colors.
Fair warning – bobble and popcorn stitches do eat up more yarn than basic stitches, so plan accordingly. They’re also slightly more time-intensive, but the result is so worth it. These covers elevate simple pots into conversation pieces, especially when you group them with smoother textures for contrast.
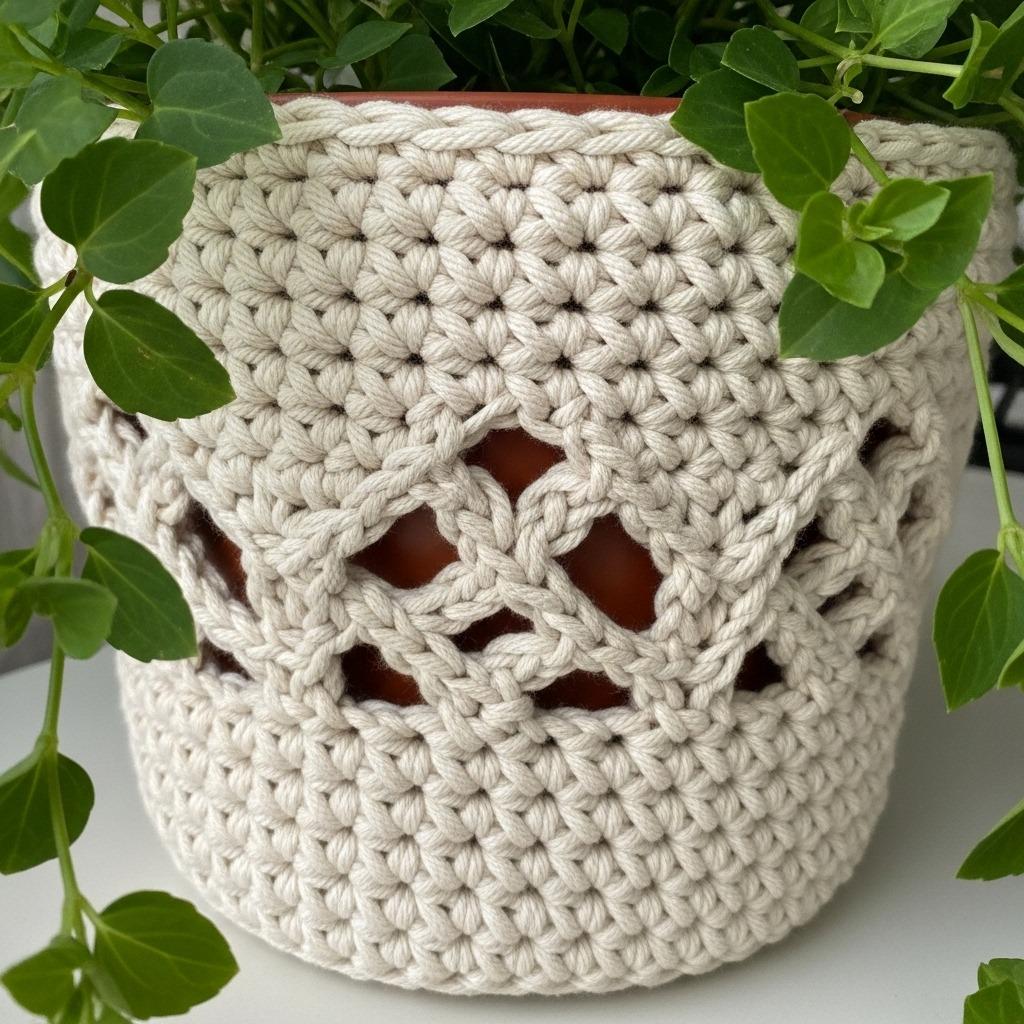
4. Lacy Openwork Patterns

Not every crochet flower pot needs full coverage. Openwork and lacy patterns create a delicate, romantic effect while letting the pot color peek through. This works especially well if you have pretty ceramic pots that deserve to be seen, or if you want a lighter look for spring and summer.
Shell stitches, fans, and simple V-stitch patterns create airy designs that feel less heavy than solid covers. The negative space becomes part of the design, creating interesting shadows and glimpses of the pot beneath. These patterns work up relatively quickly since you’re skipping stitches throughout.
I often use these lacy covers for smaller pots clustered on tables or hanging planters where you want decoration without overwhelming the plants themselves. They’re also fantastic for indoor plants where you want that handmade touch but prefer something more refined than chunky yarn. The delicate patterns complement container gardening flowers without competing for attention.
5. Colorful Rainbow Progression
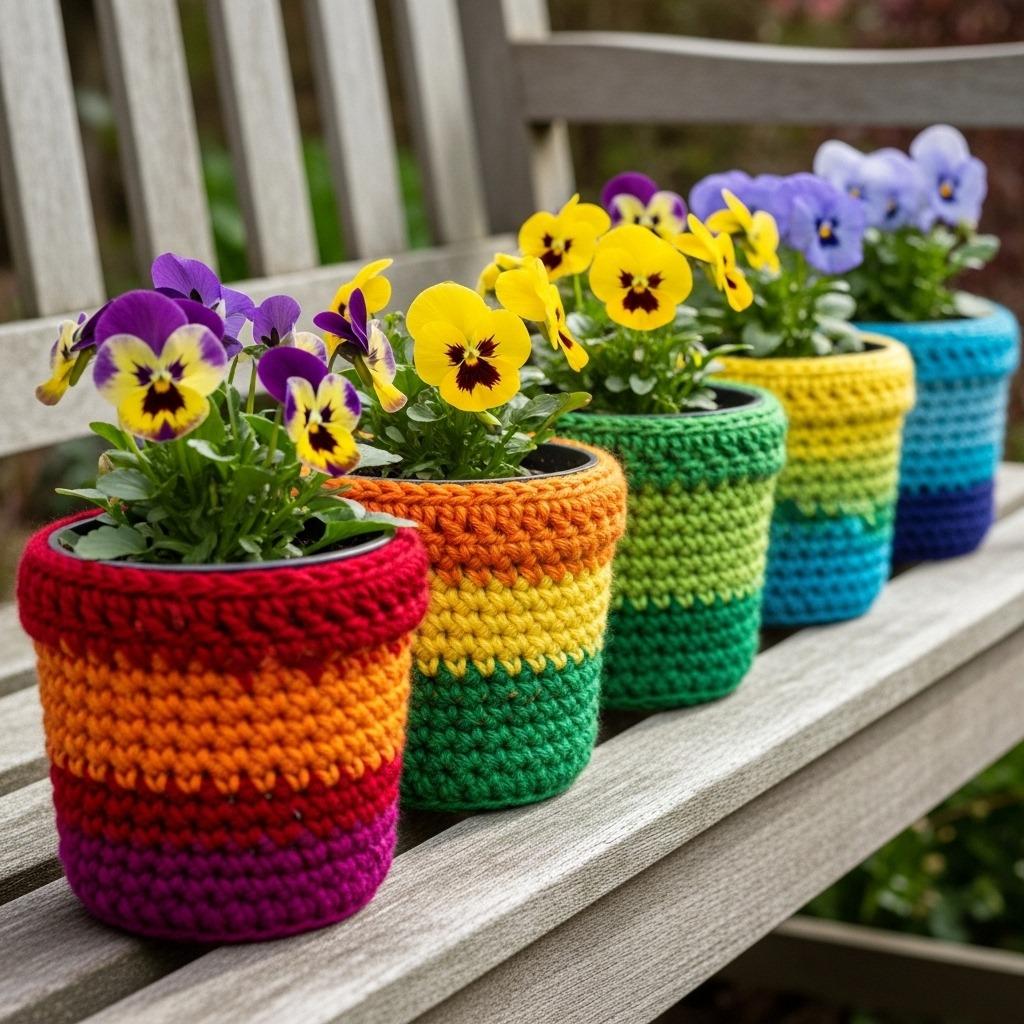
Few things make people smile quite like rainbow colors in the garden. A gradual color progression from one hue to the next creates a dreamy, gradient effect that photographs incredibly well. The key is choosing yarns that transition smoothly – either variegated rainbow yarn or individual skeins in ROYGBIV order.
You can work this as subtle or bold as you like. Soft pastels create a whisper of rainbow, while saturated brights make a statement you can see across the yard. I’ve found that changing colors every two or three rows creates the smoothest gradient, but some crafters prefer distinct color blocks for a more graphic look.
These rainbow covers pair beautifully with colorful living room schemes when you bring potted plants indoors during cooler months. They’re especially charming for children’s garden projects or whimsical fairy garden setups where playfulness is the whole point.
6. Scandinavian-Inspired Minimalist Covers
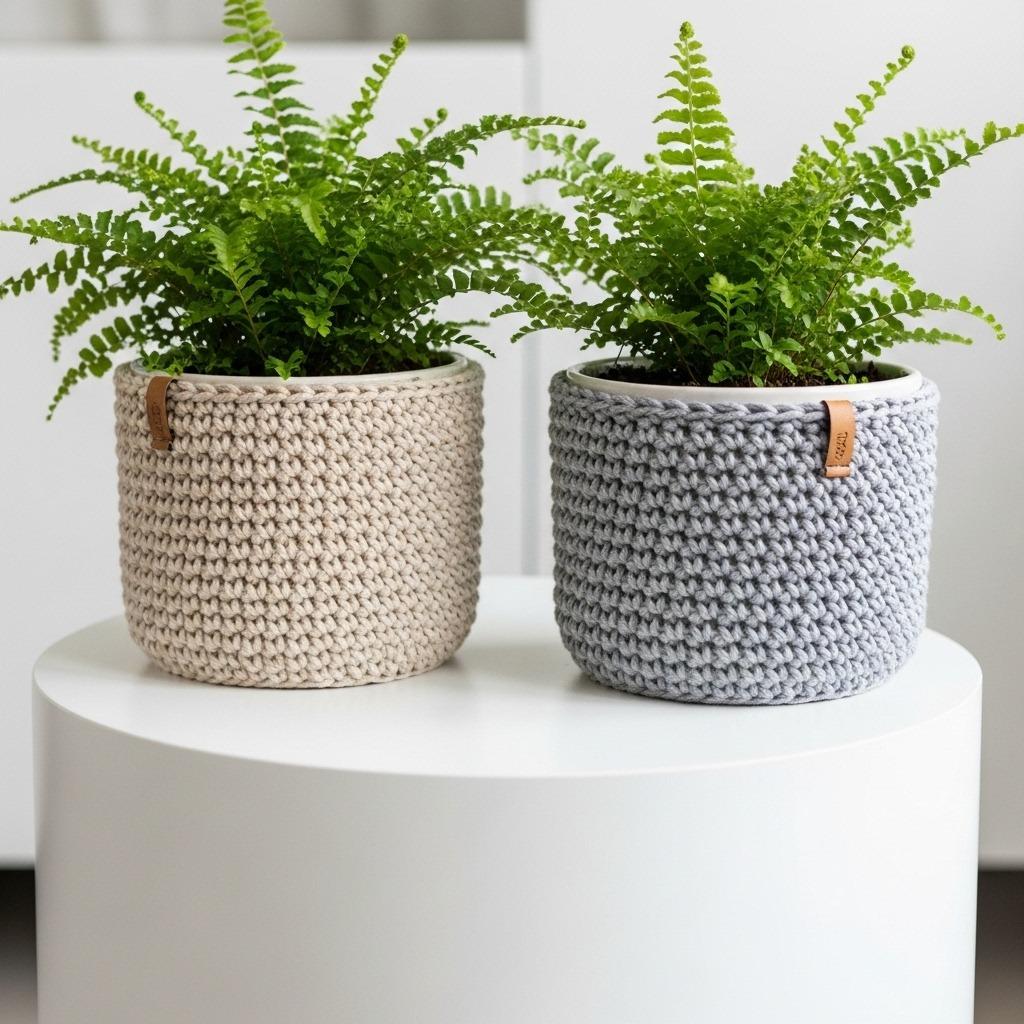
Sometimes the most striking designs are the simplest. Taking cues from Scandinavian design principles, minimalist crochet covers focus on clean lines, neutral colors, and subtle texture. Think oatmeal, gray, white, and soft taupe in basic stitch patterns that let the craftsmanship shine.
The beauty here lies in perfect tension and even stitches rather than complex patterns. A simple cylinder in single crochet worked in beautiful organic cotton creates an understated elegance that suits modern spaces. You might add a single stripe of contrasting color near the rim or keep it completely monochromatic.
These minimalist covers complement Scandinavian living room aesthetics seamlessly. The neutral palette works with literally any plant color and won’t compete with your garden’s natural beauty. It’s proof that handmade doesn’t have to mean busy or cluttered.
7. Rustic Twine and Natural Fiber Covers
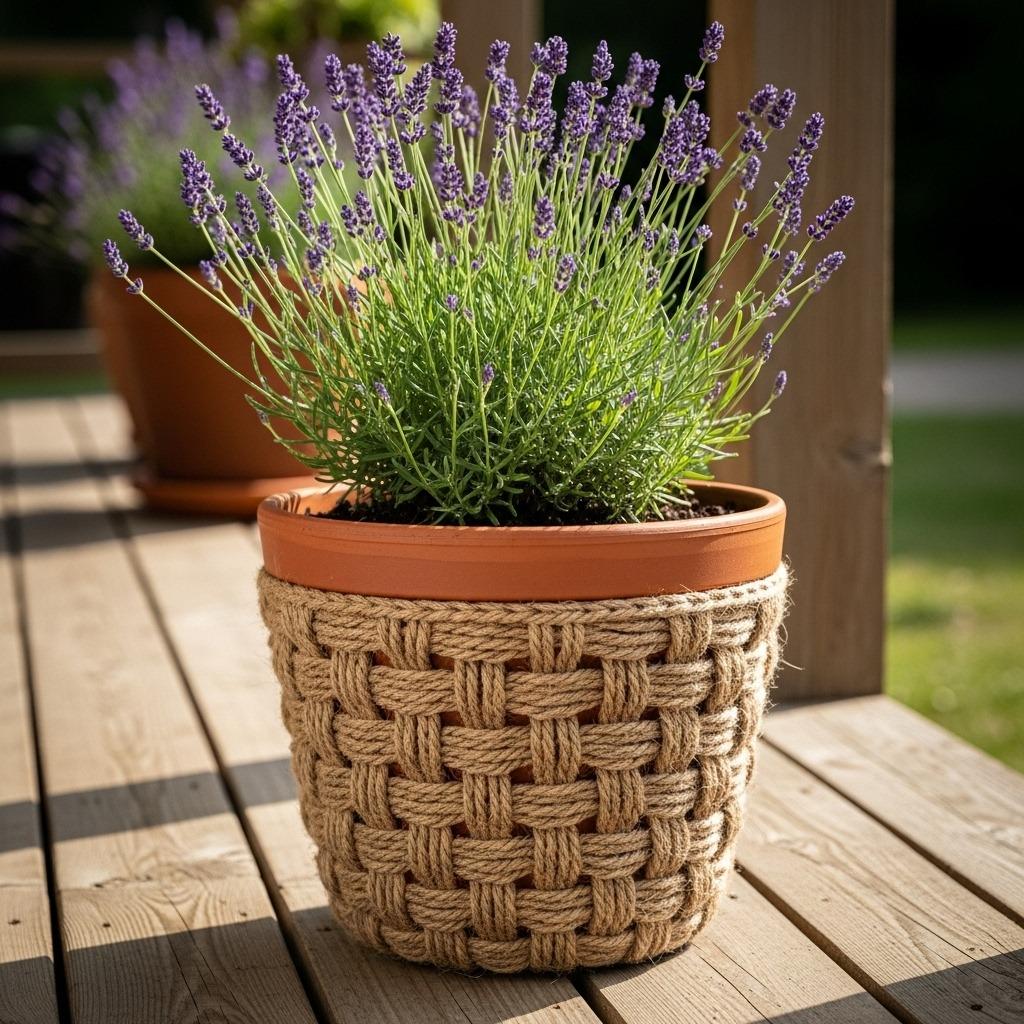
Moving beyond traditional yarn opens up interesting textural possibilities. Jute twine, hemp cord, or thick cotton string creates rustic, farmhouse-style covers with a completely different aesthetic than soft yarn. The coarser texture and neutral tones feel organic and earthy.
These natural fiber covers work particularly well for larger pots where you want presence without fussiness. The thicker material works up quickly, which is nice when you’re covering bigger containers. I love how these look paired with terracotta pots and wooden garden furniture for a cohesive natural vibe.
The durability of these materials makes them ideal for high-traffic areas or pots that get moved around frequently. They hold their shape well and can handle some weather exposure, though I’d still bring them in during harsh conditions. These rustic covers enhance farmhouse style living room plant displays beautifully.
8. Seasonal Holiday-Themed Designs
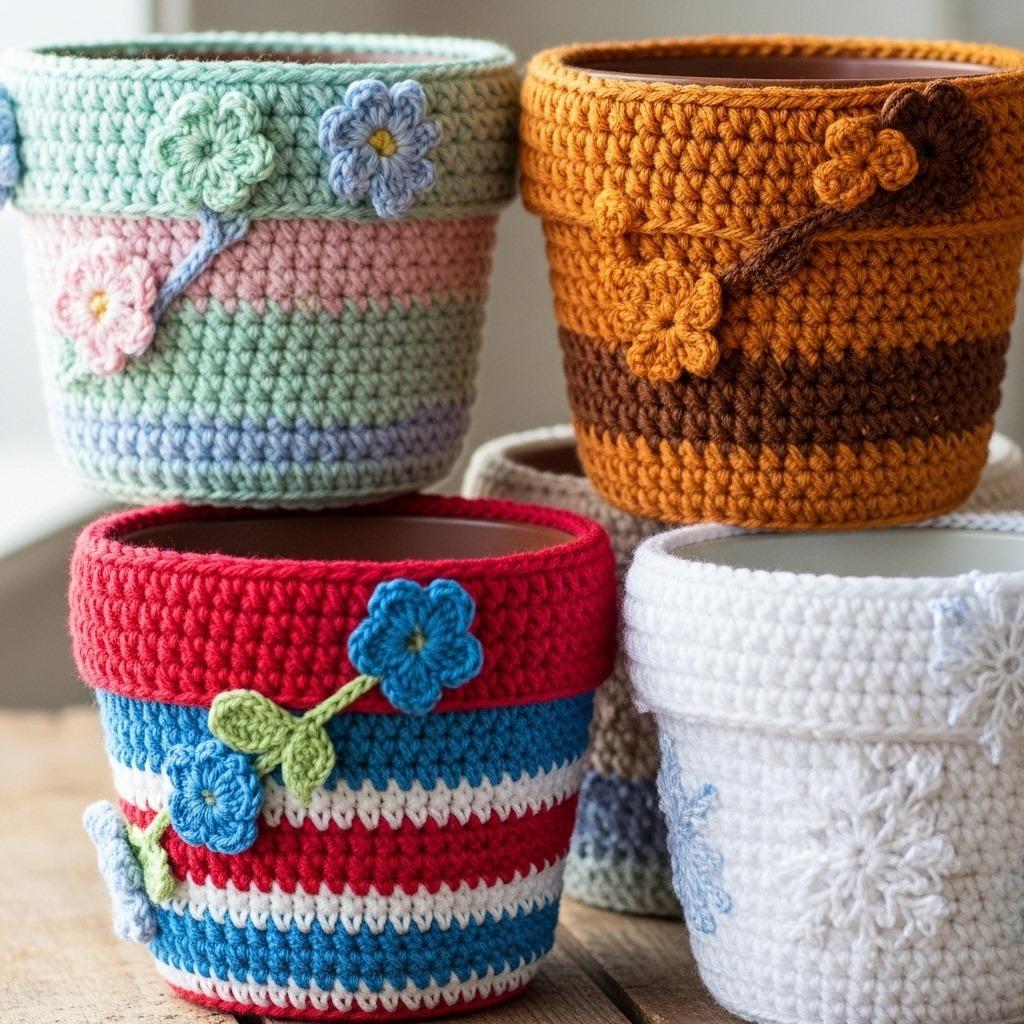
Why should clothing be the only thing that changes with the seasons? Seasonal crochet flower pot covers let you refresh your garden’s look for holidays and changing weather. Red and green stripes for winter holidays, pastel florals for spring, patriotic colors for summer, and warm oranges and browns for fall.
You could create a rotation of covers for the same pots, swapping them out as seasons change. This is more practical than buying new planters for each holiday and adds that handmade, thoughtful touch that pre-made decorations can’t match. Plus, they’re easy to store when not in use – just fold them up and tuck them away.
I’ve seen incredibly creative seasonal designs incorporating small crocheted embellishments like snowflakes, flowers, or leaves attached to basic covers. These details take a bit more time but create truly custom pieces. The seasonal rotation also keeps your garden feeling fresh and intentional throughout the year.
9. Bohemian Fringe and Tassel Details
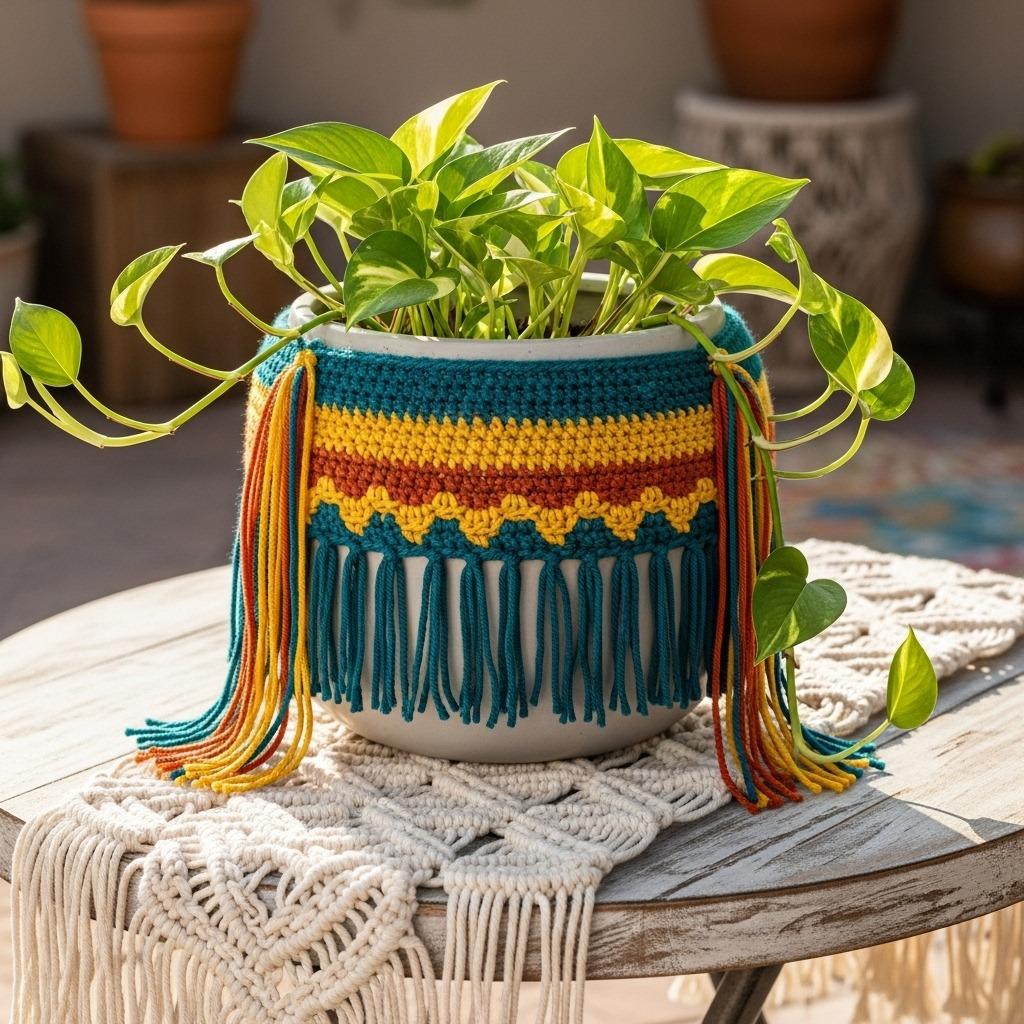
Adding fringe or tassels to the bottom of your crochet flower pot cover creates movement and that perfectly imperfect boho aesthetic. The dangling elements catch the breeze and add a playful, relaxed vibe that suits casual garden spaces beautifully.
You can attach fringe in a single color for cohesion or use multiple coordinating shades for more visual interest. The length of your fringe dramatically changes the look – short fringe feels tidy and intentional, while longer strands create a more dramatic, statement-making effect. I typically aim for fringe that’s about one-third the height of the pot.
These bohemian touches work wonderfully with boho style bedroom plant collections when you bring greenery indoors. The casual, artistic quality of fringe and tassels creates a collected-over-time feel rather than too-matchy-matchy perfection. Sometimes the best designs have that slightly undone quality that feels authentic and lived-in.
10. Fitted Covers with Button or Tie Closures
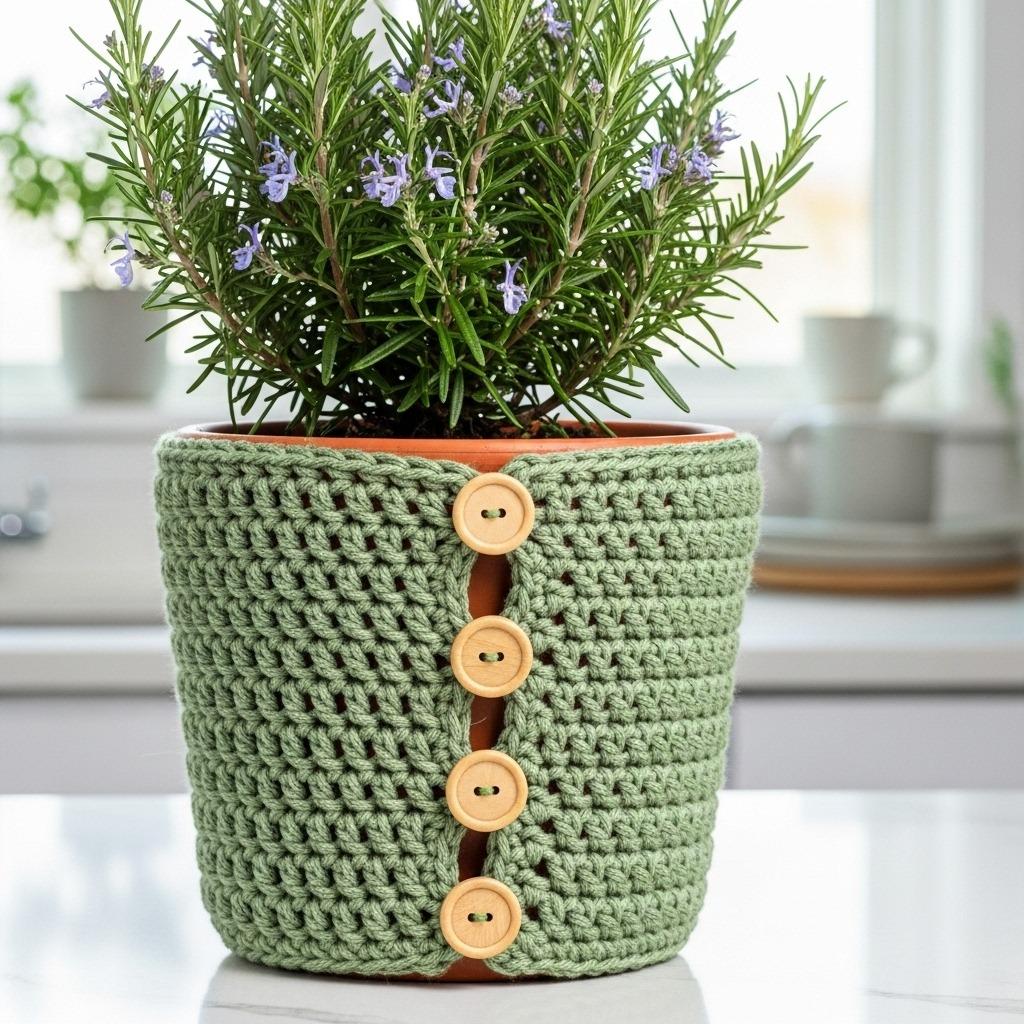
Instead of creating a seamless sleeve, some crochet flower pot covers feature back closures that make them adjustable and easier to put on and remove. Wooden buttons, coconut shell buttons, or simple ties add functional detail while contributing to the overall design.
This approach gives you flexibility if you’re gifting covered pots and aren’t sure of exact sizes. The adjustable closure means one cover might fit a range of similar-sized pots. It also makes washing the covers simpler since you can easily slide them off without stretching.
I love adding three or four buttons up the back of a cover for visual interest even when they’re facing the wall. The closure becomes a design element rather than just a necessity. Using vintage or unique buttons transforms each cover into a one-of-a-kind piece with its own character and story.
Sizing Your Covers Perfectly
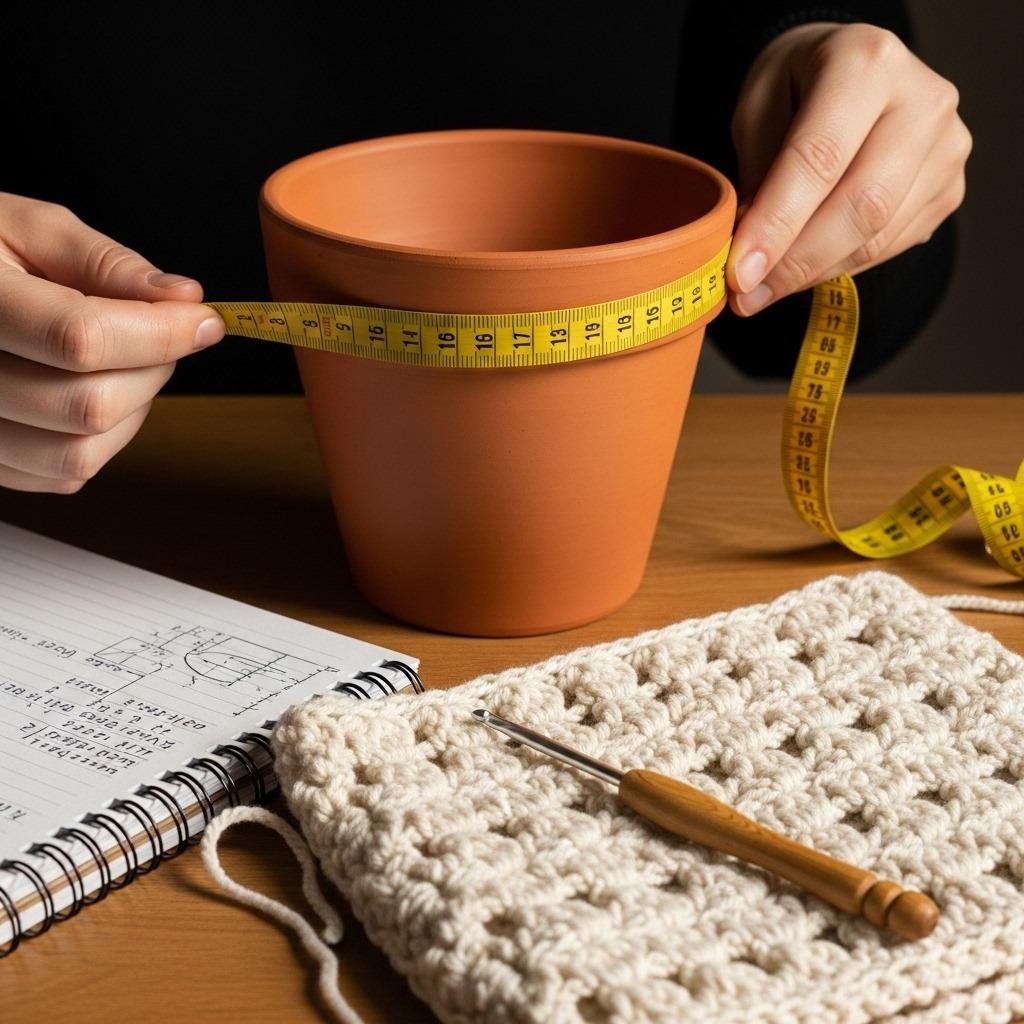
Getting the fit right makes the difference between a cover that looks polished and one that’s sliding around or too tight. Start by measuring your pot’s circumference at its widest point and its height. Most covers work best with about half an inch of negative ease (meaning the cover is slightly smaller than the pot) so it hugs snugly without being stretched to its limit.
For pots with a tapered shape, you have options. You can work increases or decreases as you go to follow the pot’s contours, or keep it cylindrical and let it drape naturally. Both approaches work – the fitted version looks more tailored, while the draped style has a relaxed, casual vibe.
Always make a gauge swatch if you’re working from a pattern, especially if you’re new to crochet. Your tension might be tighter or looser than the pattern designer’s, which can throw off sizing significantly. It’s tempting to skip this step, but spending 15 minutes on a gauge swatch saves you from remaking an entire cover that doesn’t fit.
Caring for Your Yarn Garden Crafts
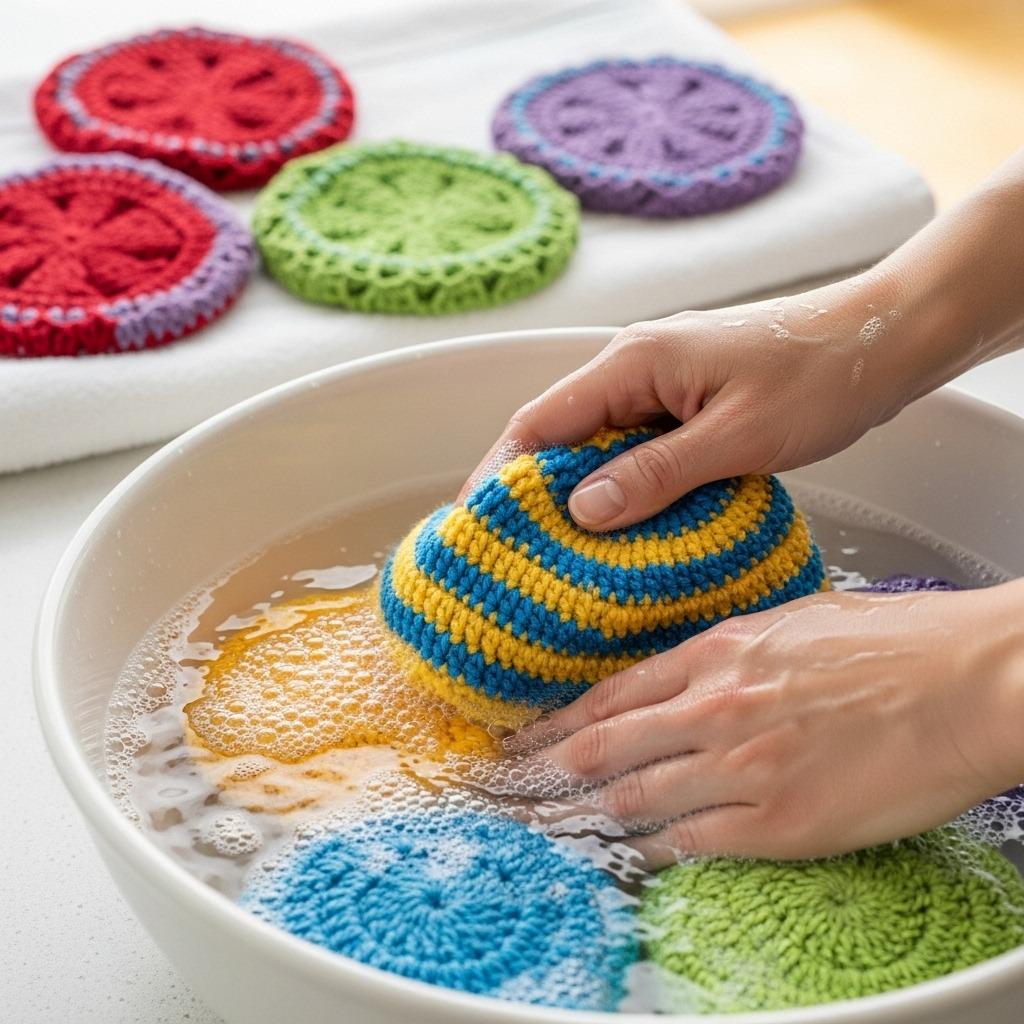
Outdoor yarn projects need occasional maintenance to keep looking fresh. Most crochet flower pot covers can be hand-washed in cool water with gentle detergent, then reshaped and laid flat to dry. I typically clean mine at the end of each season before storing or rotating to new covers.
UV exposure and moisture are the biggest challenges for outdoor crochet. Bringing covers in during heavy rain helps extend their life, and positioning pots under eaves or pergolas provides some natural protection. If you notice fading, it might be time to refresh with a new cover – which is part of the fun, honestly.
For indoor plant displays, caring for decorative crochet pots is even simpler. Spot clean any soil or water marks as needed, and give them a full wash once or twice a year. The great thing about having multiple covers for the same pots is that you can rotate them while others are being cleaned or if you just want a change.
Mixing Crochet Covers with Other Garden Elements
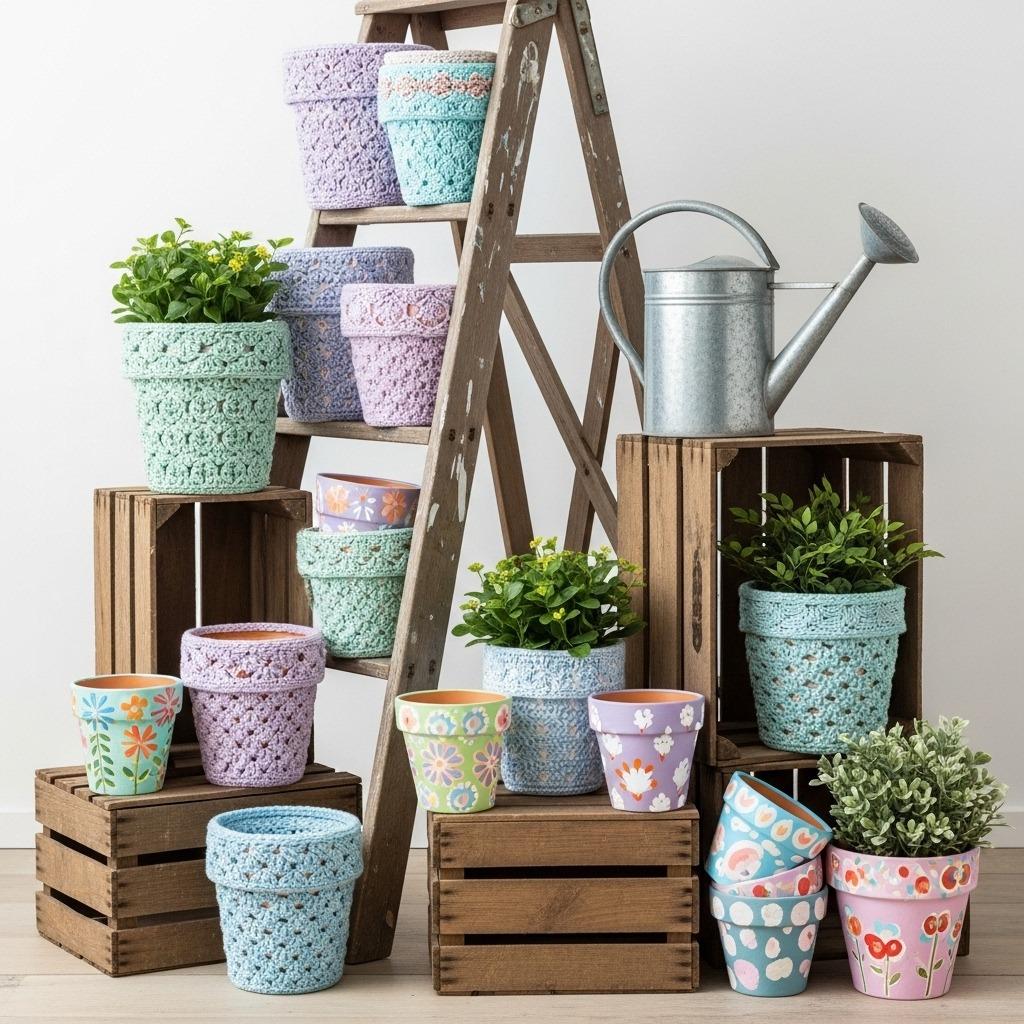
The real magic happens when you start combining different textures and materials in your garden displays. Crochet flower pot covers look stunning paired with natural wood, stone, and metal elements. The softness of yarn creates pleasing contrast against harder surfaces.
Try grouping several covered pots at varying heights on a wooden ladder shelf or vintage chair. Mix in some uncovered ceramic pots, woven baskets, and maybe a few flower pot painting ideas for an eclectic, collected-over-time vibe. The variety keeps things interesting while the color palette ties everything together.
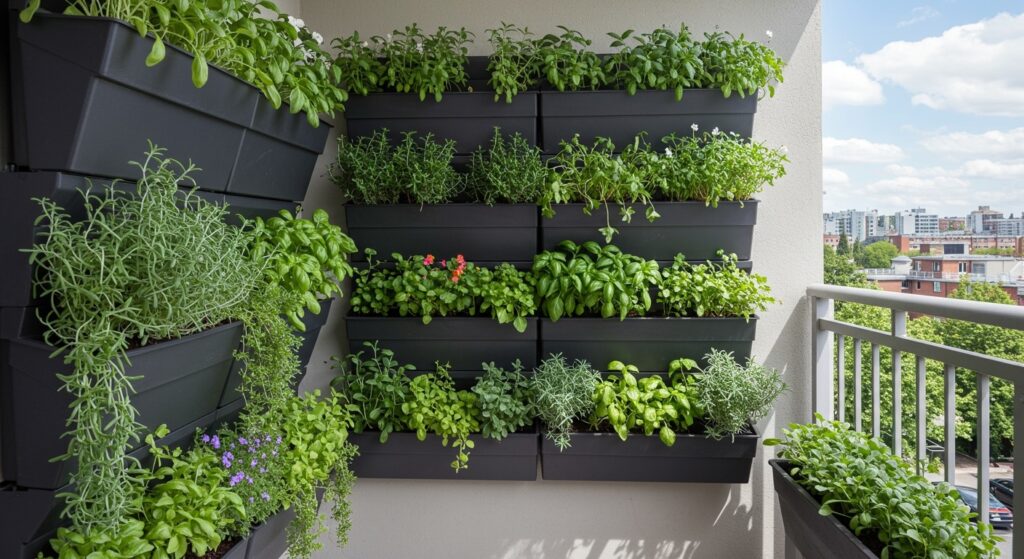
These handmade touches can transform even the simplest outdoor spaces into charming retreats. Whether you’re working with a sprawling garden or a compact balcony vegetable garden, crochet covers add personality and warmth that helps your space feel intentionally designed rather than thrown together.
There’s something deeply satisfying about creating functional beauty with your own hands. Crochet flower pot covers might seem like a small detail, but they’re exactly the kind of thoughtful touch that transforms ordinary gardens into spaces that feel personal and inviting. Whether you’re making one cover for your favorite plant or outfitting your entire patio, you’re adding a layer of coziness and charm that you just can’t buy ready-made.
The versatility of these yarn garden crafts means there’s always room to experiment with new colors, patterns, and styles as your skills grow. Start simple if you’re new to crochet, or challenge yourself with intricate patterns if you’re more experienced. Either way, you’ll end up with handmade container ideas that make your plants look even more beautiful and your garden feel like an extension of your creative spirit.