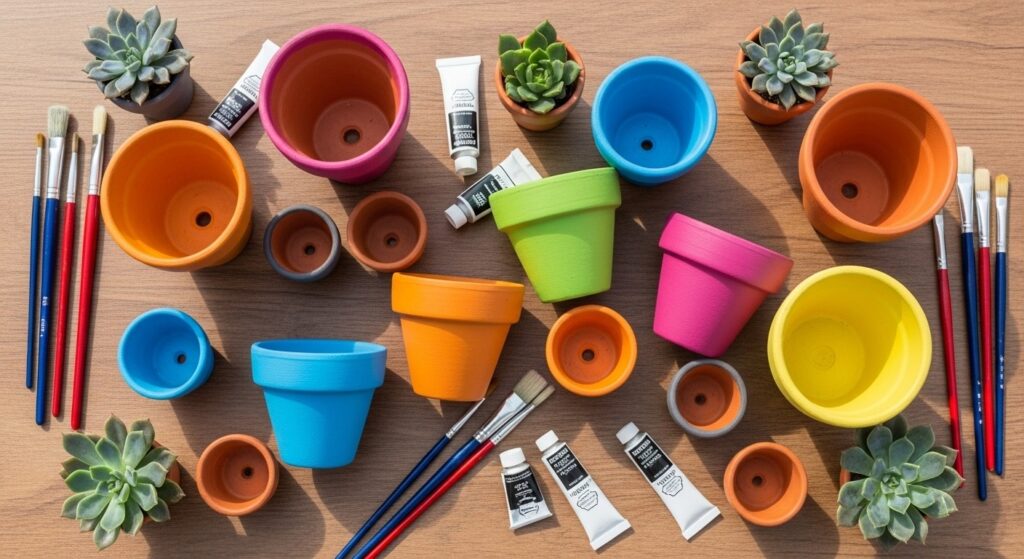
Ever look at your plain terracotta pots and think they deserve a little more pizzazz? I’ve been there. Those bland clay containers do their job, but they’re not exactly Instagram-worthy, are they?
Painting flower pots has become one of my favorite weekend projects. It’s honestly therapeutic – no special skills required, just some basic supplies and a willingness to get a little messy. The best part? You can completely customize them to match your space, whether that’s a boho chic living room or a minimalist balcony.
What I love about this craft is how forgiving it is. Made a mistake? Paint over it. Changed your mind halfway through? Grab a different color. These aren’t heirloom pieces we’re creating – they’re fun, personal touches that make your plants feel like part of your decor instead of afterthoughts. Plus, it’s way cheaper than buying designer planters that cost more than the plants themselves.
Ready to transform those boring pots into conversation starters? Here are 13 creative ways to paint your planters that’ll have your green friends looking their absolute best.
1. Classic Two-Tone Color Block
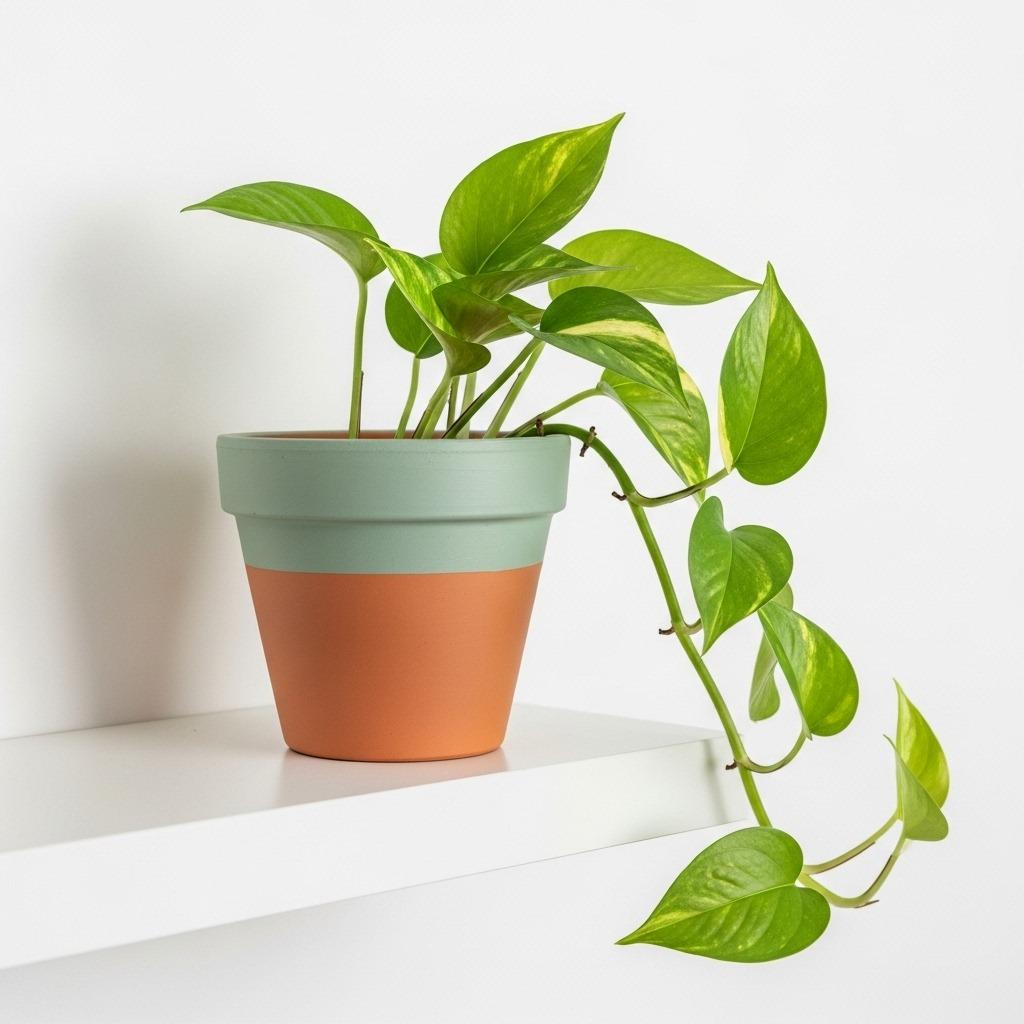
There’s something satisfying about the simplicity of a two-tone pot. Just pick two colors that speak to you and divide the pot into sections – horizontal bands work beautifully, but don’t be afraid to try diagonal splits or vertical halves either.
I usually paint the top portion in a bold color and leave the bottom natural terracotta, or vice versa. The key is using painter’s tape to get that crisp, professional line between colors. Trust me, it makes all the difference between “handmade charm” and “I tried.”
This technique works especially well if you’re painting multiple pots for a cohesive look. Stick with the same two colors but switch up which one goes where. Instant container gardening style upgrade.
2. Geometric Patterns
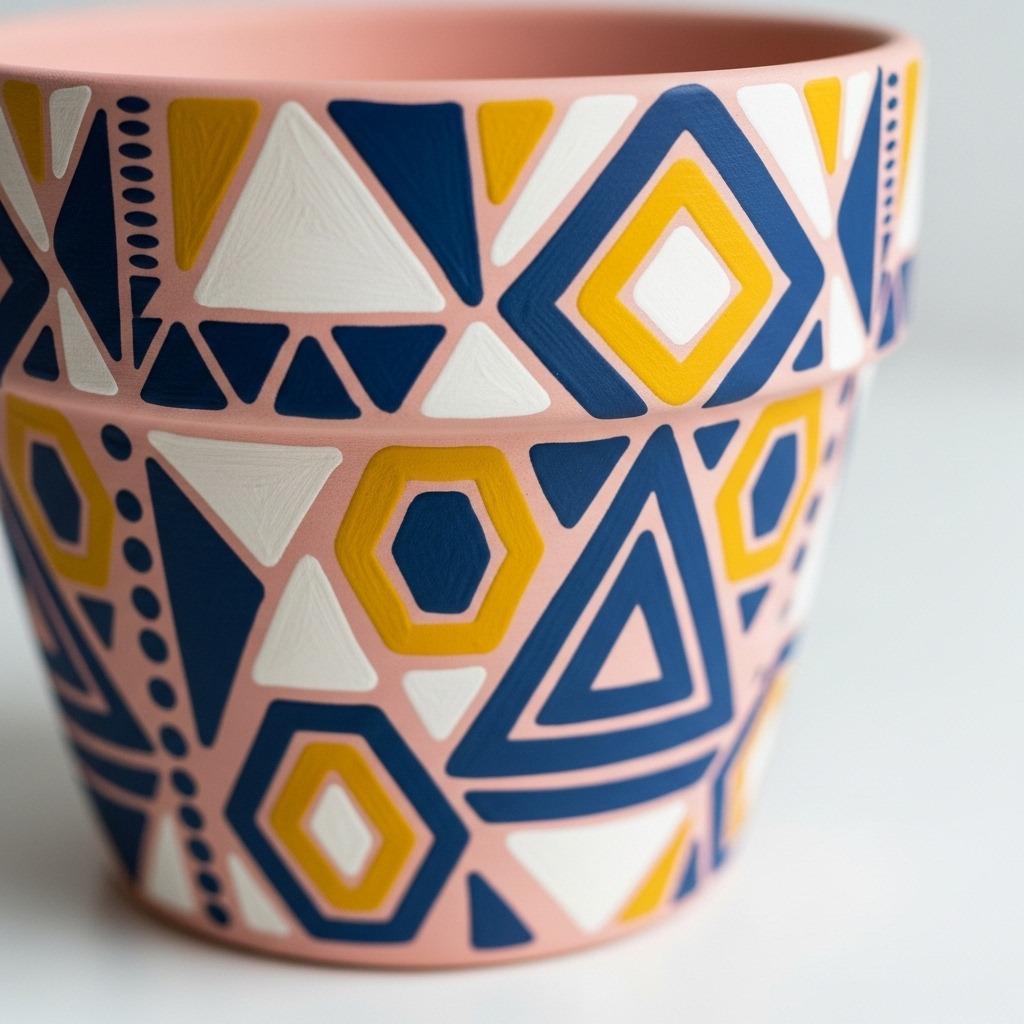
Geometric designs feel modern and put-together, even when they’re slightly imperfect. Triangles, diamonds, stripes, chevrons – pick your shape and run with it. Honestly, the wonky handmade quality just adds character.
You can go full maximalist and cover every inch with patterns, or keep it minimal with just a few strategic shapes around the rim. I’ve found that using a pencil to sketch the design first saves a lot of frustration later. Acrylic paint markers can be your best friend here too – so much easier to control than a brush for detailed work.
The beauty of geometric patterns is that they pair well with both bold colorful living room aesthetics and more subdued spaces. Just adjust your color palette accordingly.
3. Ombre Fade Effect
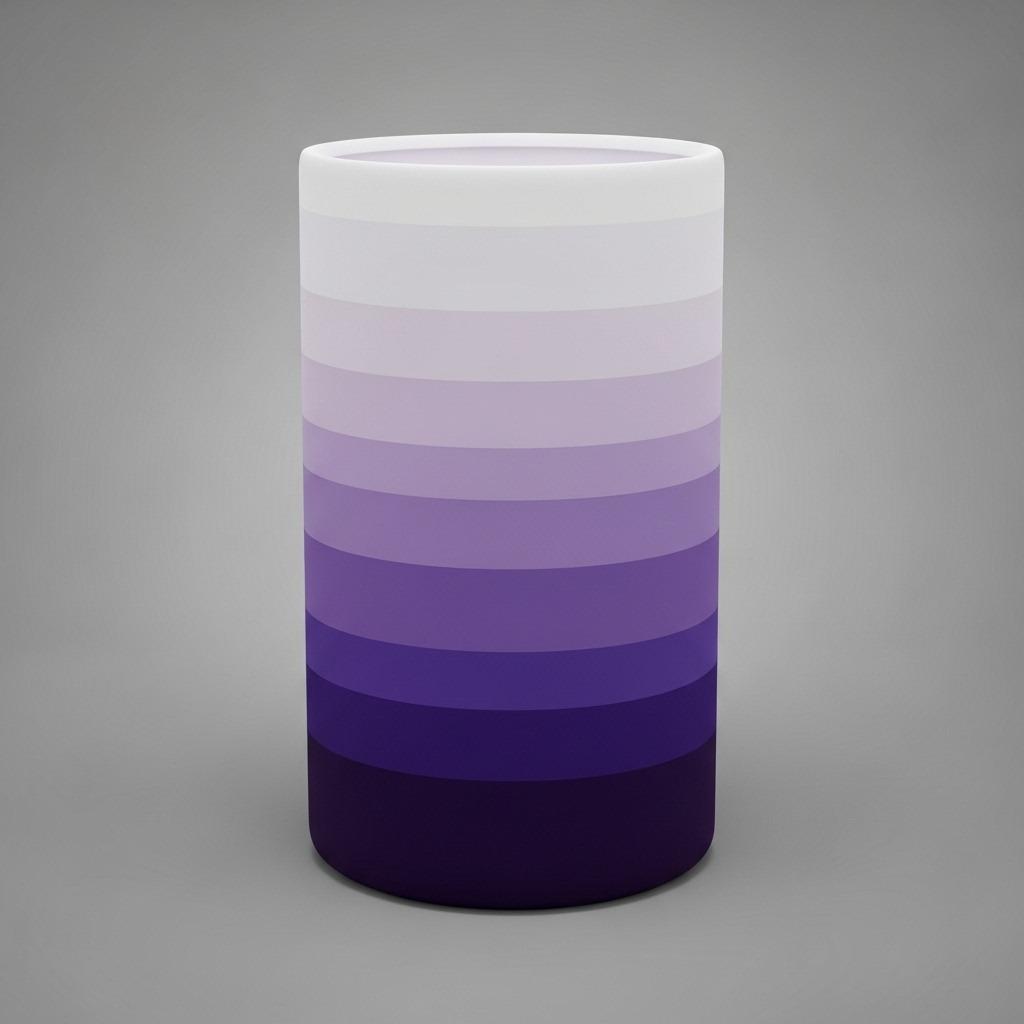
Creating an ombre effect sounds fancy, but it’s actually pretty straightforward once you get the hang of it. The trick is working while the paint is still wet so the colors blend naturally into each other.
Start with your darkest shade at the bottom and gradually add white paint as you move upward, blending as you go. Keep a spray bottle of water handy to keep the paint workable if it starts drying too fast. Yeah, it might take a few practice pots to nail the smooth transition, but that’s part of the fun.
This technique creates such an elegant, almost meditative look. Perfect for herbs on your kitchen windowsill or a statement plant in your entryway.
4. Dotted Mandala Design
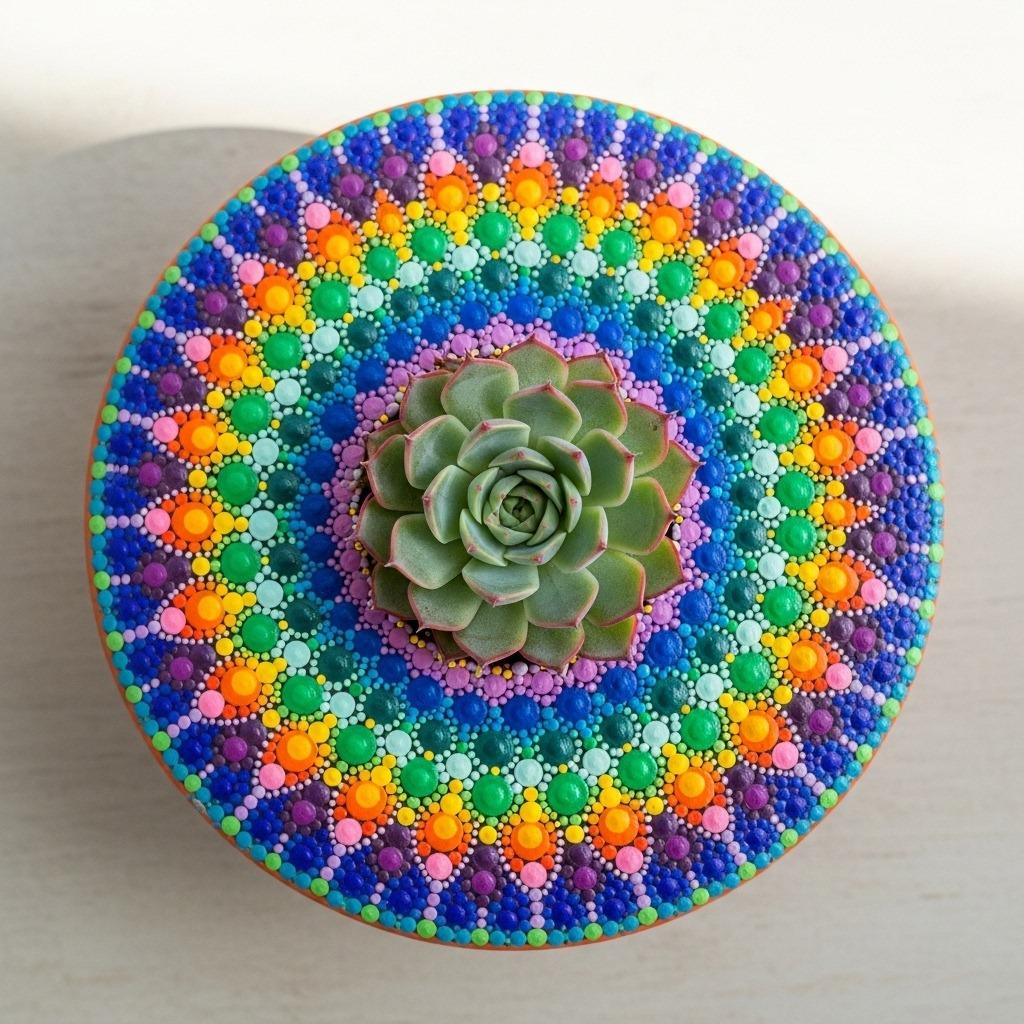
There’s something mesmerizing about dotted mandalas. They look incredibly detailed and time-consuming, but here’s the secret – you’re just making dots in circles. That’s it. Seriously.
Grab some dotting tools (or the end of a paintbrush works fine), pick 3-4 coordinating colors, and start from the center working your way out in concentric circles. The repetitive nature of it is actually quite calming. Some people meditate, I make dots on pots.
These hand-painted pots become little pieces of art on their own. They work beautifully for indoor garden living room setups where you want the planters to stand out as decorative elements.
5. Minimalist Line Art
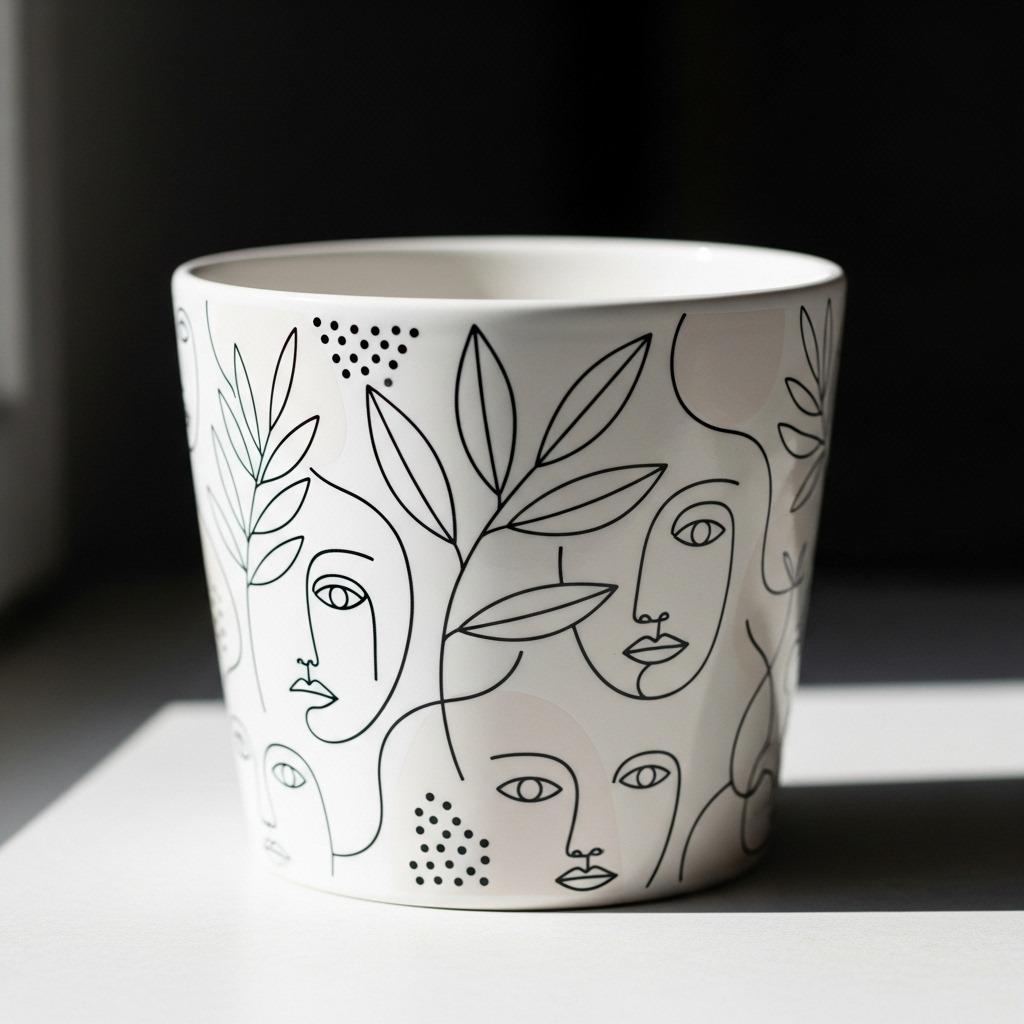
Sometimes less really is more. A few well-placed black lines on a white or neutral pot can look surprisingly sophisticated. Think simple leaf outlines, abstract faces, or flowing organic shapes.
This is one of those creative pot decorations that looks deceptively simple but makes a big impact. Use a fine-tipped brush or paint pen to keep your lines clean and intentional. Don’t overthink it – the beauty is in the effortless, sketch-like quality.
I love grouping several of these minimalist pots together on a shelf or table. They create visual interest without overwhelming your space, which is perfect if you’re going for that modern minimalist living room vibe.
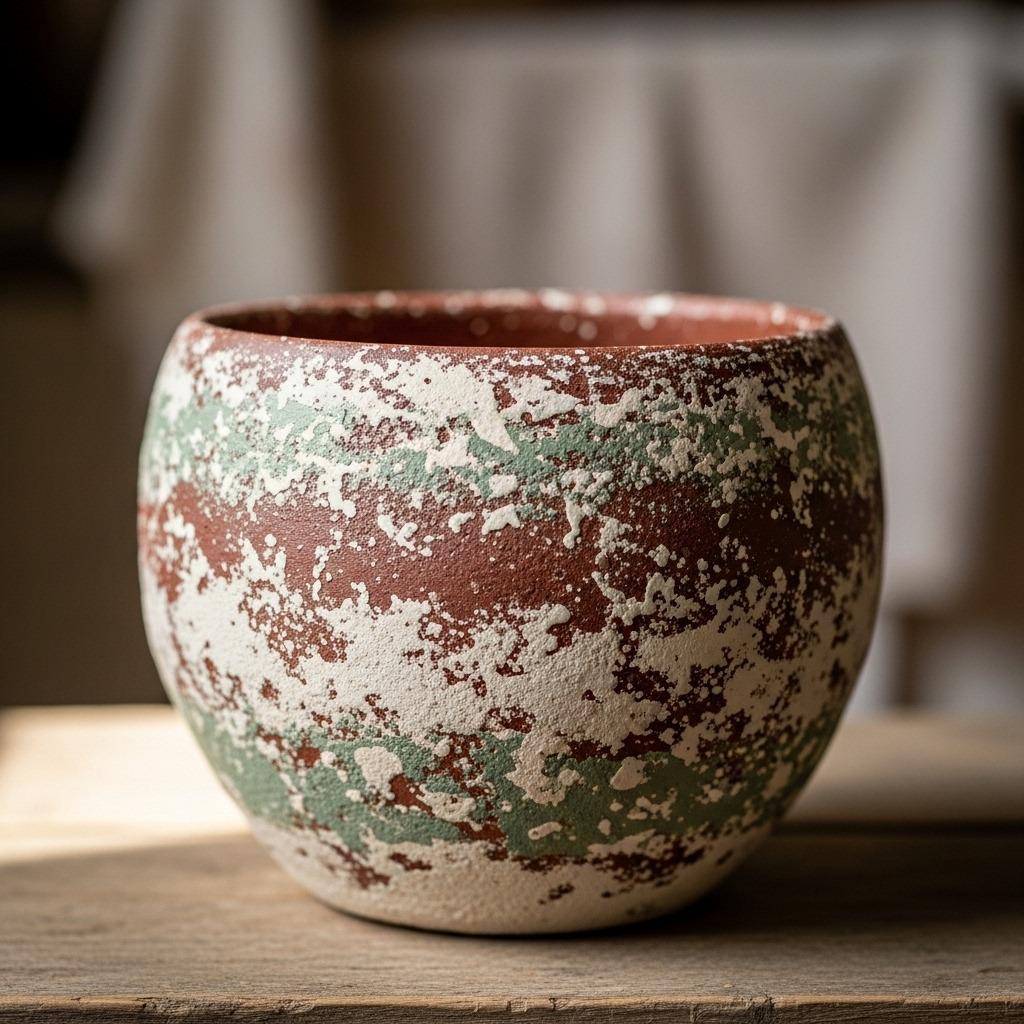
6. Marbled Swirl Effect
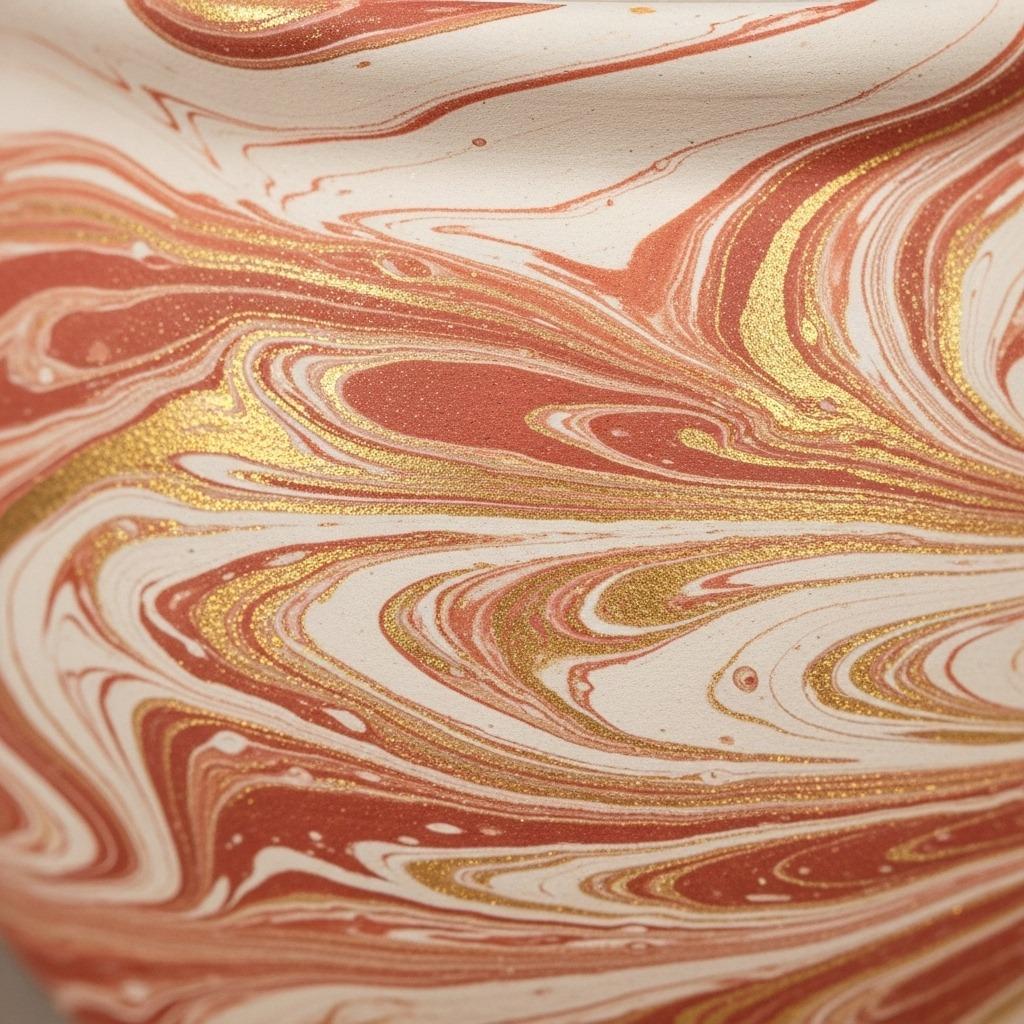
Marbling gives you that expensive, artisanal look without the artisanal price tag. The technique involves swirling colors together while they’re wet to create those gorgeous, unpredictable patterns.
You can marble directly on the pot or use the water marbling technique where you float paint on water and dip the pot through it. Fair warning – the water method gets messy, so maybe do this outside. But the results? Chef’s kiss.
Each pot becomes completely unique, which I think is the whole point of DIY anyway. No two are exactly alike, and that’s what makes them special.
7. Botanical Illustrations
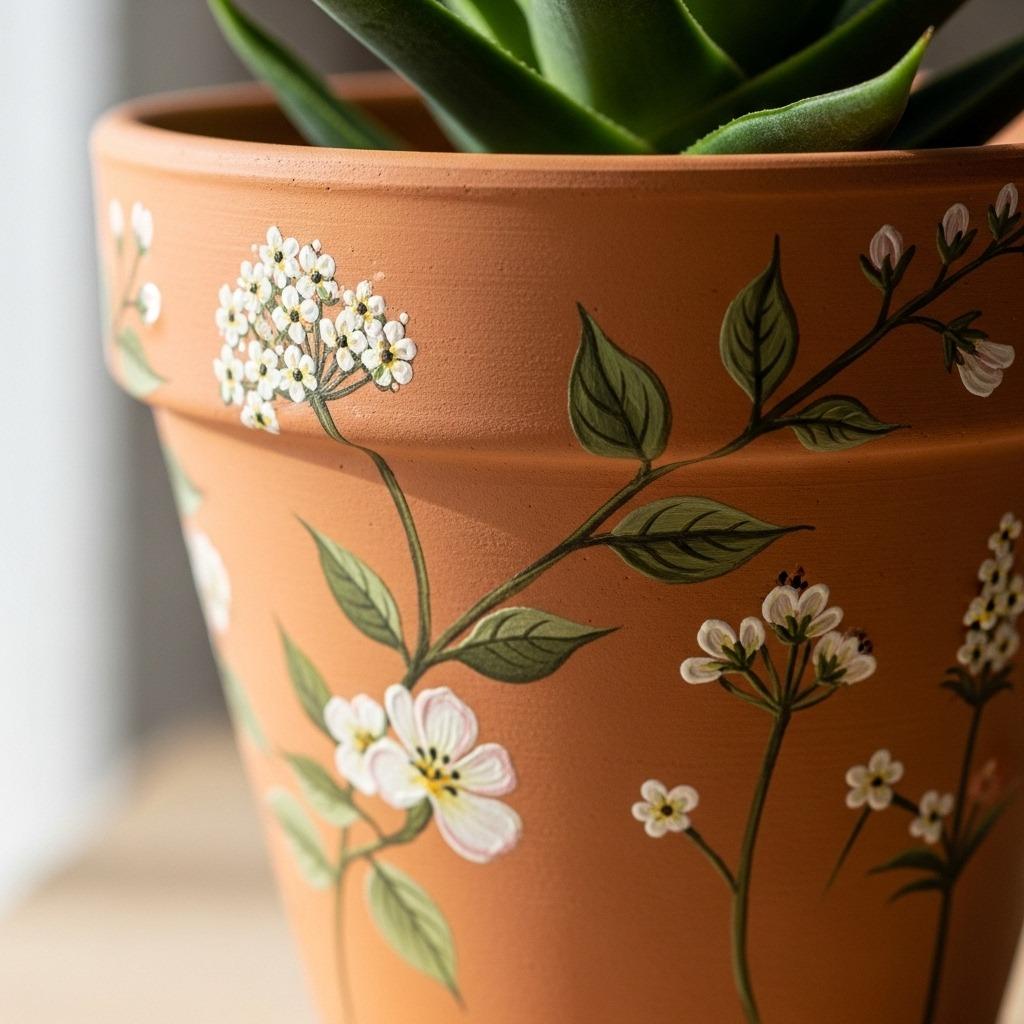
If you’re feeling slightly more artistic (or just want to pretend you are), try painting simple botanical designs. Small flowers, leaves, ferns, stems – you don’t need to be a professional illustrator to pull this off.
Look up some simple botanical drawing references online for inspiration. The trick is keeping your designs loose and organic rather than trying for photorealistic accuracy. Think watercolor botanical prints, not scientific textbook diagrams.
These pots add such a garden-fresh feel to any space. Perfect for your actual garden projects or bringing some of that outdoor energy to your balcony vegetable garden setup.
8. Metallic Accent Details
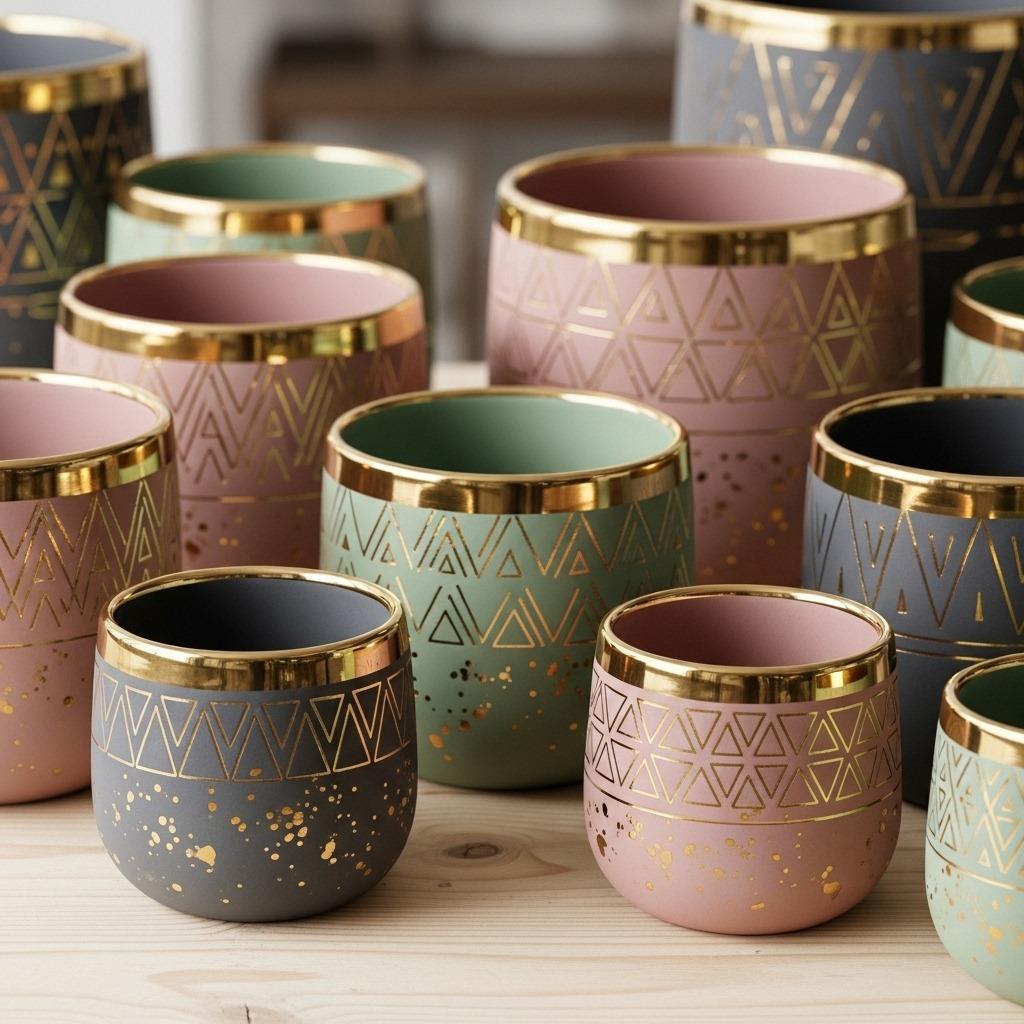
A little metallic paint goes a long way in elevating basic painted pots. Gold, copper, or silver accents on the rim, base, or scattered as details add that touch of glam without going overboard.
You could paint the entire rim metallic for a dipped effect, add metallic dots or stripes, or even do a light metallic dry brush over a base color for subtle shimmer. Metallic paint pens are great for adding fine details without the hassle of cleaning tiny brushes.
This technique works especially well if you’re incorporating plants into rooms with metallic fixtures or hardware. Everything feels intentionally coordinated, like you actually planned your decor (even if you’re mostly winging it like the rest of us).
9. Chalkboard Paint Pots
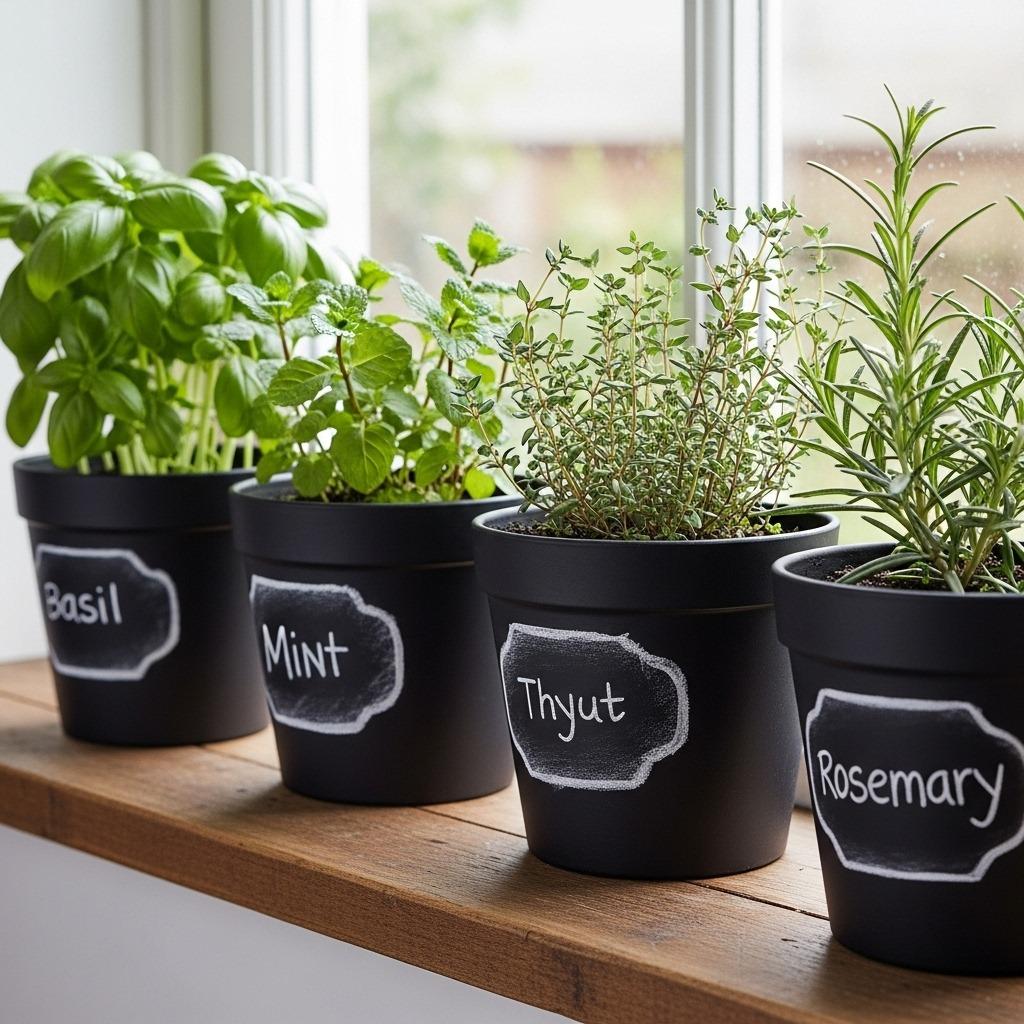
Here’s a practical twist on flower pot painting ideas – chalkboard paint. Paint your pots with chalkboard paint, and suddenly you have cute, customizable labels that you can change whenever you want.
This is incredibly handy for herb gardens where you actually need to remember what you planted. Write the plant name, planting date, or even care reminders right on the pot. Made a mistake? Just wipe it off and start over.
Beyond the practical angle, chalkboard pots just look charming. That matte black finish has a modern, farmhouse quality that fits into pretty much any garden and nursery ideas aesthetic you’re going for.
10. Drip Paint Effect
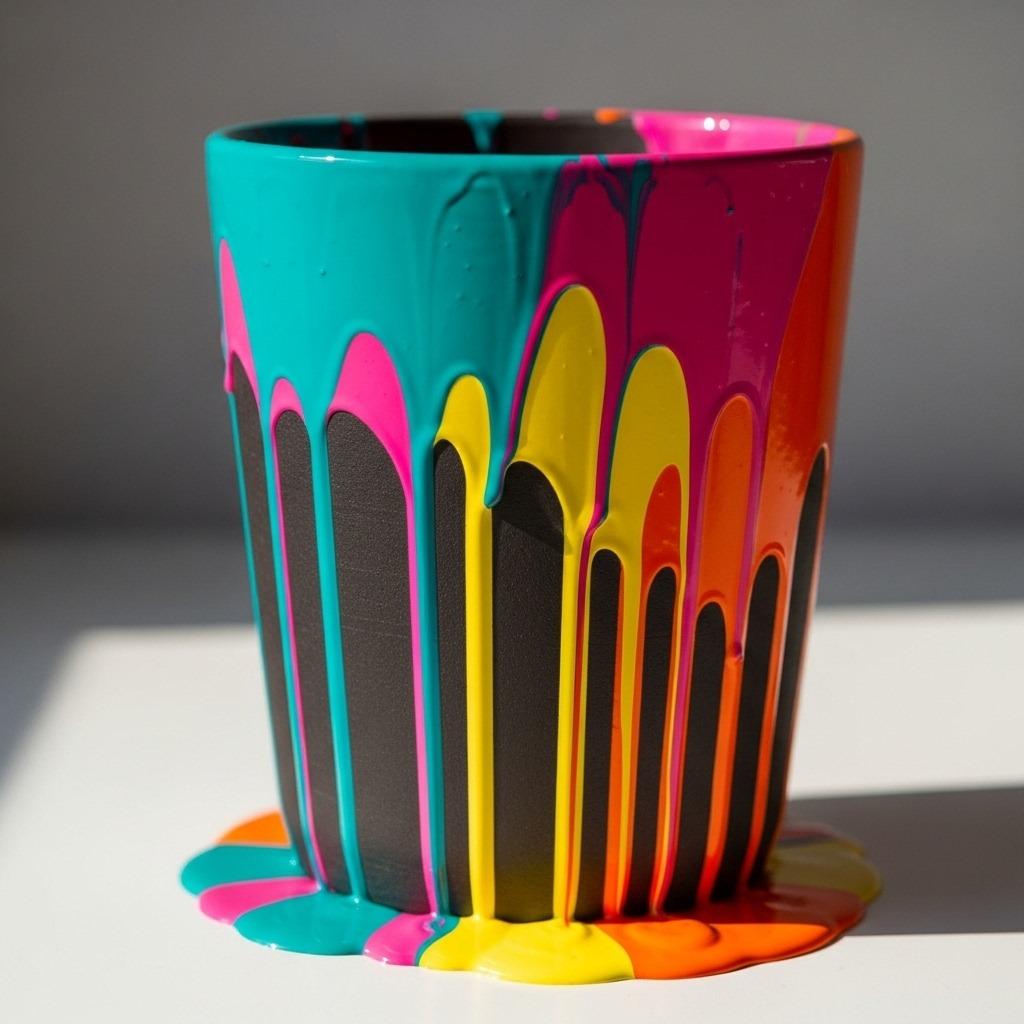
The drip paint technique embraces happy accidents and looks intentionally artistic. Water down your acrylic paint, pour or brush it around the rim, and let gravity do its thing.
You can control how far the drips go by adjusting the paint consistency – thinner paint runs longer, thicker paint creates shorter drips. Layer different colors for a rainbow effect, or stick with a monochrome palette for something more sophisticated.
This garden craft DIY project is particularly fun because you never quite know how it’ll turn out. Each drip takes its own path, creating completely unique patterns every time. Plus, it’s nearly impossible to mess up – drips are supposed to be unpredictable.
11. Sponge Painted Texture
Sponge painting creates beautiful texture and depth that you just can’t get with a regular brush. Dab different colors on with a natural sponge to build up layers of color and interest.
This technique is wonderfully forgiving for beginners. The random, organic pattern hides brush strokes and imperfections naturally. Start with a base coat, let it dry, then sponge on lighter or darker shades to add dimension.
The textured finish works particularly well for larger pots where a flat color might feel boring. It adds visual interest without being too busy or demanding attention.
12. Stenciled Patterns
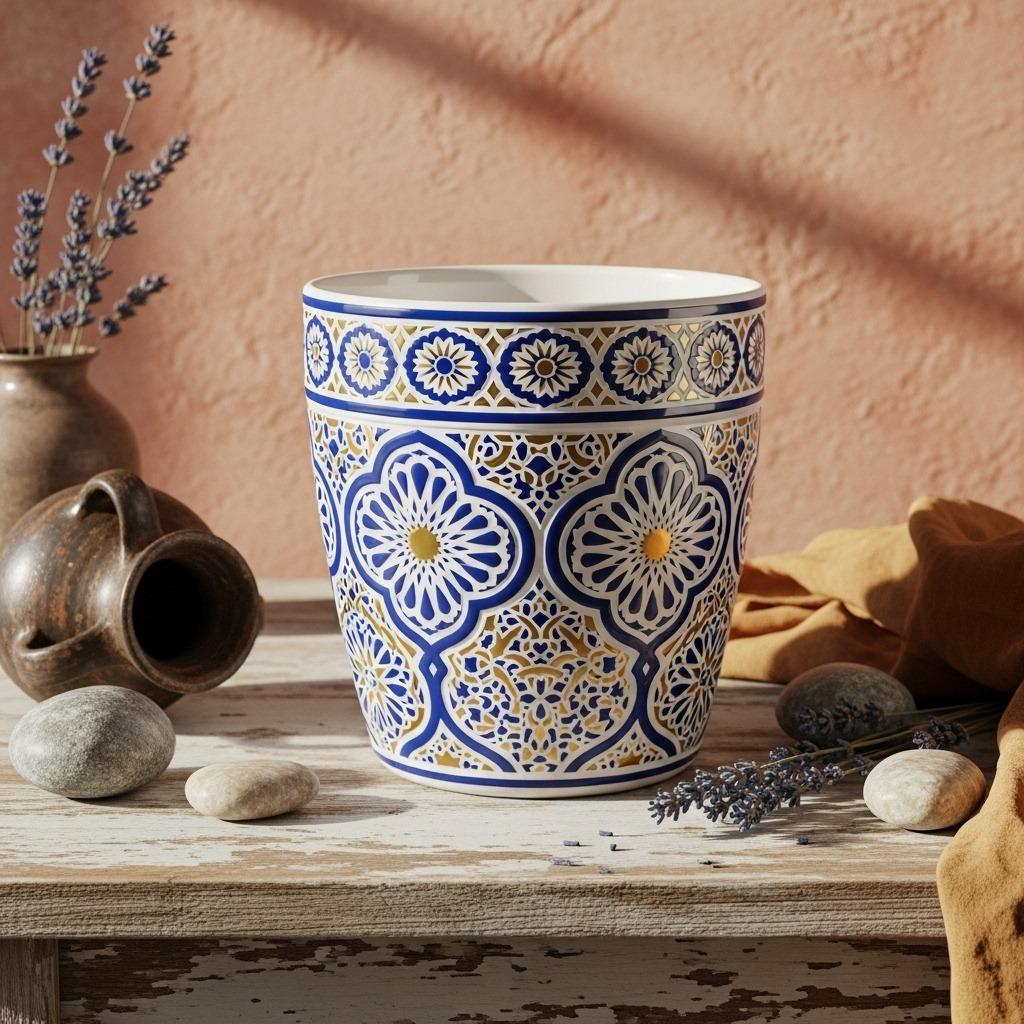
If freehand painting makes you nervous, stencils are your secret weapon. You can find affordable stencils in countless patterns, or make your own with adhesive vinyl and a craft knife.
Tape the stencil securely to your pot, apply paint with a sponge or stencil brush using a dabbing motion (not brushing – that’s how you get paint bleeding under the stencil), and carefully peel away to reveal clean, professional-looking designs.
Moroccan patterns, damask designs, tribal prints, florals – whatever matches your style. You can mix and match stencils on different pots for coordinated variety, perfect for styling vertical gardening ideas where multiple pots are grouped together.
13. Abstract Brush Strokes

Sometimes the most striking hand-painted pots are the ones that don’t try to be anything specific. Just grab a brush and make bold, confident strokes in contrasting colors for an abstract, contemporary look.
Think of it as controlled chaos. Wide brush strokes, directional marks, overlapping colors – there’s no right or wrong here. The looser and more confident your strokes, the better it tends to look. Ironic, right?
This approach feels very current and artistic, like something you’d find in a trendy plant shop for three times the price. Group several abstract pots together and they create their own little gallery moment wherever you place them.
Getting Started With Your Pot Painting Project
Now that you’ve seen all these ideas, you’re probably itching to grab some pots and get started. Before you dive in, let me share a few things I’ve learned through trial and error (mostly error, if we’re being honest).
First, prep matters more than you’d think. Clean your pots thoroughly – dirt and dust prevent paint from adhering properly. If you’re painting terracotta, you might want to seal the inside first to prevent moisture from seeping through and discoloring your beautiful paint job from the inside out. Some people skip this step and do fine, but I’ve had enough ruined pots to know better now.
Acrylic paint is your best bet for most projects. It’s affordable, comes in every color imaginable, and works on pretty much any surface. Let each layer dry completely before adding the next – I know, I know, patience isn’t fun, but trust me on this one. Rushing leads to smudges and muddy colors.
Finish with a clear sealer, especially for pots that’ll live outdoors. Weather, water, and sun will fade even the best paint job without protection. A few coats of acrylic sealer or polyurethane keeps your hard work looking fresh much longer. Yeah, it’s an extra step, but future you will thank present you.
There’s something genuinely satisfying about transforming a basic pot into something that feels personal and unique. These aren’t just plant containers anymore – they’re little expressions of your style, conversation pieces that make visitors ask “where did you get that?”
The beauty of flower pot painting ideas is that you can start simple and work your way up to more complex designs as you get comfortable. Your first pot might be a basic two-tone situation, and that’s perfectly fine. By pot number ten, you might be confidently hand-painting intricate patterns without a second thought.
What I really appreciate about this craft is how accessible it is. You don’t need expensive supplies or special training. Just some paint, pots, and a willingness to experiment. Some will turn out exactly as you imagined, others will surprise you, and a few might be learning experiences (translation: kinda ugly, but hey, you tried). That’s all part of the process.
So grab those sad, plain pots taking up space in your garage or pick up a few cheap ones from the hardware store. Put on some music, spread out your supplies, and see where your creativity takes you. Your plants – and your space – will thank you for it.